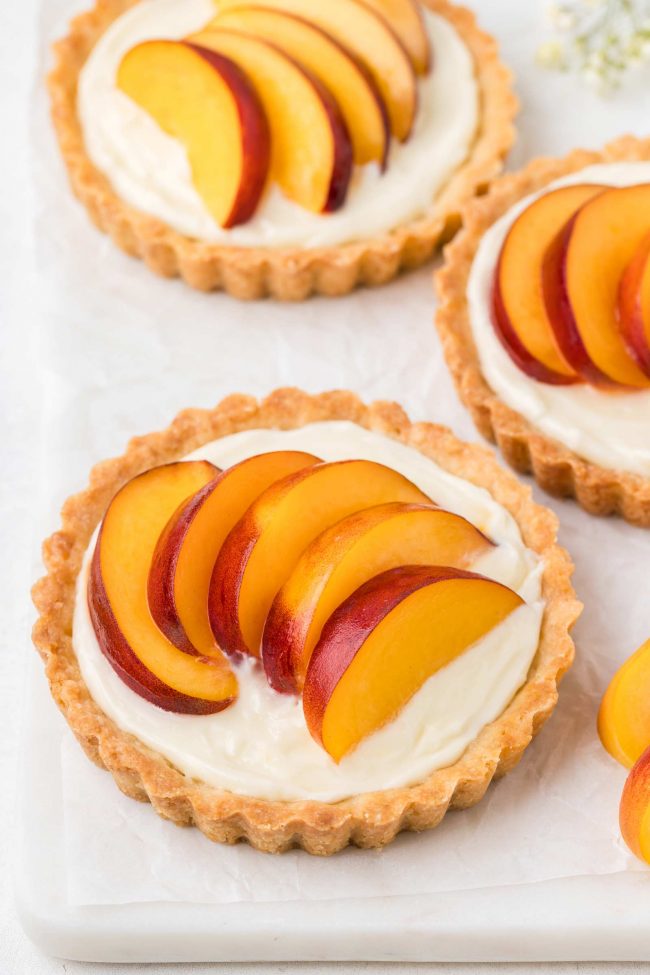
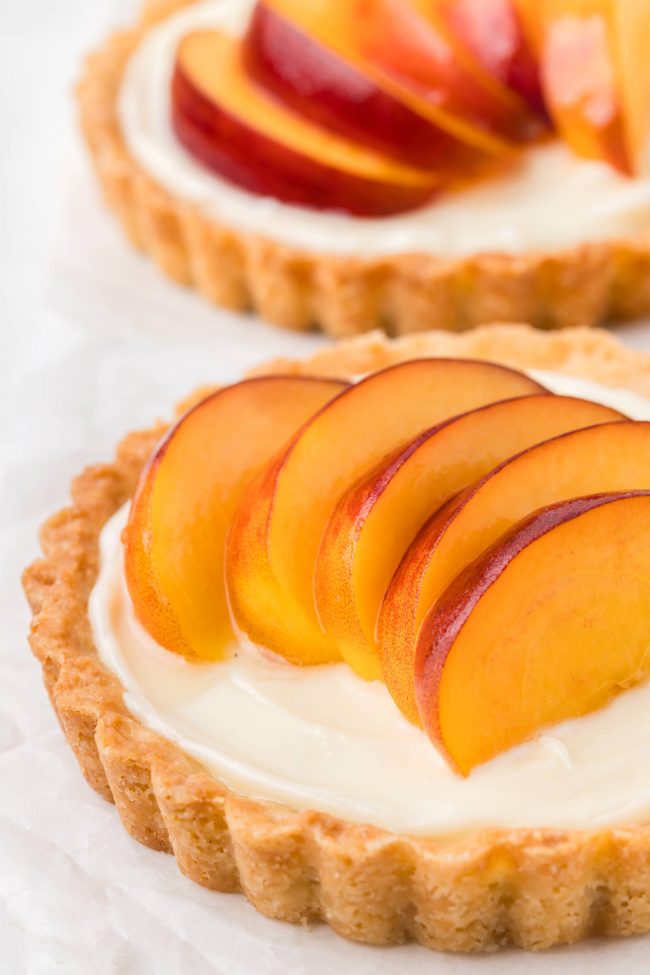
These peach tartlets have the most amazing sweet, buttery crust and can be made with all-purpose or gluten-free flour. They have a no-bake cheesecake-like filling and are topped off with fresh peach slices and apricot jam.
I loved the filling from my 4th of July Fruit Pizza so much that I wanted to use it in something else sweet and summery.
I’m also obsessed with the crusts in this Blueberry Tartlets recipe, so here we are!
If these tartlets don’t look peachy enough for you, then you can peel and chop the peaches and cover the filling with them.
I tried a cooked peach filling but found that it was too much. I wanted to be able to clearly taste the crust and the cheesecake filling, which I couldn’t really do with the sweet filling on top.
So that’s why I’m keeping things simple here.
And should you have just 1/4 cup (45 grams) of peaches left over, you can make this lovely Peach Margarita I posted last week!
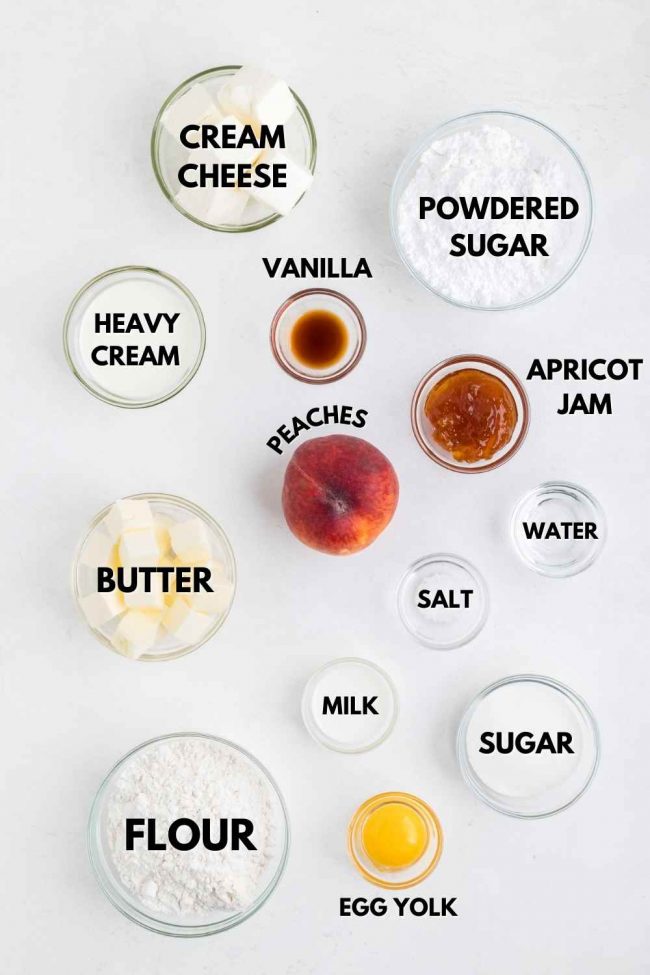
Ingredients
Here’s an overview of everything you’ll need to make these lovely peach tartlets!
Fresh vs canned peaches
To make these tartlets, you need fresh peaches for the best texture and flavor.
While you can use canned peaches in a pinch, fresh peaches provide a firmer texture and superior taste. Canned peaches are too soft and can release too much liquid, which can make the filling runny.
Make sure to select ripe but firm peaches for the best results.
Apricot jam glaze
Brushing the peaches with apricot jam enhances the flavor and appearance of the tartlets.
Gently heat the apricot jam to make it easier to brush over the peaches, ensuring a smooth and shiny finish.
Can I use other fruit?
Of course! Since you’re just adding raw fruit to the top, you can add whatever you’d like.
But there are a few types of fruit I’d advise against.
What fruit not to use
While many types of fruit are perfect for these tartlets, some may not be the best choice due to their texture, moisture content, or flavor. I wouldn’t recommend any of these:
- Watermelon – its high water content can make the filling and crust soggy and dilute the flavors.
- Bananas – they tend to brown quickly and become mushy, although they can work if added just before serving.
- Citrus fruits – fruits like oranges and grapefruits can be too juicy and acidic, which might overpower other flavors and make the crust soggy.
- Melon – cantaloupe and honeydew, like watermelon, are too watery and can make the filling and crust soggy.
- Kiwi – although kiwi can be tasty, it sometimes reacts with dairy products, developing a bitter taste over time. So you’d want to add that shortly before serving.

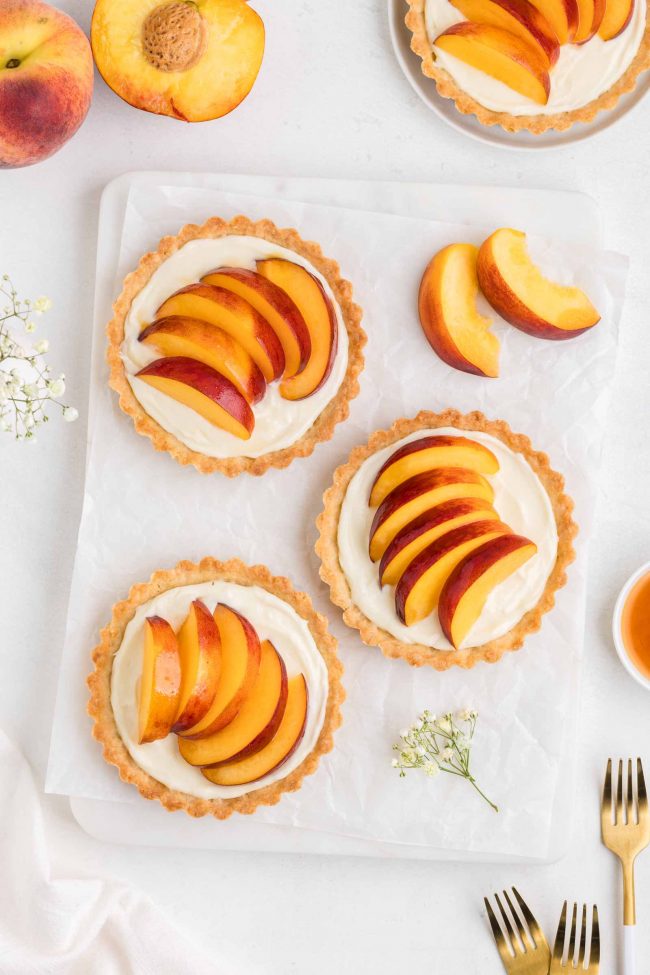
Tart crust
I tried maybe 8 tart crust recipes before realizing I should just try this one from King Arthur Flour.
It was perfect with just a few small modifications.
They write that chilling the dough is optional, but I believe it’s important as the dough is much more manageable if you chill it.
They also suggest using pie weights and docking the crust (pricking holes all over the bottom with a fork).
None of that is needed for these tartlets. If you make it in a full-sized tart pan, it is. But mini tarts are easier.
All of the other tart crust recipes I tried were too crumbly, not sweet enough, flavorless, or were cakey or became soggy after filling.
These were perfect and so delicious that we ate a few unfilled. Undoubtedly the best tart crust I’ve ever had.
How to make the filling and top them
I love that these peach tartlets look somewhat classy but are actually really, really easy. The filling’s made in one bowl, and then you just top them off with some peaches and jam.
If you’d like to use a different type of jam, that’d work as long as it goes well with peaches. Might I suggest this Peach Jam? :)
As an Amazon Associate, I earn from qualifying purchases. For more info, see my disclosure.
Mini tart pans
I used these Wilton Perfect Result 4.75″ (12 cm) Tart Pans, which come in a 6-pack.
I’ve owned this set for a decade, and they remain in great condition. Just like with other tart pans, you should remove the tart from the pan before cutting it.
If you use a knife on them, then of course they’ll get scratched up.
If you can’t get your hands on those, make you get mini tart pans with removable bottoms to make shell removal easier.
Can I make 5 instead of 4 tarts?
This is what I initially did. It works, but I preferred the shells to be a bit thicker and to contain more filling.
I wouldn’t try stretching it out to 6 tarts, though. You wouldn’t have enough dough.
If you pressed it into 6 tart pans, anyway, the baked tart shells would almost definitely be too thin and brittle to remove from the pans without crumbling.
Do I have to bake the crusts?
Most definitely. They have milk and egg yolk in them.
If you’d like a cheesecake dessert with a no-bake crust, then you could try this Cheesecake Tart which is topped off with strawberries and strawberry preserves.
Can I roll the dough out instead of press it in?
The original recipe says you can, but I find it much simpler and faster to just press it in.
Do I need to use pie weights?
Not when following this recipe for mini tart pans. I’ve also used this recipe for a 9″ tart, and for that, you do need pie weights.
The crust slumped without them.
Make ahead and how to freeze
These are fantastic to prepare in advance!
The dough
You can make the tart dough up to 3 days ahead. Or you can freeze it for up to 3 months.
Wrap the disc of dough in plastic wrap, and then place it in a Ziploc bag. Thaw the dough overnight in the fridge.
Don’t use the microwave to thaw it! If you absolutely must, then use 30% power.

Unbaked tart shells
You can press the dough into the tart pans, cover them well, and refrigerate them for up to 3 days or freeze for up to 3 months.
Baked tart shells
Once baked, you can store them in an airtight container at room temperature for up to 3 days or refrigerate for up to 5 days. They can also be frozen for up to 3 months!
The filling
The topping can be made and refrigerated for up to 3 days in advance.
I previously thought it wouldn’t freeze well, but I recently tried it out, and there weren’t any downsides to it. It was still just as tasty!
I had only frozen mine for about a month, so that’s as long as I can recommend.
How to store
The filled tarts can be refrigerated for up to 3 days. Amazingly, they don’t get soggy (thanks to the crust recipe!), and I think I even prefer them on the second day.
The crust absorbs just a bit of moisture from the filling, making the tarts utterly irresistible.
But do not add the peaches until the day of serving! I had one peach-topped tartlet sitting in the fridge for 3 days. It didn’t go bad or taste bad, but it didn’t look its best.

Can I freeze them?
You can freeze the filled tarts, but you won’t want to freeze the fresh peaches. Freezing can change the texture and flavor of peaches.
Gluten-free option
So far, I’ve only tried this tart crust with King Arthur Flour Gluten-free Measure for Measure Flour.
It’s just as delicious as the version made with all-purpose flour. I haven’t tried it with Bob’s Red Mill Gluten-free 1-to-1 Baking Flour, but based on similar recipes I’ve made, it’d likely be a tiny bit gritty in comparison to King Arthur.
If you try out another brand and are disappointed with the results, I highly recommend trying it again with King Arthur.
Whether you make the traditional or gluten-free version, I hope you’ll enjoy these peach tartlets! I’d love for you to leave a comment down below if you try them out. :) Thanks!
Peach Tartlets

- Prep Time:
- Cook Time:
- Ready in:
- Yield: 4 tarts
Ingredients
- 1 1/4 cups (150 grams) all-purpose flour or King Arthur Flour Gluten-free Measure for Measure Flour
- 1/4 cup (50 grams) granulated sugar
- 1/2 teaspoon salt
- 8 tablespoons (113 grams) unsalted butter, cold, cut into 1/2" cubes
- 1 large egg yolk
- 1 teaspoon vanilla extract
- 1-2 tablespoons (14-28 grams) milk1
- 6 ounces (169 grams) cream cheese, room temp 2
- 1 cup (120 grams) powdered sugar
- 1/2 teaspoon vanilla extract
- pinch of salt
- 1/4 cup (60 ml) heavy cream, cold
- 1-2 tablespoons apricot jam
- Just enough water to make the warmed apricot jam runny enough to brush on the peaches (this amount depends on your jam)
- 1-2 peaches
For the crust:
For the topping:
For brushing on:
Directions
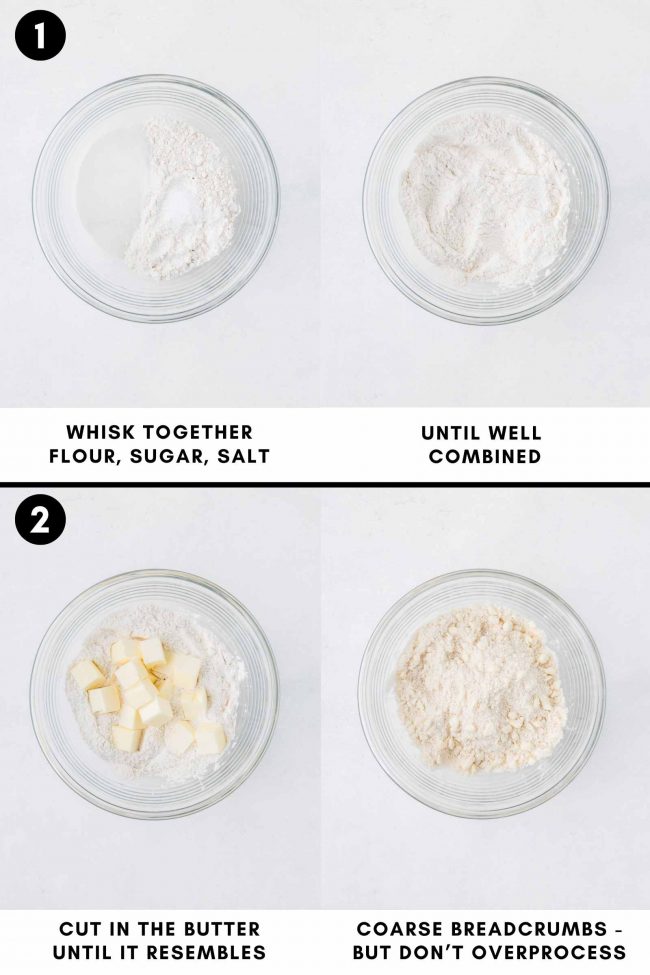
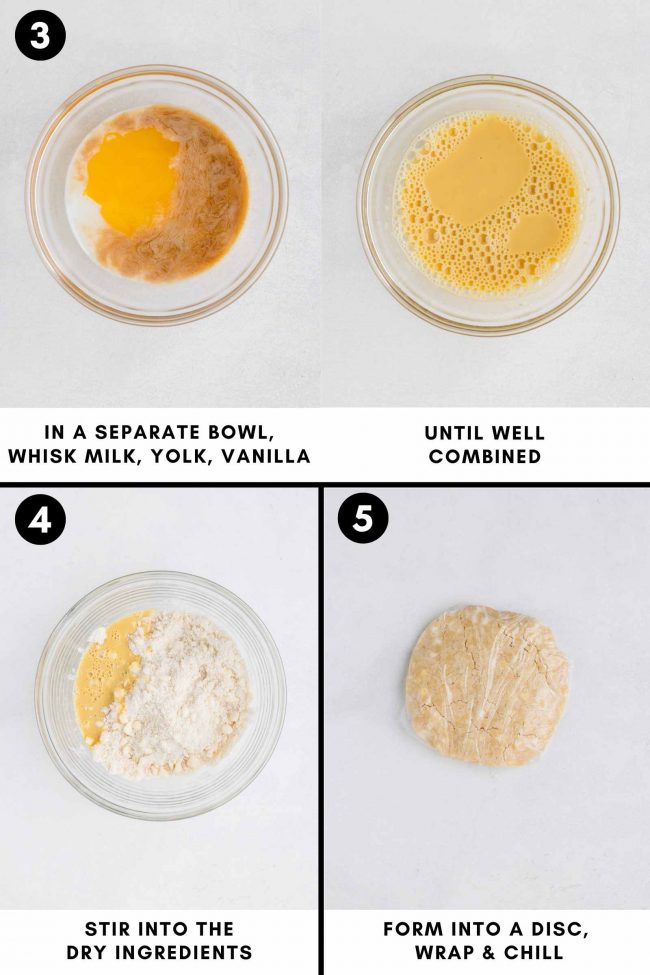
- In a medium bowl, whisk together the flour, sugar, and salt.
- Cut in the cold butter until the mixture resembles coarse breadcrumbs.
- In a separate small bowl, whisk the egg yolk, vanilla, and just 1 tablespoon of milk. Stir this into the dry ingredients.
- Use your hands to work the dough a bit and to bring the dough together. The dough should be crumbly but cohesive when squeezed. It won’t form a ball or a loose ball like with pie dough.
- I placed a piece of plastic wrap in a mixing bowl and then dumped the dough into there and wrapped it up into a very loose, crumbly disc.
- Chill for 1 hour or up to 3 days. You can also freeze it for up to 3 months.
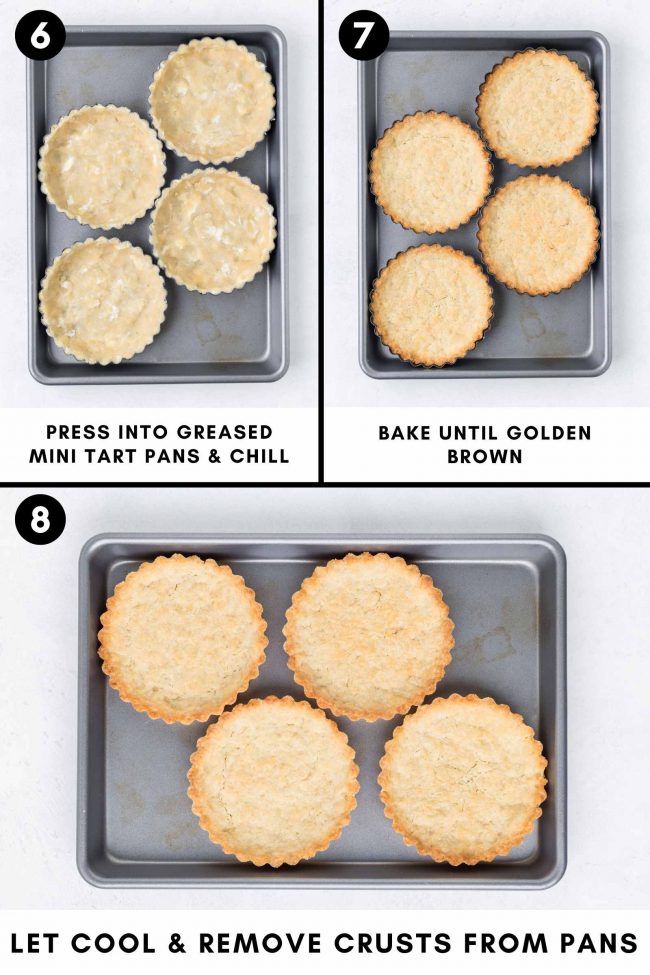
- Grease 4 mini tart pans with removable bottoms.
- Take a fourth of the dough crumbles (I used 91 grams, but I used the extra tablespoon of milk - if you follow the recipe exactly, you can use 88 grams) and place in the pan.
- Press up the sides and evenly over the bottom of the pan. Do the same with the other 3 tart pans.
- Place in the fridge for at least 30 minutes or cover and refrigerate for up to 3 days or freeze for up to 3 months.
- Towards the end of the chill time, preheat the oven to 375 °F (190 °C) and place a baking sheet large enough to fit all 4 tartlets in the lower third of your oven.
- After 30 minutes of chilling, place the tartlets directly onto the hot baking sheet and bake for 18-22 minutes, rotating halfway through if you notice them browning too quickly in certain areas, until the sides are nicely browned and the bottom has browned a bit.
- Remove the baking sheet and tartlets from the oven and place them on a wire rack to cool completely, about 1 hour (get started on Step 15 during this time). The crusts will crumble if you try to remove them from their pans while still warm. If making ahead of time, you can put the cooled crusts in an airtight container and store at room temp for up to 3 days or refrigerate for 5 days.
- Once cooled, unmold the crust - the removable bottom is going to stick to the bottom for now, and that’s okay.
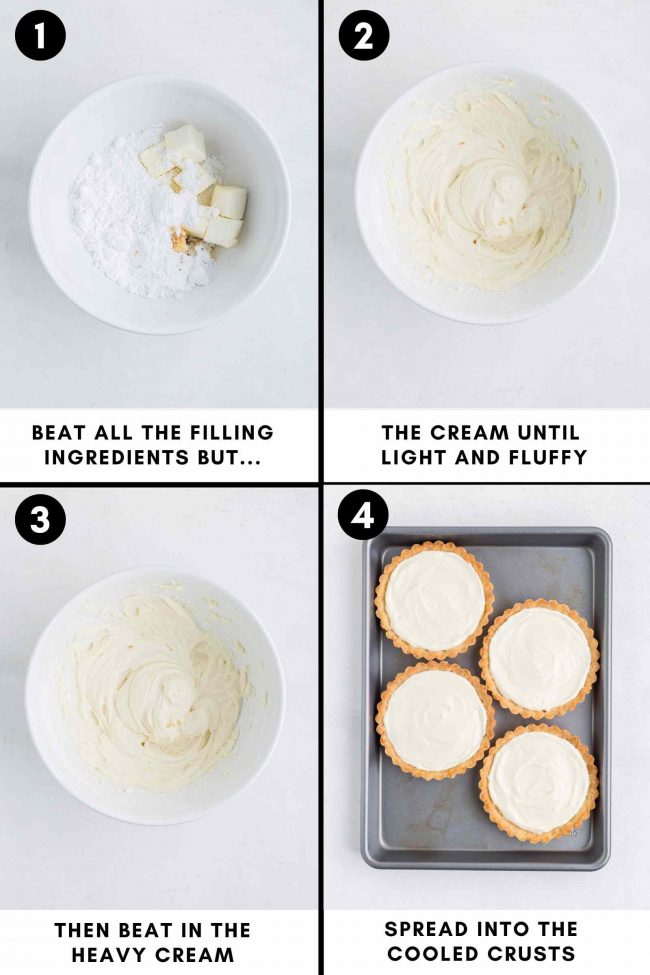
- While it’s cooling, prepare the topping.
- In a large mixing bowl, beat the cream cheese, powdered sugar, vanilla, and salt using an electric hand mixer at medium speed until completely combined.
- While still mixing, now on low, gradually add the heavy cream.
- Once it’s well incorporated, turn the speed to high and beat until stiff peaks form - about 3 to 5 minutes. Place in the fridge until ready to assemble the tarts. The topping can be made and refrigerated up to 3 days in advance or frozen for up to 1 month.
- Spoon in the filling. It yields about 1 1/4 to 1 1/3 cups (277 grams), so you should have enough for at least 1/4 cup (70 grams) per tart.
- The filled tarts can be refrigerated for up to 3 days. They don't get soggy during that time, and I think I even prefer them on the second day. If you chill them for 4+ hours and let the topping soak in a bit, they’re much less crumbly, and you can easily remove the removable bottom from the tartlet.
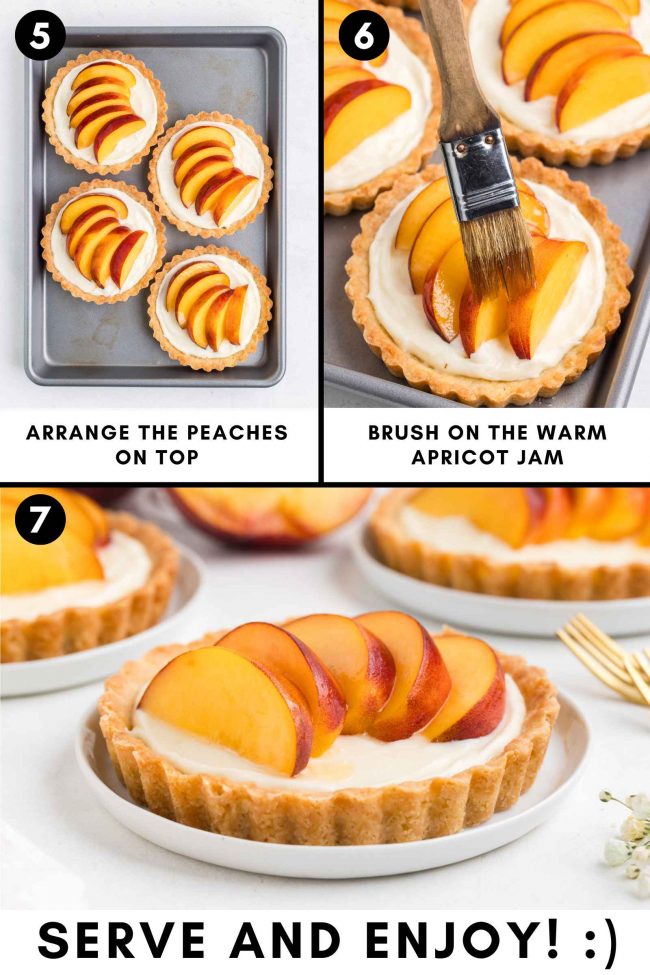
- The day of serving, slice a peach and arrange the slices neatly on top of the topping.
- Warm the apricot jam in a small bowl in the microwave or on the stovetop over low heat. Add enough water to make it runny enough to brush over the peaches. You just need a very small amount.
- Let cool a few minutes and then brush over the peaches.
Prepare the crust:
For the filling:
Top them:
Notes
- You might need up to another tablespoon of milk to get the dough together. If it's too dry with 1 tablespoon of milk, add a teaspoon at a time rather than dumping in another full tablespoon.
- If you live outside the US or Canada, you likely only have access to cream cheese packaged in small tubs designed for spreading on toast, rather than the brick-style variety sold in North America. You'll need to use 225 grams of that toast cream cheese to yield the 6 ounces (169 grams) of brick-style cream cheese needed for this recipe. Place the 225 grams of toast cream cheese in the center of a clean tea towel or cheesecloth (a paper towel won't suffice), and squeeze out the excess liquid until you have 169 grams of cream cheese.
Join over 12,400 readers and sweeten up
your inbox with new posts for free!
This subscription is free of charge and can be canceled at any time.


There are no responses on “Peach Tartlets” — Be the first one!