These mint brownies are a deliciously indulgent treat that combines the rich, fudgy goodness of brownies with the refreshing, cool flavor of mint. Whether you’re preparing them for Christmas, St. Patrick’s Day or just a weekend treat, these brownies are a crowd-pleaser. You can make them traditionally, gluten-free or dairy-free.
Ten years ago, I posted a Mint Chocolate Brownies recipe that never really gained much attention, and I never quite understood why because they’re absolutely delicious. They use peppermint extract in the brownie batter but don’t have any kind of topping. I suppose they are kind of boring-looking.
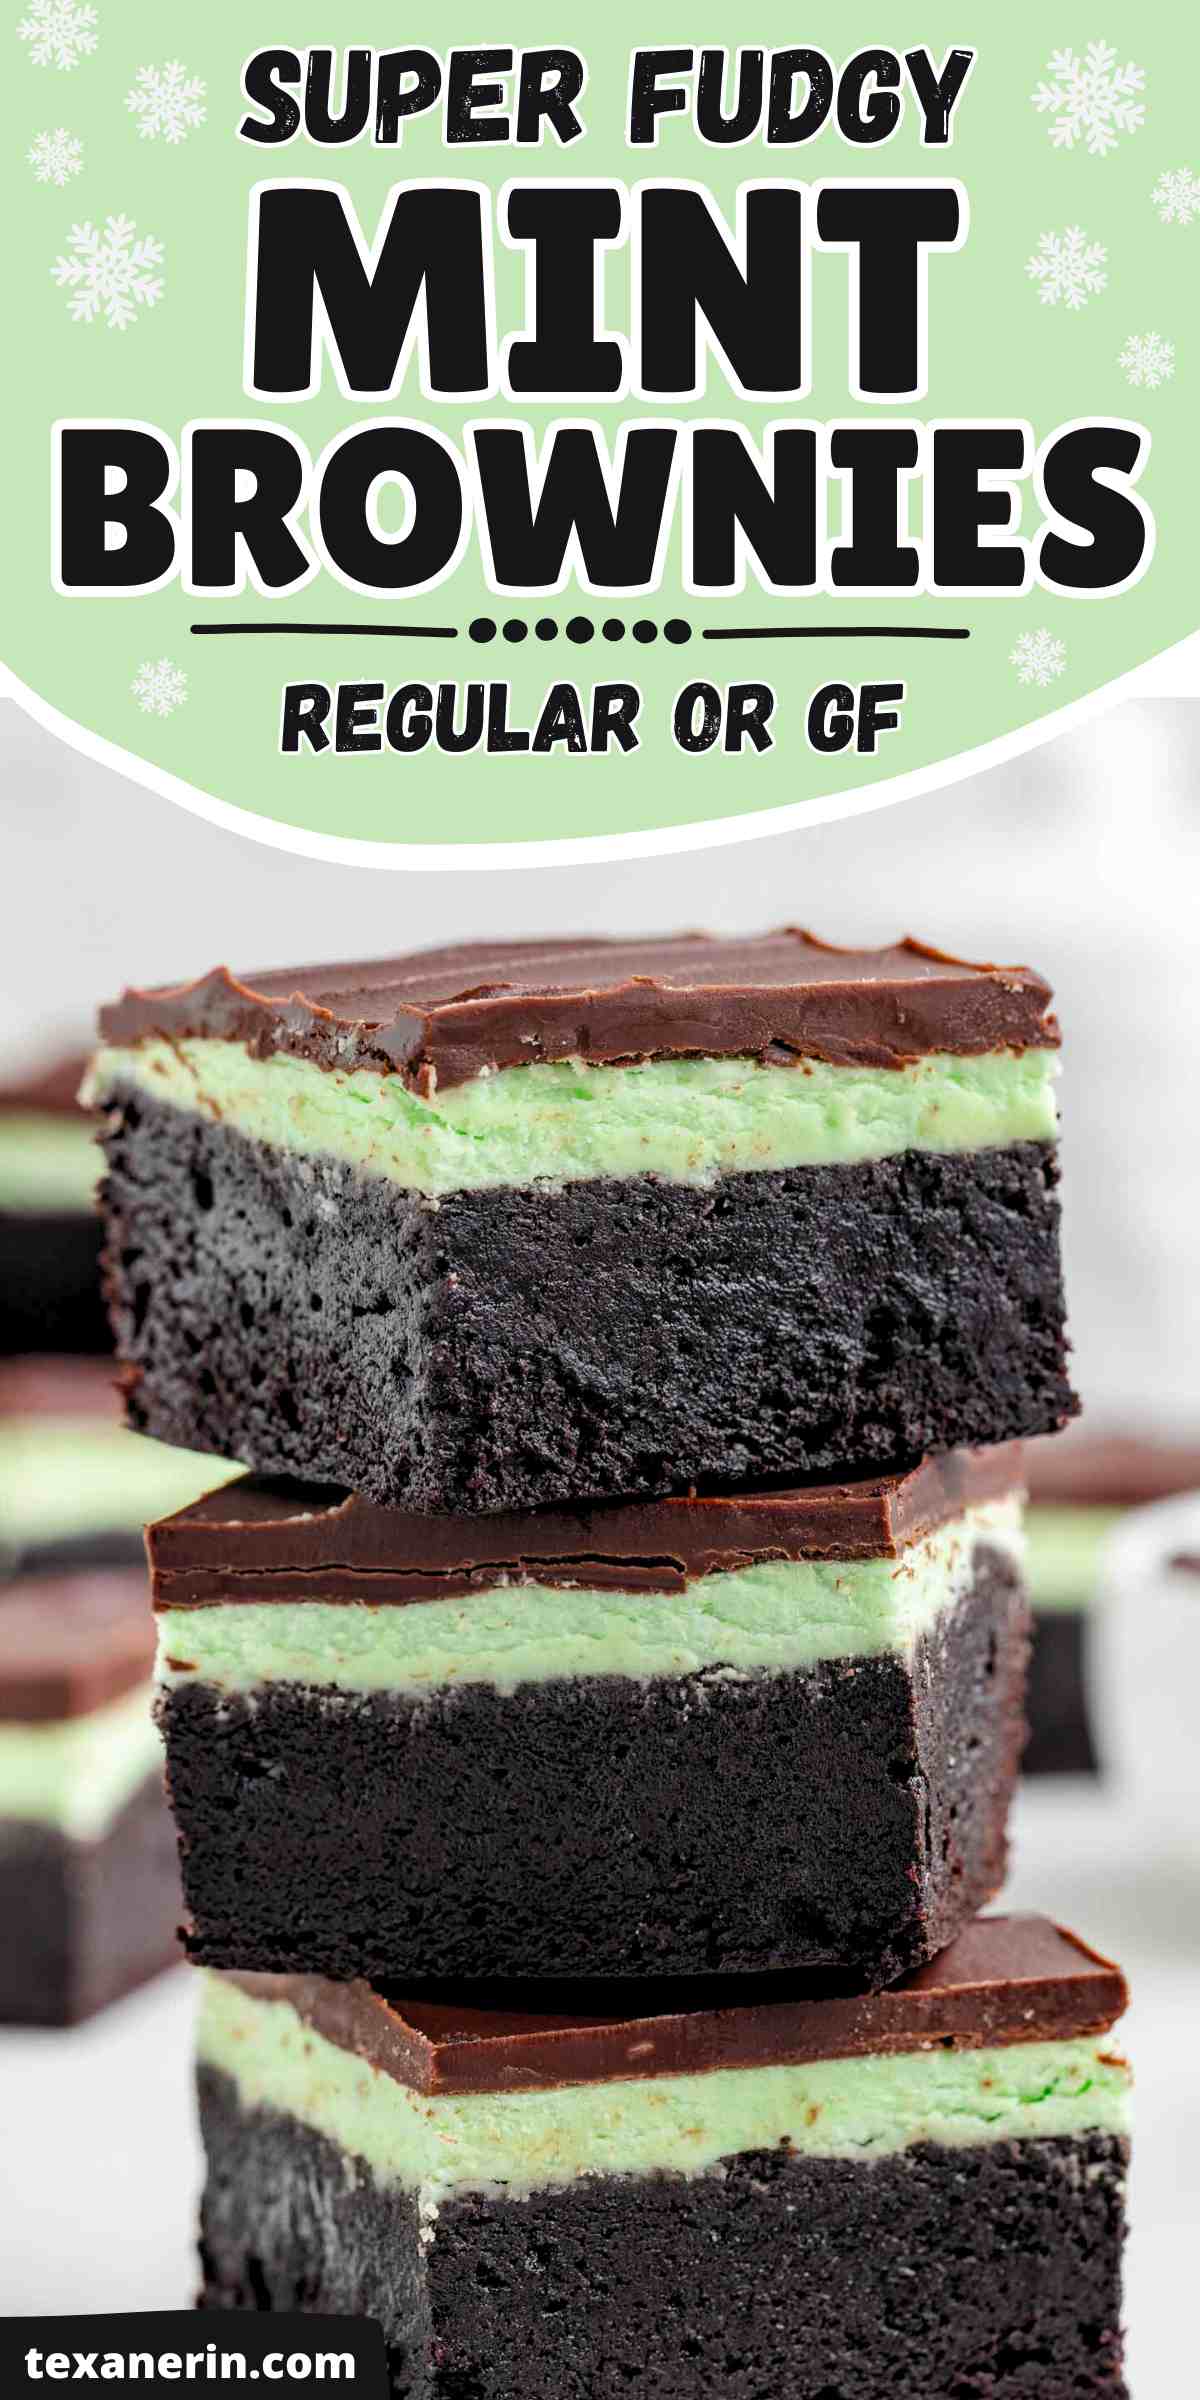
But after recently googling “mint brownies,” I finally get it. It seems like the trend is for a green layer of mint frosting sandwiched between the brownie base and an easy chocolate glaze, much like the classic Andes mint candies. Now I understand why people are expecting that particular look and flavor combination.
So here we go! I hope you all will like these better. :)
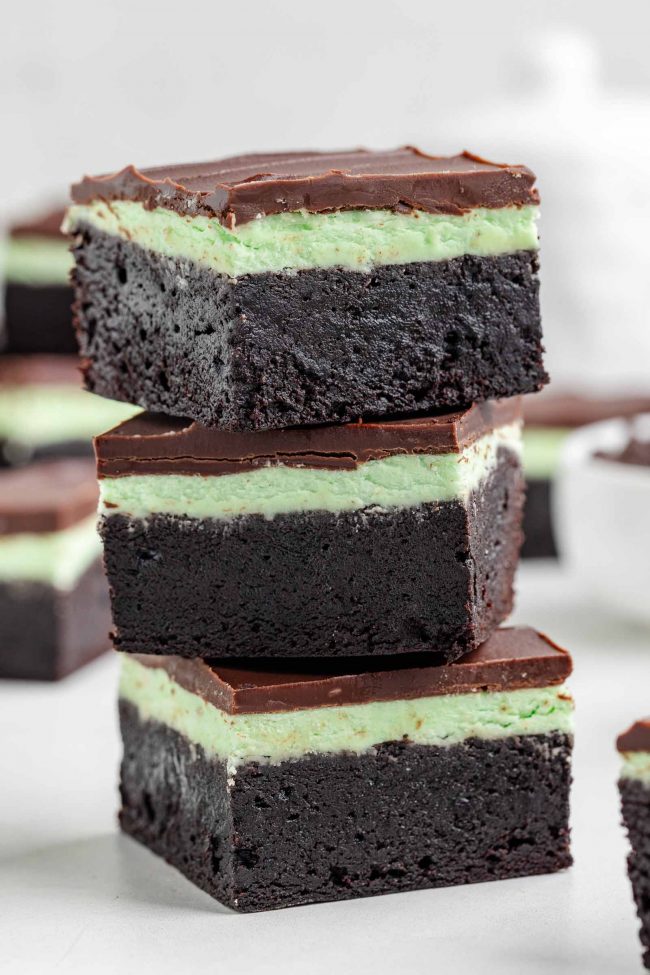
Yield
Before you scroll down to the recipe and see the massive amounts of butter and sugar, I need to say that this recipe yields a lot of brownies.
They’re very thick and with the mint and chocolate layers, they’re even richer than normal brownies.
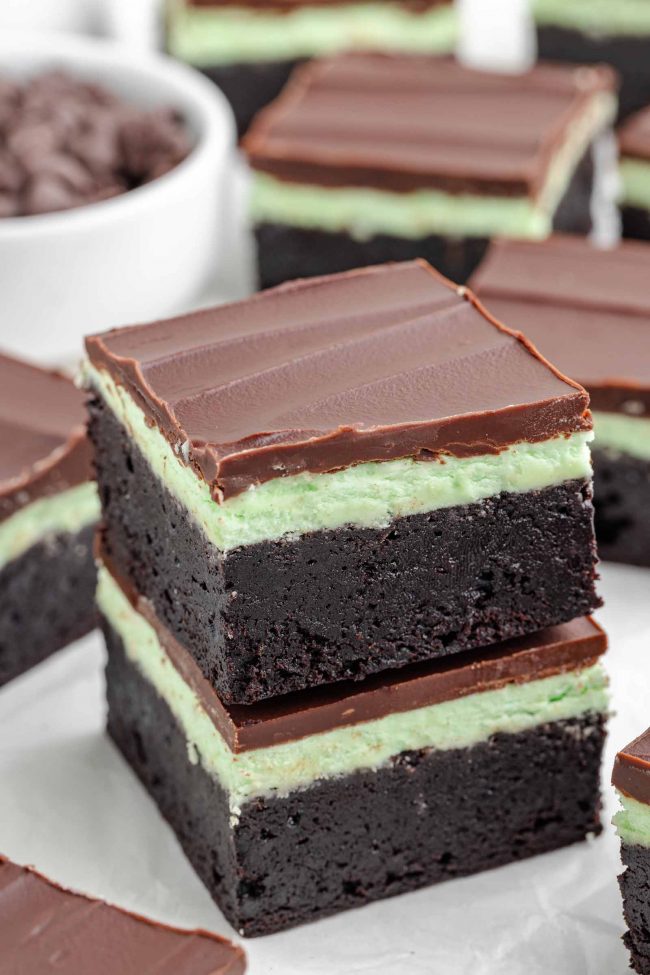
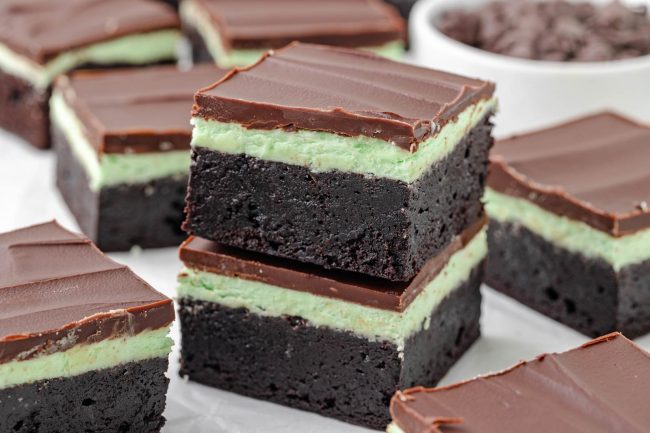
If you’re making these for a holiday party, I’d cut them into small bite-sized pieces rather than the huge brownies you see in the photos.
1×1-inch or 1×2-inch cuts are typically the best choice. They allow guests to enjoy the dessert without feeling overwhelmed, especially if other treats are also being served. Use a ruler or pastry cutter to make precise, evenly sized portions.
- 1″ x 1″ (2.5 cm x 2.5 cm) squares – this will yield 117 pieces (13 rows x 9 rows). These tiny portions are ideal for rich desserts where guests might want just a taste.
- 1″ x 2″ (2.5cm x 5 cm) rectangles – this will yield 54 pieces (13 rows x 4 rows). These are still small but a bit more substantial for those with a bigger sweet tooth.
- 2″ x 2″ (5 cm x 5 cm) squares – this will yield 24 pieces (6 rows x 4 rows). This is how I’d cut them if there weren’t any other desserts being served.
If you don’t want so many brownies, you can make a half batch. The baking time is 15-22 minutes. There’s such a variation there because I’ve included so many flour options.
You can find the measurements for a half batch here → Gluten-free Brownies, where I also list all-purpose and whole wheat flour as options.
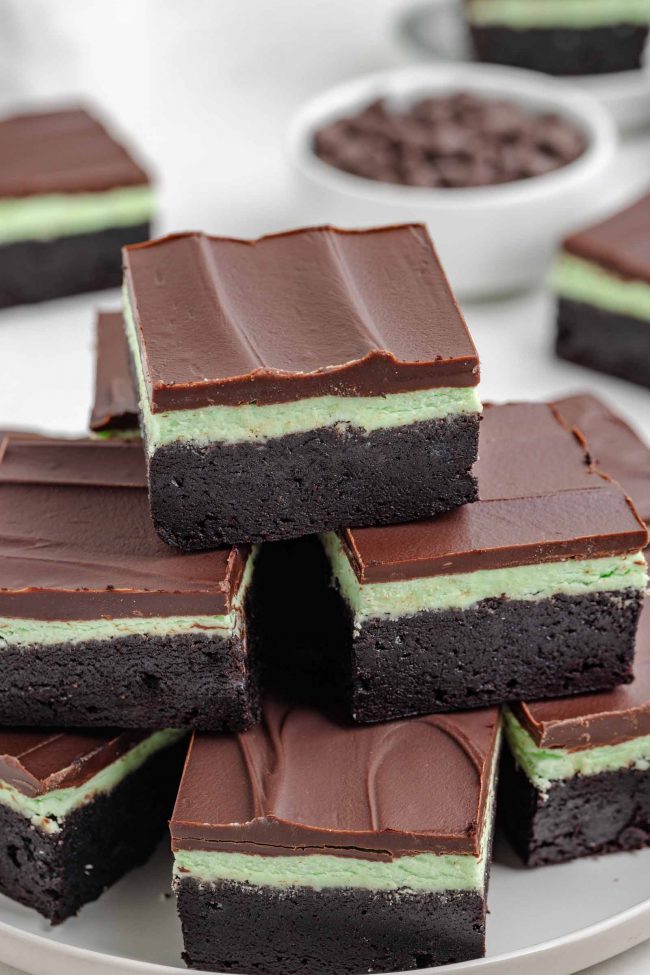
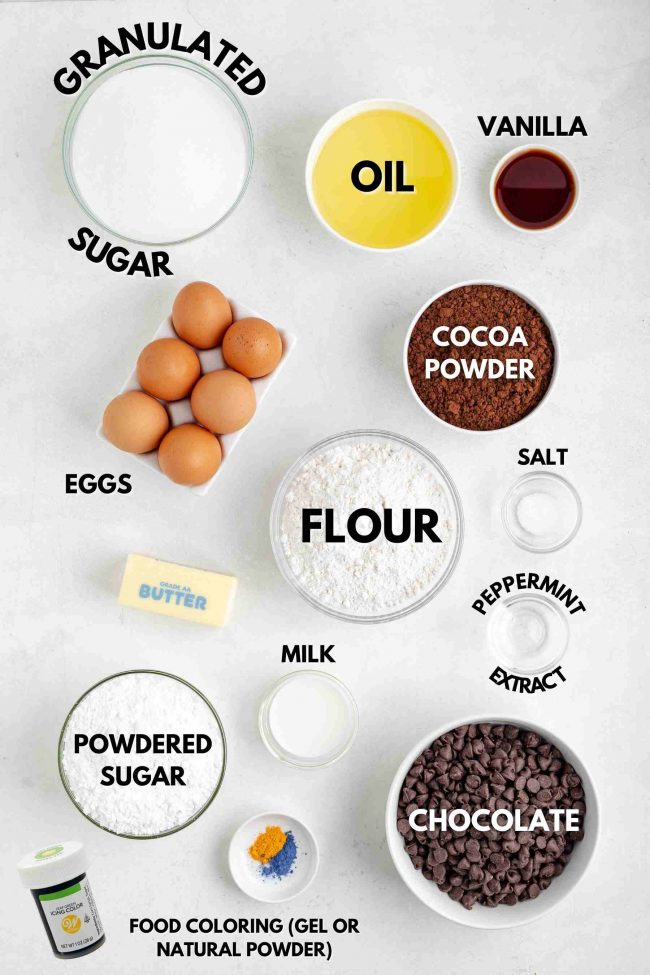
Ingredients
Here’s what you’ll need.
Brownies
- Flour – you have a few choices here. The brownies pictured were made with all-purpose flour, but I’ve also tested them using whole wheat, white whole wheat and several gluten-free options I talk about at the end of the post.
Each version is equally delicious and looks identical! - Cocoa powder – I used Dutch-process cocoa powder for these peppermint brownies. If you’re considering natural cocoa powder (like regular Hershey’s), the brownies might turn out a bit cakier. I haven’t tested it, so I can’t say for sure.
- Butter, coconut oil or vegetable/canola oil – half butter and half canola oil was used in the photos, and that’s what’s listed in the recipe. But you can do all butter, all oil, or whatever mix you’d like.
I was trying to be a bit frugal by doing half and half because I figured most people would find using 1 3/4 cups (394 grams) of butter in just the brownie base a bit insane. Also, when using butter instead of canola or vegetable oil, the brownies firm up more in the fridge, which makes cutting easier.
These brownies also work great with all coconut oil. I always use refined coconut oil to avoid coconut flavor, but if you don’t mind it, unrefined coconut oil works too.
If you use all canola or vegetable oil, your brownies will be even more gooey than the ones in the photos. - Sugar – you can use granulated sugar or coconut sugar for the brownie base. I don’t recommend making these brownies sugar-free unless you have a tried-and-true sugar-free substitute that works as a 1:1 replacement for granulated sugar.
- Eggs – egg subs don’t work in this recipe. Believe me. I tried for years! For an egg-free option, I recommend my Paleo Vegan Brownies, which are an eggless adaptation of the brownie base used for these mint brownies.
- Vanilla and salt
Mint frosting layer
In addition to butter, you’ll also need:
- Powdered sugar – no sub for this.
- Milk – you can use any type you’d like except for canned coconut milk.
- Food coloring – I go into detail about this below.
- Peppermint extract – you can use a different extract if you’d prefer. Almond or orange extracts sound great for some Christmas brownies.
Chocolate topping
- Chocolate chips – mixed with (more!) butter or coconut oil (not vegetable/canola oil), this forms the chocolate topping.
Can I just use a box mix?
Sure! You need to make a 9″ x 13″ (23 cm x 33 cm) pan of brownies. So just follow the package instructions for that, and then use the mint and chocolate topping from this recipe.
As an Amazon Associate, I earn from qualifying purchases. For more info, see my disclosure.
Food coloring
You can, of course, use whatever food coloring you’d like. Or just omit it!
I like to use natural food coloring like Supernatural Kitchen Food Colors ($35.68/oz) or Color Kitchen ($31.80/oz). I’ve tested both in this mint frosting, and the colors turn out vibrant and beautiful.
However, both options are on the expensive side. I tend to stock up when iHerb has a big sale. So far, both brands have worked well in everything I’ve tried.
If you have some leftover green coloring, it works great in this Mint Lemonade, which uses fresh peppermint.
The photographer used McCormick Nature’s Inspiration Food Colors, which have been unavailable on Amazon for a while. I also checked Walmart and they’re out of stock there, too.
That set doesn’t include green, but there are directions on the package for making green. That’s why you see orangish-yellow and blue powders in the ingredients shot above.
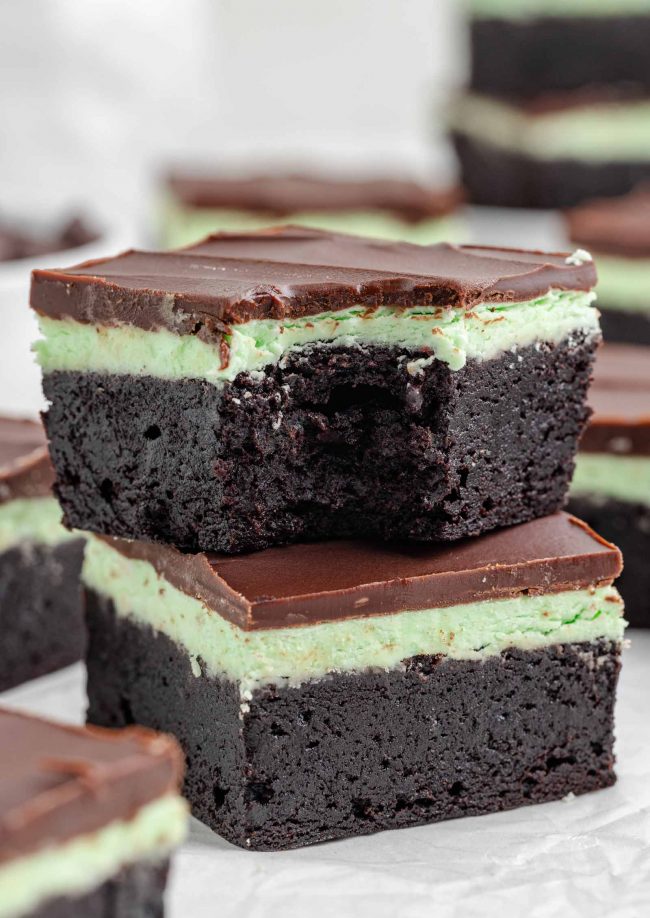
Get the right extract!
When buying extract, make sure to get peppermint and not mint extract, which has more of a spearmint taste.
And if you don’t like mint, just use vanilla or another extract instead. Start off with a tiny amount and add more to taste.
To help use up some of the leftover peppermint extract, this Mint Chocolate Fudge is a perfect choice for Christmas! And this Mint Chocolate Tart is probably the favorite of my mint chocolate desserts because it’s so quick and easy.
How to make them
The full recipe can be found at the bottom of this page.
The only way you can really mess these up is if you overmix or overbake them. Both will result in dry, cakey brownies.
I’ve given this brownie base recipe to dozens of Germans, and I think all but a few have overbaked them. Despite me saying that a toothpick will not come out clean. ;)
Brownies aren’t a traditional German recipe, and I think so many people new to baking brownies are expecting them to look cakey when they come out of the oven.
But that’s not how fudgy brownies work. If you were to dig into the center of the brownies with a fork after taking them out of the oven, it’s still going to look like goo. It’s not going to look baked. That’s normal!
It shouldn’t look like totally raw batter, though. If the batter looks as liquid as it was in the bowl, then they’re not ready.
Tips
Here are a few helpful tips to ensure your chocolate mint brownies turn out perfectly.
- Make sure to let the brownie base cool completely before adding the mint frosting to avoid melting the frosting.
- If you prefer a more intense mint flavor, feel free to adjust the amount of peppermint extract in the frosting.
- For an extra fun touch, you can swirl some extra mint frosting through the chocolate topping before it sets.
How to cut them
If you want really nice cuts like in the photos, you unfortunately can’t just cut them up quickly like you’d normally do with brownies. Cutting too quickly or carelessly might cause the green layer to smudge
- Chill thoroughly – refrigerate the brownies until the buttercream is firm. This helps keep the layers intact and prevents the frosting from smudging when cutting.
- Use a sharp knife – choose a sharp knife with a thin blade to make clean cuts. A thicker blade may crush or distort the layers.
- Warm the knife – dip the knife in hot water, then dry it with a towel before each cut. The heat helps the blade glide through the buttercream and topping without sticking.
- Cut slowly – use steady, even pressure when slicing to avoid tearing the layers or creating uneven edges.
- Wipe between cuts – after each slice, wipe the knife clean with a damp cloth to remove any frosting or chocolate residue. This prevents smearing and keeps the cuts neat.
- Score the surface – lightly mark the top layer with the knife to outline your cuts before slicing. This ensures evenly sized brownies and helps guide the knife for precise cuts.
- Let sit briefly at room temperature – if the brownies are very cold and the chocolate layer feels too hard, let them sit at room temperature for 5-10 minutes before cutting. This softens the chocolate glaze slightly and reduces the risk of cracking.
Troubleshooting
If you encounter any issues while making these mint chocolate brownies, here are some common troubleshooting tips.
- Line the pan with parchment paper before baking, leaving an overhang on the sides. This makes it easier to lift the entire brownie slab out of the pan for cutting, ensuring cleaner edges.
- If your brownies are too cakey (this recipe is for fudgy brownies!), you may have overmixed the batter. Be sure to stir just until combined to maintain the fudgy texture.
- If your mint frosting is too runny, add a little more powdered sugar until you reach the desired consistency. If it’s too thick, add a tiny bit more milk.
- Allow each layer (brownie, mint frosting, and chocolate topping) to chill and set fully before adding the next one. This keeps the layers firm and distinct, making slicing much easier.
How to make ahead, store and freeze
Each element can be prepared ahead of time and even frozen for up to 3 months. I’ve done this, and the brownies were just as delicious as when they were fresh.
- Brownie base – once baked, the brownie base can be covered tightly in plastic wrap and stored at room temperature for 3 days or refrigerated for up to 5 days. If you want to freeze it, wrap it in plastic wrap and place it in a Ziploc bag.
- Mint frosting – the mint frosting can be prepared in advance and stored in an airtight container in the refrigerator for up to 3 days. Allow it to come to room temperature before spreading it on the brownies.
- Chocolate topping – prepare the chocolate topping and let it cool slightly before spreading it over the mint frosting. If you need to make it ahead, store it in an airtight container in the fridge for up to 2 days, then gently reheat to spread over the frosting.
- Assembled brownies – once the brownies are fully assembled, store them in an airtight container in the refrigerator for up to 5 days. If your kitchen is below 70 °F (21 °C), you can store them at room temperature for a day. Ensure they’re kept away from direct sunlight and heat to prevent the buttercream and chocolate topping from melting.
And for another great make-ahead minty brownie recipe, try these Easy Peppermint Patty Brownies!
Gluten-free version
These brownies, that have the same base as my Gluten-free Brownies, come out great with Bob’s Red Mill 1-to-1 Gluten-free Baking Flour and King Arthur Flour Gluten-free Measure for Measure Flour. Both are meant as a direct sub for all-purpose flour.
You can also use teff flour or light buckwheat flour, which is what I always use because it’s available everywhere around here and is much cheaper than the other options.
Just make sure your buckwheat flour is labeled as gluten-free!
If you don’t want to use either of those or a gluten-free 1:1 replacement for all-purpose flour, I’ve got these options for you. They’re all adaptations of the brownie base in these mint brownies.
So all you would do is follow the directions for these recipes (but omitting added chocolate chips and frosting) and then come back here for the mint filling and chocolate topping. You’ll need to either double the brownie portion and use a 9″ x 13″ pan or halve the mint frosting and glaze recipes below.
And for a healthier mint treat, check out these Gluten-free Thin Mints Cookies! They’re maple-sweetened and made with almond flour.
I hope you’ll enjoy these mint brownies! If you try them out, I’d love to hear your thoughts below in the comments. Thanks! :)
Mint Brownies
- Prep Time:
- Cook Time:
- Ready in:
- Yield: 24 large or 117 bite-sized
See notes for dietary-friendly options!
Ingredients
- 2 cups (250 grams) flour1
- 1 1/2 cups (172 grams) Dutch-process cocoa powder
- 1/2 teaspoon salt
- 3/4 cup + 2 tablespoons (196 grams) unsalted butter or refined coconut oil, melted and cooled slightly
- 3/4 cup + 2 tablespoons canola or vegetable oil
- 3 cups (600 grams) granulated sugar
- 2 tablespoons vanilla extract
- 6 large eggs (50 grams each, out of shell), room temperature
- 1 3/4 cups (210 grams) powdered sugar
- 1/2 cup (113 grams) unsalted butter, room temperature
- 1 1/2 teaspoons peppermint2 extract
- 1-2 tablespoons milk
- pinch of salt
- green food coloring
- 2 cups (340 grams) semi-sweet chocolate chips or chopped chocolate
- 1/2 cup (113 grams) unsalted butter
For the brownie base:
Mint frosting:
Chocolate topping:
Directions
- Preheat the oven to 350 °F (175 °C) and line a 9” x 13” (23 cm x 33 cm) pan with a piece of parchment paper.
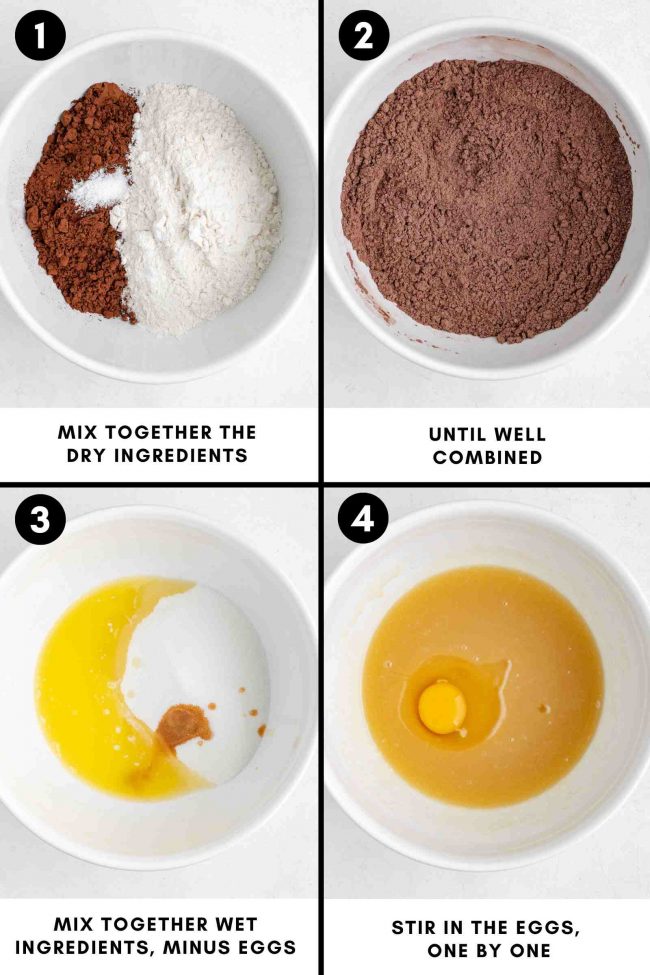
- In a medium mixing bowl, stir together the flour, cocoa powder, and salt. Set aside.
- In a large mixing bowl, stir together the melted butter, oil, sugar, and vanilla extract. Once combined, add the eggs one at a time and stir just until combined.
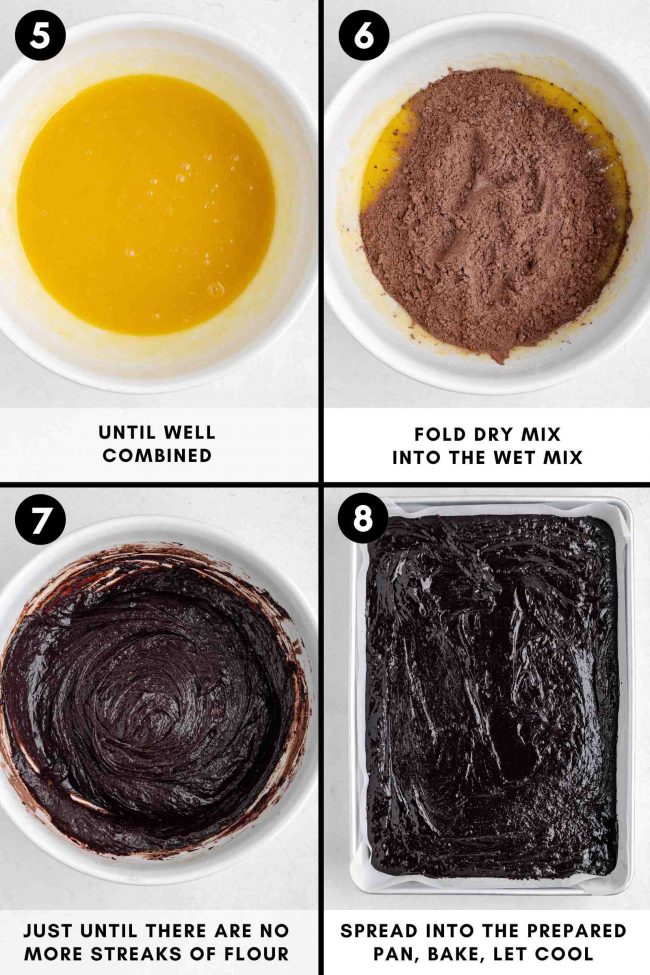
- Fold the dry mixture to the wet and stir just until almost no streaks of flour remain. Do not overmix!
- Spread the batter into the prepared pan and spread it out evenly.
- Bake for 22-26 minutes or until the middle no longer appears wet on the surface. If you tilt the pan slightly to the side, the brownies should stay where they are and not slump over to the side as if they were raw. A toothpick inserted into them will not come out clean.
- Let cool completely, about 2 hours, and then refrigerate for at least 2 hours or until totally firm. They can be covered tightly in plastic wrap and stored at room temperature for 3 days or refrigerated for up to 5 days.
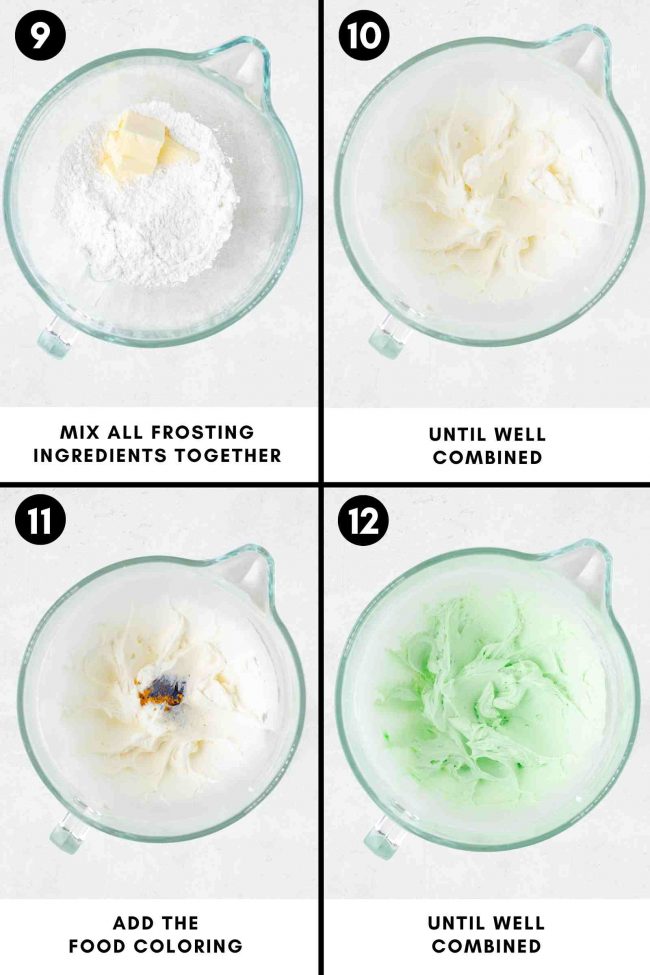
- Place powdered sugar, butter, peppermint extract, 1 tablespoon milk and salt in a large mixing bowl. Using an electric hand mixer or stand mixer, start by beating on low speed until the ingredients are well combined. Then increase to high speed and continue mixing until the buttercream is smooth and creamy.
- Add the remaining milk, if needed, so that it’s thin enough to spread but not be runny. I used 2 tbsp total.
- Gradually add in the food coloring until you're happy with the color.
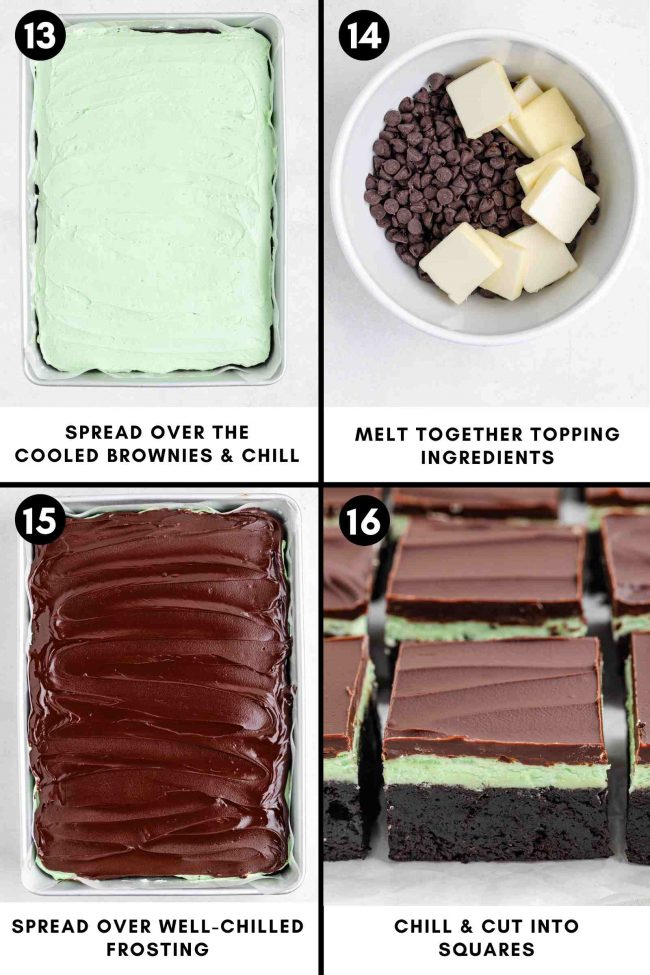
- Spread evenly over the top of the brownies. Chill for 30-60 minutes or until firm.
- Melt the chocolate and butter in a microwave-safe bowl at 50% power in 30 seconds ingredients, stirring after each, until totally melted and smooth.
- Let it cool for about 5-20 minutes or until it’s almost room temp but still easy to spread. You don’t want that it's so firm that it mixes together with the green layer.
- Spread evenly over the chilled green layer.
- Refrigerate for 25-35 minutes or until the topping is firm enough to cut through without it blending together with the green layer, but not so hard that it cracks. Some recipes said to chill it for only 10 minutes. My chocolate layer was much too soft at that point. I needed 35 minutes. You’ll just have to check every now and then. Another option is to let it firm up completely and then let it soften at room temp. I needed about 10 minutes when doing it this way. See post for cutting tips.
- Cover and refrigerate for up to 5 days or freeze for up to 3 months. If your kitchen is below 70 °F (21 °C), you can store them at room temperature for a day. Ensure they're kept away from direct sunlight and heat to prevent the buttercream and chocolate topping from melting. However, chilling them thoroughly is essential for clean, even cuts! They're very gooey at room temp.
Make the brownies:
Make the mint frosting:
Make the chocolate topping:
Notes
- For the flour, you can use 2 cups (250 grams) all-purpose flour, white whole wheat flour, whole wheat flour, or for gluten-free, use one of these:
- 2 cups (250 grams) King Arthur Flour Gluten-free Measure for Measure Flour
- 2 cups (276 grams) Bob's Red Mill 1-to-1 Gluten-free Baking Flour
- 2 cups (250 grams) light buckwheat flour
- 2 cups (316 grams) teff flour.
You'll want to make sure whatever brand of buckwheat or teff you buy is labeled as gluten-free. - I don't recommend mint extract, which has more of a spearmint taste.
- For dairy-free, use coconut oil instead of butter in the brownies and vegan butter in the buttercream and the chocolate topping. Coconut oil would also work, but the flavor is better with butter. Remember if you use unrefined coconut oil, there will be coconut flavor in your brownies. Also use plant-based milk instead of regular milk for the buttercream. Also make sure your chocolate is dairy-free.


2 comments on “Mint Brownies” — Add one!
Brought these brownies to a family reunion, and they were oh so loved! Lots of recipe requests! Kind of a weird choice for February but everyonee still devoured them! Thanks a ton. Can’t wait to make these again!
You’re welcome! I also think it’s not the most obvious choice, but still a good one. ;) So glad that people liked them! Thanks for your comment.