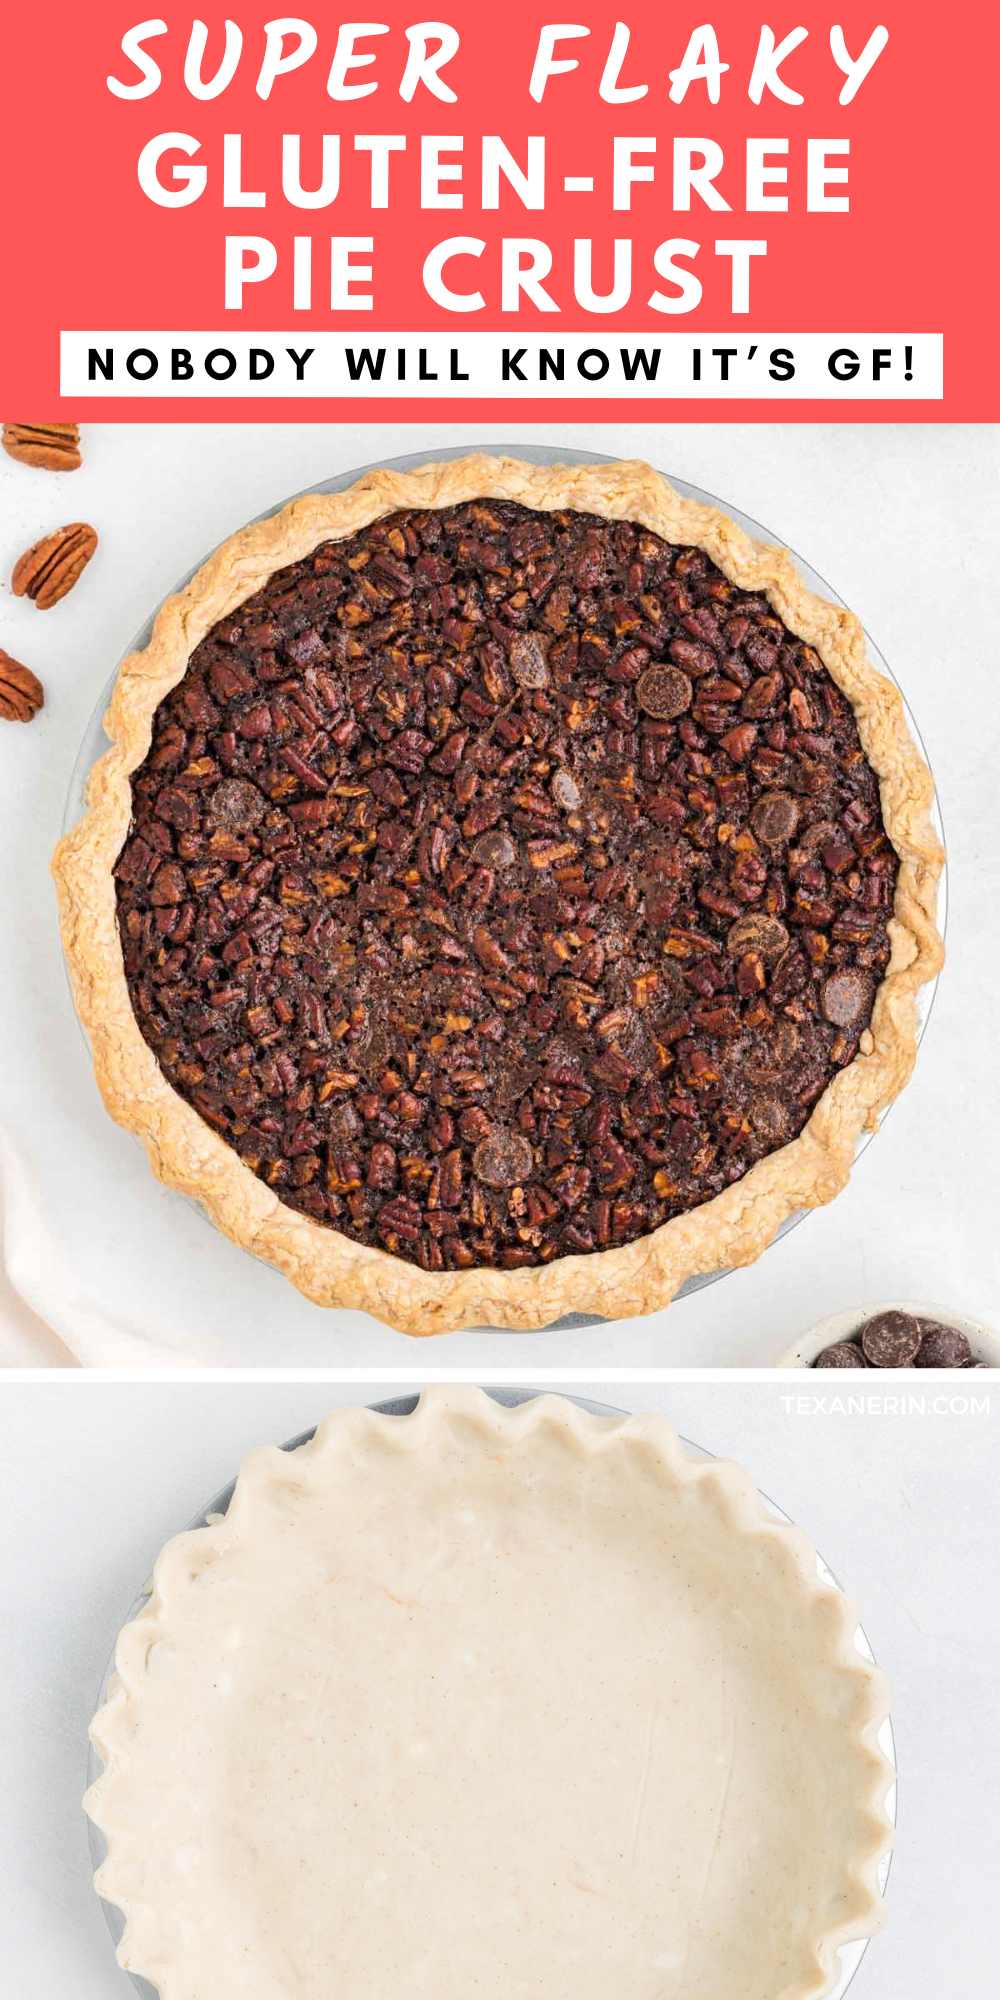
This gluten-free pie crust recipe is perfect for a variety of pies. Its buttery, melt-in-your-mouth texture makes it the best gluten-free pie crust I’ve ever tried. It takes just 5 minutes to mix together and 30 minutes to bake – making it an easy and delicious gluten-free dessert option. Once you’ve tried this crust, you’ll never go back to store-bought again! Now with a dairy-free and vegan option. It can also be made with all-purpose flour!
After 11 years of experimenting during the holiday season, I’ve finally created a flaky pie crust recipe that I absolutely love!
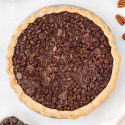
Yesterday, I shared my Cocoa Pecan Pie and realized that this outstanding crust shouldn’t be confined to just one pie recipe that not everyone may be interested in.
For years, I’ve expressed my disdain for regular, flaky pie crust, finding it mundane and not worth the calories. However, this particular crust is a game-changer! I cringe whenever I see food bloggers use that word, but here, it’s true. 😬
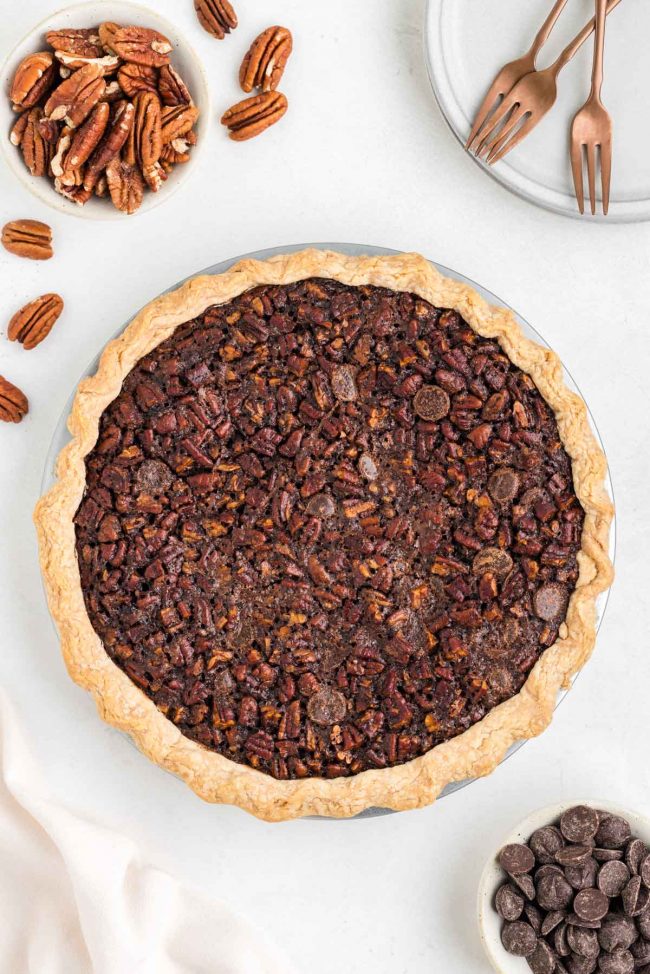
To add flavor, I added vanilla, a little sugar and a bit more salt than usual.
Does it taste gluten-free? Absolutely not. If you change anything at all about the recipe, it probably will. You need to follow the directions and ingredients list exactly.
Once I finally nailed the recipe and prepared my first pie with it, it sounded like I was crushing a bag of chips as I cut through it. I couldn’t help but laugh maniacally.
After cutting a few slices, the pie slid around the pan, and I could pick up the entire pie in my hands. Not that this is something anyone ever needs to do!
It was just a test. It was a rare achievement after numerous trials with bad pie crusts that stuck, were greasy, and more.
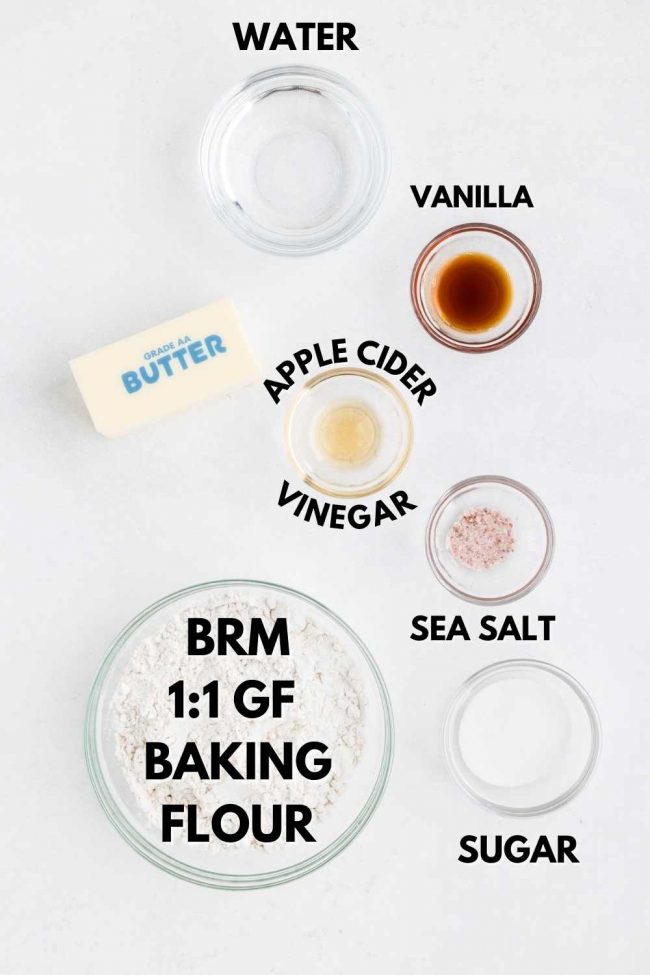
Ingredients
Here you can see what you need. I talk about each ingredient below.
What pies can I use it in?
Besides the cocoa pecan pie, I’ve successfully used it for apple hand pies (it would be great in these Gluten-free Mummy Hand Pies!), an upcoming apple pie that won’t be ready until after Thanksgiving, this Paleo Chocolate Fudge Pie, and pumpkin pie.
I normally would have waited until I had proper photos for all of these pies before posting the crust recipe, so you could see what it looks like with different filling recipes, but I wanted to post this ASAP for people in need of a crust recipe for Thanksgiving.
For the pumpkin pie, I blind baked it and used the filling from my Crustless Pumpkin Pie recipe, resulting in the best pumpkin pie I’ve ever had. However, determining the ideal baking time and temperature remains a work in progress.
I initially baked it following the crustless pie directions (I apparently wasn’t thinking, as crustless pies need to be baked at lower temps) but had to increase the temperature to 350 °F (175 °C) for an additional 15 minutes when it remained overly jiggly after 55 minutes at 300 °F (150 °C).
For the next attempt, I plan to bake it at 350 °F (175 °C) for 45-55 minutes.
But to actually answer the question – you can use it in any type of pie you’d like! I think graham cracker crusts work better for things like this No-bake Pumpkin Cheesecake Pie pie, other cheesecake-like pies, peanut butter pies, etc. – but if you’d prefer a flaky, butter pie crust, you can certainly use this recipe.
I’ll definitely be using it in this Caramel Pecan Cheesecake Pie next week!
What flour to use
As an Amazon Associate, I earn from qualifying purchases. For more info, see my disclosure.
It’s astonishing how well this gluten-free pie crust turns out using Bob’s Red Mill 1-to-1 Gluten-free Baking Flour. Despite my expectations, King Arthur Flour Gluten-free Measure for Measure Flour didn’t yield comparable results. The latter produced a crust that lacked the desired flakiness.
I was actually shocked by the results with Bob’s. I thought I had grabbed the wrong bag!
So I immediately made it again with Bob’s, got the same results, and have since made it another 10+ times with perfect results.
Then I tried it with the King Arthur GF flour, and the results weren’t anywhere near as good. Not flaky and not nearly as tasty.
Can I use another brand?
I think pie crust is the absolute most finicky thing in the world of baking. Minus fancy pastries I don’t even bother with. ;)
I really don’t recommend using a different brand.
I usually have better results with King Arthur Flour than with Bob’s Red Mill, but in this recipe, it was the opposite! And it was a huge difference.
I’m sure you could come up with an amazing crust recipe using King Arthur, but this isn’t it.
If you feel like experimenting and aren’t expecting a fantastic crust, then you can certainly experiment.
Can I use oat/almond/coconut/etc. flour?
Nope! You need to find a recipe that already calls for those types of flour. This one specially uses the Bob’s flour I talk about above.
I would recommend the oat flour pie crust in my Gluten-free Pecan Pie recipe, but it’s the weirdest thing. It works PERFECTLY in this recipe, but not in any of the others I’ve tried.
Like I said, pie crusts are finicky!
What kind of pie pan to use?
When you chill or freeze pie crust dough and then place it in a hot oven, it’s important to ensure that your pie dish is suitable for this.
Most ceramic pie dishes can handle the transition from the fridge or freezer to the oven, but it’s always a good idea to check the manufacturer’s instructions. Ceramic dishes heat up slowly and evenly, and are resistant to sudden temperature changes.
With Pyrex or glass bakeware, it’s best to avoid extreme temperature changes as it can cause the dish to break or shatter. Glass pie dishes are great because you can easily check if the bottom has browned, but it’s not recommended to put them directly from the freezer into a hot oven.
Modern oven-safe glass pans are designed to handle moderate temperature changes, so it’s generally safe to transfer them from the fridge to an oven set at 350 °F (175 °C). However, if you’re using an older dish, it’s better to err on the side of caution and avoid sudden temperature changes unless you’re confident it can withstand it.
Metal pie dishes, typically made from aluminum or aluminized steel, are excellent heat conductors. They are perfect for blind baking or prebaking pie crusts to achieve a crispy texture.
Metal dishes can endure extreme temperature changes, allowing you to put them straight from the fridge or freezer into a hot oven. Just keep a close eye on them, as they can heat quickly and cause the crust to overbrown. I have this Norpro one, which is stainless steel, and love it.
If you notice the crust browning too fast, you can use foil strips or a pie shield to protect the edges.
Type of butter
This pie tastes worlds better with US European-style or actual European butter (by that, I mean butter produced in and for a European country – not butter exported to the US from Europe). I found it to be quite boring with regular US butter.
The butter thing is a bit confusing, but US European-style butter, like Kerrygold or Plugra, works the same as US butter. They can be used interchangeably.
However, actual European butter from Europe is not interchangeable with US butter or US European-style butter in every recipe. Especially pie crusts!
I can’t understand why actual European butter works differently than US European-style butter. I’ve looked up the fat percentage of a few brands of US European-style butter, and they’re 82%, just like our butter in Europe. It makes zero sense.
But I can tell you, after having lived in Germany for 14 years, the two types of butter aren’t interchangeable. I have a supply of US butter in my freezer and test all of my baked butter-containing recipes with both types of butter so I can see the difference side by side.
So on the huge off chance you’re in Europe and have access to US all-purpose flour or the Bob’s Red Mill GF flour I talk about below, you need to use 110 grams of butter + 3 grams of water in place of 113 grams of butter.
It sounds silly, I know, but it makes a big difference for crust recipes.
The reason I mention the flour is because it can also be hugely different depending on where you live. It’s best to find a pie crust recipe from the country where you live.
So many US expats I know here spent their first holiday seasons confused about why their pie crusts were swimming in butter or why their cookies spread totally flat and were a greasy mess. The butter and flour are the culprits!
Can you taste the apple cider vinegar in the crust?
Absolutely not. If you don’t have any on hand, you can use white vinegar.
Some people say the vinegar inhibits the gluten (if you’re using all-purpose flour), which tenderizes the crust, making it flaky. I’ve seen people claim the same is true for gluten-free pie crust, although it doesn’t have gluten.
I used vinegar in pie crust for the first time with today’s recipe. Then I read this experiment. And they said it didn’t have an effect.
Vodka, however, seems like a great addition! I’ll definitely try that next time. For now, I’m thrilled with this crust, exactly as it is, for the first time ever making a flaky pie crust, so I’ve included the vinegar in the recipe.
Does it work in a deep dish pan?
Yes, but there’s not enough dough to crimp the edges. It’s just the perfect amount for crimping with a standard 9″ pan.
Do I have to chill the dough?
A great pie always starts with an exceptional crust. One way to achieve perfection is by chilling the dough and allowing it to rest briefly before rolling it out.
Although this may seem like an insignificant step, it’s actually the secret to achieving the best crust, even when using gluten-free flour.
Refrigerating the pie dough, whether it’s gluten-free or not, solidifies the fat, preventing it from overmixing into the flour. This helps maintain the structure of the crust as it bakes. Additionally, the flour absorbs the moisture in the dough, resulting in a flakier texture.
Non-chilled dough also tends to be less smooth and crumbly, making it more difficult to roll out. It also has a tendency to brown quickly and become tough.
Therefore, it’s crucial not to skip this step, as it’s really the best way to achieve a super flaky crust.
Should I blind bake the pie crust?
While blind baking isn’t mandatory, it yields an extra-crisp crust bottom. The process involves freezing the crust, preheating the oven, covering the crust with parchment paper and pie weights/beans, and baking until lightly browned.
Full instructions are below in the recipe!
What kind of pies to blind bake
Blind baking is typically recommended for pies with wet or custard-like fillings, as it helps set the crust before adding the filling.
Here are some types of pies that are commonly blind baked:
- Custard pies – pies with custard fillings, such as quiche or pumpkin pie, benefit from blind baking to ensure the crust is fully cooked and doesn’t become soggy. Because a soggy crust is really a sad, unfortunate thing.
- Cream pies – pies featuring luscious, creamy fillings, such as chocolate cream or banana cream pies, often have a blind-baked crust to maintain its crispness.
- Pies with no-bake fillings – you need to prebake your flaky, traditional pie crust if you’re not going to be putting it in the oven to cook the filling. For a fully prebaked pie crust, you need to bake it just a few minutes longer than a partially blind baked crust.
- Tarts – both sweet and savory tarts often call for blind baking to achieve a crisp, flaky crust, especially if the filling is moist.
Can I just dock (poke holes in) the dough instead of using pie weights/beans?
Docking the pie dough is an alternative method to using pie weights or beans, and it’s effective in certain situations. It doesn’t work in all recipes, though.
Docking means pricking the bottom of the crust with a fork to create small holes, which helps prevent the crust from puffing up during baking.
However, it’s important to note that docking may not be appropriate for all types of pies, especially those with very liquid or heavy fillings. In such cases, using pie weights or beans are recommended to provide additional support and prevent the crust from slumping or bubbling up excessively.
If you’re making something with a no-bake filling, like strawberry pie, and you need a fully baked pie crust, then docking is fine. If you’re going to be partially or mostly baking your pie crust before returning the crust with its filling to the oven, then blind baking with pie weights is much more preferable.Then you don’t have to worry about the wet pie filling saturating the holes and making the crust soggy.
What kind of beans can I use?
When using beans as pie weights for blind baking pie crust, use dry, uncooked beans. The type of beans doesn’t significantly impact their effectiveness as weights, so you have the flexibility to use lots of different varieties. Some commonly used beans for blind baking include:
Chickpeas, lentils, black beans, and pinto beans.
It’s important to designate a set of beans specifically for this purpose, as they can’t be cooked and eaten after being used as pie weights. Once you’ve used them for blind baking, store them in a separate container for future use with your next pie.
Do I have to bake the pie crust on a baking sheet?
No, but it’d be extremely silly not to. This is why:
- It’s much easier to remove the pie from the oven when placed on a baking sheet.
- I’ve made this pie crust loads of times over the past few months, and I’ve never had issues with butter melting from the crust. However, individual variations, such as a slightly smaller pie pan or differences in butter brands, might come into play.
Imagine the disappointment of having to pull a pie out of the oven after just 10 minutes of baking because of burned butter at the bottom of your smoke-filled oven. Cleaning up the mess becomes necessary before returning the pie to the oven, potentially compromising the crust and the entire pie.
Using a baking sheet entirely avoids this frustrating and unfortunate situation. - Cook’s Illustrated conducted an experiment. They baked a cherry pie directly on the oven rack, resulting in a soggy, juice-soaked crust. In contrast, the pie baked on a baking sheet had a solid, non-soggy crust. You can find the detailed explanation at the provided link (as this post is already quite long!).
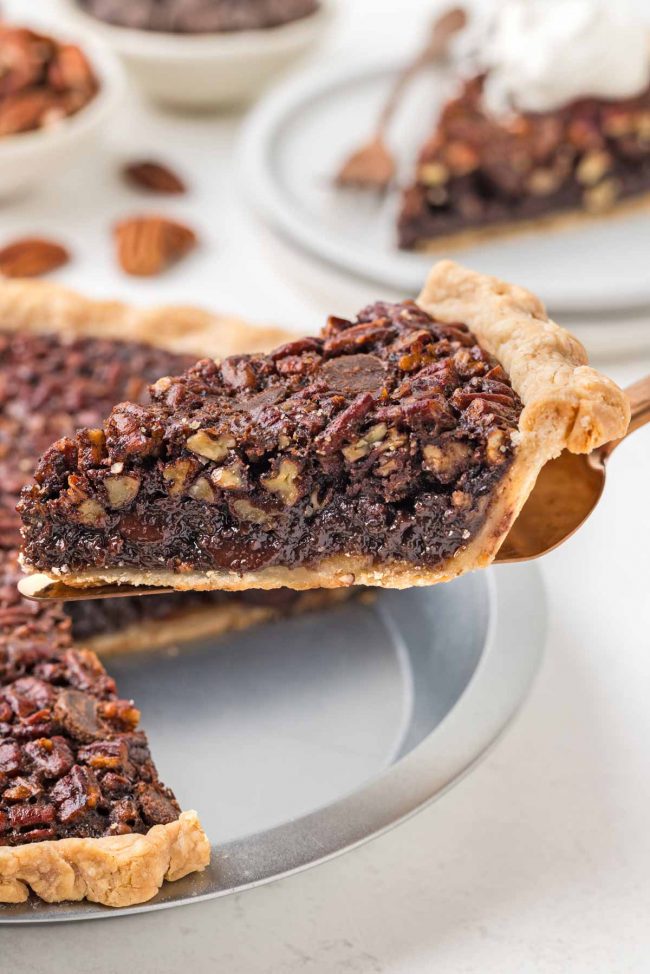
Look at the crust below. This wasn’t even blind baked, and it’s far from soggy! I implore you to bake the pie on a baking sheet. :)
How to store a prebaked pie crust:
- Allow the prebaked pie crust to cool completely at room temperature in order to help prevent condensation inside the storage container.
- Wrap the pie crust securely in plastic wrap or aluminum foil, and then place in a Ziploc bag. Make sure it’s well covered to prevent exposure to air and moisture.
- It can sit at room temperature for up to 3 days or be frozen for up to 2 months.
- When you’re ready to use the prebaked pie crust, thaw it in the fridge for a few hours or overnight. Thawing at room temperature can lead to sogginess
That’s because thawing a prebaked pie crust at room temperature can cause condensation to form on the surface as the crust warms up, especially if it’s been stored in the freezer. This condensation introduces moisture, which can seep into the crust and make it soggy, particularly at the base.
By thawing the crust in the fridge, the temperature rises gradually, minimizing condensation and preserving the crust’s crisp texture.
Dairy-free and vegan version
Update! As requested, I tried this out with vegan butter.
Violife is the only plant-based butter brand that we have in Germany that is also sold in the US, so that’s what I was able to test it with. I have no idea how other brands will do because I haven’t tested any other brands.
I used 113 grams Violife. I only need 3 tablespoons of water, and it was just as easy to work with as the butter crust. I only needed to blind bake it for 20 minutes before removing the parchment paper and pie weights, and then I baked another 5 minutes. I made an apple pie with a lattice top. I used real butter for the top so I could compare the two.
The flavor is definitely better with real butter, but if you like the taste of Violife, then I think you’d like this crust. It somehow reminded me a bit of popcorn, which I didn’t like so much, but eating the crust with the filling was something else. It was really amazing!
I made a caramel apple pie (recipe’s not ready), so the filling is kind of gooey. I don’t know if the crust would be as great with something not gooey.
I tried Violife on its own, and the taste weirded me out a bit, so I think that may be my issue. With butter, the crust is so delicious that I couldn’t stop picking at the lattice crust. I definitely didn’t do that with the Violife crust.
It wasn’t as flaky, but almost there. With real butter, you can see the layers in the baked crust. With Violife, it was like you could almost see them. But they didn’t quite form. Violife crust was just as crisp as the butter one.
And the bottom crust is super crisp! I’m amazed.
We don’t have Miyoko’s here, so I can’t compare it with that. If anyone tries it, please report back here! Or if anyone tries with any other brands. Are there any brands that really taste just like butter?
I hope you’ll enjoy this pie crust! I would absolutely love to hear what you think if you try it out. Thanks so much! :)
Gluten-free Pie Crust
- Prep Time:
- Cook Time:
- Ready in:
- Yield: 1 pie crust
Ingredients
- 1 1/4 cups (173 grams) Bob's Red Mill 1-to-1 Gluten-free Baking Flour + a tiny bit more for flouring
- 1 tablespoon granulated sugar
- 1/2 teaspoon fine sea salt
- 1/2 cup (113 grams) unsalted butter (taste is better with European-style butter1 like Kerrygold or Plugra) or Violife vegan butter for dairy-free/vegan, cut into 8 pats
- 1 teaspoon cold2 vanilla extract
- 1/2 teaspoon cold apple cider vinegar
- 2.5 to 5.5 tablespoons (37-81 grams) cold water
Directions
- Get out a 9” (23cm) pie plate that’s oven-safe and suitable for transitioning from the fridge or freezer to a hot oven (refer to the post for additional information - I use this one). Do not grease.
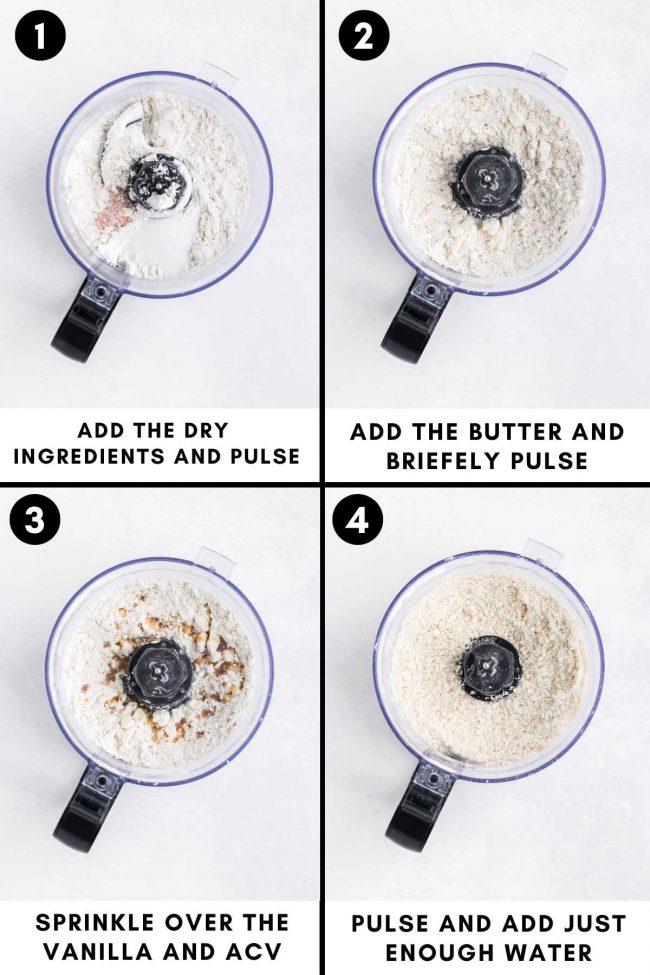
- In the bowl of a food processor equipped with an S-blade, combine the flour, granulated sugar, and salt. Pulse a few times.
- Switch the processor to the lowest speed and add the butter. Process until you have pea-sized bits of butter; avoid overprocessing.
- Evenly drizzle vanilla extract and apple cider vinegar over the mixture.
- At the lowest speed, pour in 2.5 tablespoons of water. The required water quantity depends on factors like the temperature of your ingredients and kitchen. Through multiple trials with the same brand of ingredients, I've found a range between 2.5 and 5.5 tablespoons.
- Process briefly until the dough starts coming together; it should have a shaggy appearance rather than forming a uniform ball. Pinch some together, and if it holds without being excessively crumbly, it's ready. Be cautious not to add too much water, as an excess leads to a non-flaky pie crust. If needed, add more water, 1 teaspoon at a time. If you can form a disc without it crumbling apart, it's another indication that it's ready.
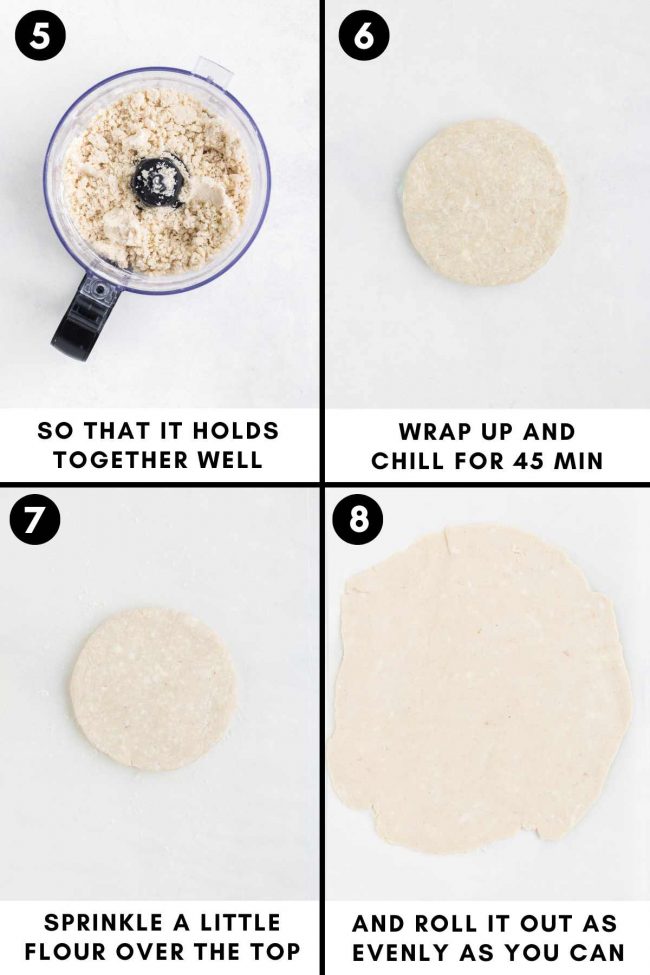
- Place the dough in the center of a large piece of plastic wrap and shape it into a flat disc, approximately 1” (2.5cm) or slightly less. If it remains crumbly and doesn't form a disc, it requires a touch more water.
- Chill the dough for a minimum of 45 minutes and up to 2 days.
- Lightly flour a piece of parchment paper and place the unwrapped dough on it. Sprinkle a small amount of flour over the dough.
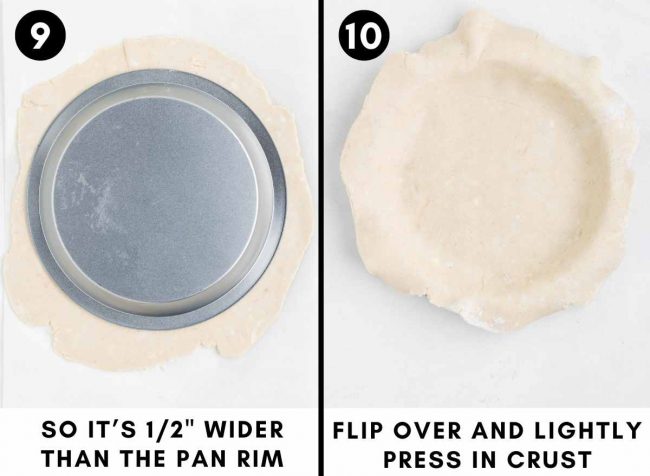
- Cover the dough with plastic wrap or another piece of parchment paper and roll it out to be approximately 1/2” (1 1/4 cm) wider than the top circumference of your pie plate.
- Remove the plastic wrap or parchment covering the pie crust, place the ungreased pie pan on top of the dough, and flip over the dough and pan. Press the dough down around the edges at the bottom of the pan, then remove the parchment paper.
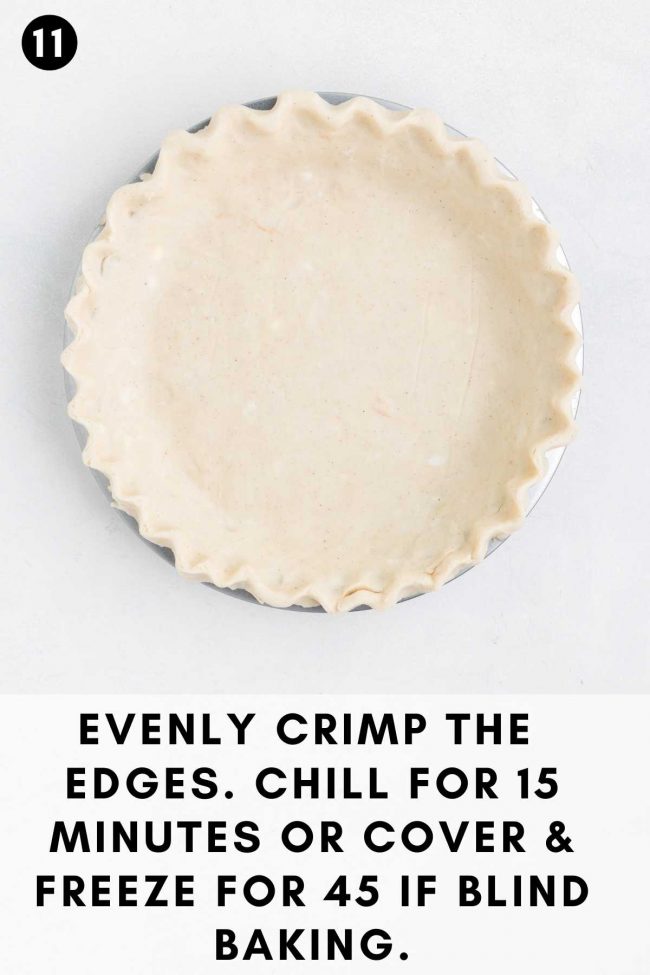
- Fold the dough so that it aligns with the edges and crimp the rim.
- If your recipe calls for baking the filling in an unbaked pie crust, then chill the crust, uncovered, for 15 minutes before filling and following your pie recipe instructions.
- Cover the pie crust loosely with plastic wrap and transfer it to the freezer (not the fridge!) for 45 minutes.
- While it chills, preheat the oven to 400 °F (205 °C) and position a baking sheet on the lower third baking rack.
- Line the crust with parchment paper and fill it with pie weights or beans. Many suggest filling them to the top, but I found success just filling the bottom.
- Gently place the pan on the now-hot baking sheet and bake for 20-23 minutes or until the crimped edges lightly brown.
- Remove the weights and parchment paper and continue baking the crust for an additional 5-7 minutes or until the crust's bottom is dry and beginning to brown. If you need a fully baked pie crust (like for a pie with a no-bake filling), bake until the bottom of the crust is a nice golden brown - about 1-3 minutes more.
- Remove the pan from the oven and let it cool on a wire rack for about 30 minutes before filling. Letting it cool for at least 30 minutes ensures a crisp crust.
Prepare the dough:
How to roll it out:
How to blind bake:
Notes
- If you live in Europe, use 110 grams butter to replicate US butter for the pie crust. Instead of 84 grams of butter in the filling, use 82 grams (and no water). Also use medium EU eggs instead of large eggs.
- I put the vanilla and apple cider vinegar together in a tiny bowl in the freezer for about 10 minutes, and the same with the water. I don’t put the vanilla/ACV and the water together in the same bowl because you might not use all the water.


36 comments on “Gluten-free Pie Crust Recipe” — Add one!
2 comments are awaiting moderation!
Even though I live in Ireland and have access to delicious Kerrygold I used plant based butter for my family and followed as comments suggested and it came out delicious! I used it for apple pie last weekend for my neighbour’s birthday :)
Woohoo! I’m so glad that it worked out well with your plant-based butter. I hope that your neighbor enjoyed the pie and that they had a great birthday! Thanks so much for your comment. :)
I made this for Thanksgiving. I also used your cocoa pecan pie filling and will comment over there, but wanted to post here as well to say this pie crust is amazing. ♥♥♥♥♥ Nobody in my family knew that it was gluten-free. They thought I had bought a gluten pie at the bakery! I used Kerrygold (I’m in Michigan) and it was so perfectly buttery and flaky. I’ll be using this recipe from now on. No need for another! Thank you so much.
You’re welcome! I’m so glad that the crust was a hit and that you feel like you don’t have to try another GF pie crust recipe. I’m 100% with you on that! I also love that your family thought it had come from a bakery. I bet you felt so triumphant. 😂 I would have, at least! Thanks a ton for your feedback. :)
Hi Erin, quick question; my pie pan just came and I was looking over the recipe to figure out what I would need. I’m getting a different calculation for the 1:1 flour.
I’m assuming it’s the blue package of Bob’s 1:1 gluten free flour. If so, I’m coming up with 186 g based on the nutritional information on the package which says 1/4 cup = 37 g x 5 (1 1/4 cups for your recipe) so 37×5=186.
I’m probably getting this all wrong. So let me know when you can so I don’t mess this recipe up. Because me and pie crust have a long history and it’s not pretty 😆
** thanks for the gift guide you posted. If anyone reading this is looking for a great gift for someone who likes to cook or bake, check the gift guide out. Every product on there is top notch. I already had most of the items but I ordered the pie pan and just received it. It is such good quality and stainless steel. it’s perfect for going from the freezer to the oven for the perfect gluten-free pie crust!
Hello! I’m sorry for just now answering. It was almost 1am when you commented, and I just got my kid off to kindergarten, so I’m here now. :D And yes, it’s the blue bag! The one in the red bag is called Gluten-free All-purpose Flour. I’ll add that (blue vs red bag) to the post in case people think it’s the same stuff.
Please use the number of grams given in the recipe. Bob’s has some issues with a few of their gram measurements. Like with their arrowroot starch measurement (I think I talked about it in my paleo air fryer cookies recipe), you would really have to pack it into the cups, very tightly, to get what they list. But that’s not how you measure flour! I’ve written them about it, but they just say the measurements are correct. 🤷♀️
The 1-to-1 flour isn’t that drastic of a difference, but 138 grams is what I got after measuring it several times, with different scales (including 2 which measure accurately to .1 gram), and the end results of the baked goods are closer to the regular versions made with AP flour. I tried a few times using 148 grams, and the goodies were a little too dense. So I always use 138 grams per cup for that exact flour.
And oh, you are so nice to recommend my gift guide! Thank you. Here it is if anyone else is reading this. I’m thrilled that you like the pan, and I’m very, very happy you’re not going to risk moving one of your glass pans from the freezer to oven. :)
I hope you’ll enjoy the crust! :) Maybe in another 11 years we’ll have a new paleo flour (and paleo “butter” that tastes just like real butter) and I can post a paleo version. 😂 Sounds impossible, but I think cassava flour was only available in the US starting in 2014. So maybe there’s still hope for a magical paleo pie crust that doesn’t get soggy so quickly!
I just used this crust for my apple pie on Thanksgiving and it was perfect! It was buttery and flaky, just like I like my crust. I will definitely use it from now on!
That’s so nice to hear! I’m glad the recipe is a keeper and that you found it flaky. :) Thanks so much for your feedback!
I made a perfect strawberry pie with this crust! I love the buttery taste and it was great with my strawberry filling recipe. Next time I’ll double the crust and freeze one so I can have the crust ready to go the next time I’m in the mood for pie. My parents didn’t believe me that this pie was GF! Thanks for sharing your recipe with everyone.
You’re welcome! And how awesome that your parents didn’t think it was gluten-free. :) Thanks a bunch for your feedback! A strawberry pie sounds so delicious right now after all this Thanksgiving food. I can’t wait to try it with this crust! Thanks for the idea.
In live in the USA and will be using Kerigold butter from Ireland. Would i treat this as european butter as you mentioned? Thank you
Btw this crust looks amazing and i can’t wait to try it!!
Hi! My photographer in the US made the pie crust last night for her Thanksgiving pie and used Kerrygold. The crust is more yellow (since the butter is more yellow) and looks a bit wetter than the crust in the photos here. I would recommend using 110 grams of Kerrygold and ignore the part about adding an extra 3 grams of water. I hope you’ll enjoy it!
Thank you for your help!! It was a success. Very flaky crust. This recipe is a keeper.
You’re welcome! And that’s great to hear. :) Thanks so much for coming back to let me know how it turned out! I hope you had a great Thanksgiving.
Hi! I love all your thorough recipes! So educational! They are truly helpful! I know your don’t cover this, but do you think a non-dairy butter like from Violife would work? I’m thinking I’ll try it out anyway and I’ll let you know how it goes. Thank you so much!
Hi! I’m so glad to hear that you love them! :) I’ve never used non-dairy butter, so I really can’t say. I can’t have or don’t like the ingredients in most of the brands I’ve found, and we also have different brands here, so having me try out German brands is pretty useless. But wait – is this the Violife butter you’re talking about?! Where do you live? We actually have that here! It says 79% fat, which sounds very promising. But given that actual European butter that I buy here in Germany with 82% fat and US European-style butter sold in the US, also with 82% fat, don’t work interchangeably, I really can’t say how it’d work. My husband is out grocery shopping now, and I asked him to look for it. If he doesn’t find it, I can order from a website, but only starting tomorrow, and then I could make a pie on Wednesday. Sorry that’s a bit late! And thank you so much for your dairy-free butter tip! That would be fantastic if that’s easy to find in different countries. :D
I’m very interested to hear the results of this! I cook with Miyoko’s European Style Plant Milk Butter and would be thrilled if it worked in this recipe.
I have the Violife product Barbara mentioned arriving tomorrow and will move the pie making up to tomorrow morning. :) My family will have to live with 2-day old pie for Thanksgiving 😆 (just kidding – they won’t even notice!)
Thank you for the quick and thorough response! I feel greatly encouraged to try your recipe with the Violife butter. I also use the Miyoko’s brand occasionally and it would be fun to compare the two. Hmmmmmmmmmm… maybe we’ll forgo all the side dishes and just have pie this year? ;)
You’re welcome! Can you please let me know where you live? Because if you live in the US and have access to Violife, then that would be super. :) The pie should be done around 9am ET. I’ll report back once I know if it works or not!
Sorry for forgetting to include that tidbit. I live near Seattle, WA
No worries! And yay! That’s great news. When I look at the Violife website, all I see are UK locations (I’m not even in the UK), so I wasn’t sure if you could get it in the US. Thanks a bunch!
Barbara, how did your pie turn out?? I just know it was delish! I saw your comment in reply to mine. Hope you had a nice Thanksgiving!
The pie crust turned out delicious and very flaky. I’m not sure if it was the butter, but it came together in a ball very quickly with only 1 Tablespoon of water. But, perhaps I should have added more 🤔 because it needed to be pieced together into the pie pan 🙃 Overall, my GF, DF, Egg Free, Soy Free daughter was thrilled and happy to have a pie she could share and enjoy with family and that’s what it’s all about, right?! Without your encouraging post and comments, Erin, I would have once again just made a crisp for my daughter to share at the family meal. Thank you so much!
You’re welcome! I’m thrilled that you daughter was thrilled. :) But wow! 1 tbsp of water. Looking at the cracks in the crust, I think you’re right and that you needed more water. Did you use Violife or a different brand?
What a great idea to add photos to the Google link! I just thought about maybe adding a Google album link to every post, but I can imagine some naughty people would be adding nonsense. Hmm.
Your pie looks great. I know the problem with the filling looking and smelling burnt. I had that for the first time with my cocoa pecan pie. It was very strange, but tasted 100% not overdone at all once it had cooled! Thanks a ton for coming back to report on how the crust came out and for the photos!
I just made it with 113 grams Violife. I only need 3 tbsp of water and it was just as easy to work with. I only needed to blind bake it for 20 minutes before removing the parchment paper and pie weights, then baked another 5 minutes. I made an apple pie with a lattice top. I used real butter for the top so I could compare the two.
The flavor is definitely better with real butter, but if you like the taste of Violife, then I think you’d like this crust. It somehow reminded me a bit of popcorn, which I didn’t like so much, but eating the crust with the filling was something else. It was really amazing! I made a caramel apple pie (recipe’s not ready), so the filling is kind of gooey. I don’t know if the crust would be as great with something not gooey.
I tried Violife on its own, and the taste weirded me out a bit, so I think that may be my issue. With butter, the crust is so delicious that I’ve picked off and eaten half the lattice crust while writing this comment. I don’t feel compelled with do that with the Violife crust.
It wasn’t as flaky, but almost there. With real butter, you can see the layers in the baked crust. With Violife, it was like you could almost see them. But they didn’t quite form. Violife crust was just as crisp as the butter one.
And the bottom crust is super crisp! I’m amazed. It’s only been out for 20 minutes, so I’m going to go nap (not much sleep last night), and then take a few cell phone photos and link to them here.
We don’t have Miyoko’s here, so I can’t compare with that. If anyone tries it, please report back here! Or if anyone tries with any other brands. Are there any brands that really taste just like butter?
I originally wrote a longer comment, wanted to save it before hitting submit in case something silly happened, and instead of copying my text, I accidentally refreshed the page and deleted what I had written. 🤦♀️ I hope I didn’t miss anything, repeat things, etc.!
I’m having trouble uploading the photos, so here’s a Google album with 4 photos. I didn’t attempt to make the pie look nice. 😆 If you take the time to do so, it’ll look as nice as the photos in the post. The crust was easy to work with!
Wow!!!! Thoroughly impressed!!!! I would totally be very happy to present that! Very interesting that you still need to blind bake the crust, or is that only for the specific pie you did? Would a pumpkin pie or the chocolate pecan pie also need the crust pre baked? So encouraged the Violife product worked! Thank you so very much!
You’re welcome! That pie was a mess but still delicious! I’m not positive that I had to blind bake it, but I had time and enough Violife to make it one time, and so I went with what I thought was more guaranteed to be a success. :) The pie crust in the chocolate pecan pie wasn’t blind baked, and it came out great, but I can’t be sure that it will in every recipe. This was my first time baking with it, but it browned at the same rate as the butter version and was so crisp on the bottom, that I’m pretty sure you don’t have to blind bake the chocolate pecan pie with Violife. I would always blind bake a pumpkin pie, though. That filling is so wet and can make for soggy crust. Please report back if you try it, and have a nice Thanksgiving!
I’ve added photos to your Google link, of my crust prior to baking and after baking with the pumpkin pie filling. The pie filling looks burnt (no clue why), but is delicious and not burnt. I covered the edge of the crust for the bulk of the pumpkin filling cook time as I didn’t want it to overcook.
Hi Erin, first I have to say I just love love love all the detail in your posts. I feel like I learn new things every single time. I can definitely say that here!
I am not good at pie crust. I tend to roll them out unevenly because I don’t know how to keep even pressure and it seems I always either leave the butter in too large of pieces or don’t leave them large enough by over mixing. Ugh. I really suck at finicky things.
That being said, you’ve given me the confidence to give this a try with your detailed post. I do have a question though because I don’t know what you mean by US European butter. Can you give maybe a brand-name or two? I have Kerry Gold butter but I don’t think that’s what you’re talking about. My other butter is all organic and grass fed which tends to be pretty rich tasting. We use way more ghee than butter these days though but I think the milk solids are needed here.
If you don’t recommend either of those then I am probably out of luck. Unless you think butter flavored coconut oil would work. It’s just organic refined coconut oil with annatto. I wish I could use that but I know you said no subs, which I understand in a gluten free pie crust recipe that we want to turn out well.
I also do not own a metal pie pan, only glass. One of mine may be ceramic but I’m not sure how to tell….yikes. For some reason I have like 10 pie dishes in different configurations & sizes yet I hardly ever bake pie 😆 Mostly because I don’t like gluten free piecrust! Your promises always come true in each recipe I’ve made of yours over the years so I know that that will change with this recipe.
That cocoa pecan pie literally had my mouthwatering. What a great post that was! Pecan pie is my absolute favorite dessert of all time and chocolate is my kryptonite! The two together.. ♥️
Not sure what type of pie I’m going to make yet though. in any case, thanks in advance for all of your help and all of the amazing information you are putting out into the web-o-verse!
Hi Holly! I’m so glad you feel like you learned something. The last two posts felt like very important school essays. I am exhausted. 😆 Kerrygold is great! I’ll update the post with some more info on brands. I just found out that’s what my photographer (in the US) uses when she makes my recipes (except for this pie crust – she used normal US butter as she had run out, but she’ll be making my apple pie recipe later this month with Kerrygold, and then people can see that the crust is a bit more yellow with that). And her baked goods always look exactly like mine, and that’s how I know it’s interchangeable. I hope that makes sense! I know the butter thing is confusing.
I wouldn’t bother with ghee. Maybe it’d work, but I really have no idea. I highly recommend you use Kerrygold! I’m sure coconut oil wouldn’t work as it’s 100% fat.
If you’ve used your glass pie pans to go from fridge or freezer to a hot oven, it should be fine. But I feel uncomfortable telling anyone to use glass. It makes me way too nervous! Even if the package said it’s possible, I would still be paranoid and not do it (although this is silly of me). 😄 And putting the cold pie plate on a hot baking sheet instead of just a hot oven rack makes me even more paranoid. If you’re paranoid, as well, perhaps you could trade one of your pie pans with someone for a few days? :)
I know you usually don’t use granulated sugar (or maybe just try to avoid it?), so what type of sugar are you planning on using? Because I don’t believe any keto sweetener would work here, as they don’t brown. I know about allulose, but it browns much faster, so I don’t think it’d be good here. That said, I’ve never actually used it. But if you don’t use granulated sugar, I can’t say how the crust would come out.
I hope you’ll love it if you try it out! I’m making another pie with it in 2 days, just because I want to, which is a rarity for me. :D The crust was so good that I was picking off the crust from a few of the pies I made with it. I know you also prefer cookie crusts, and this doesn’t taste like a cookie crust at all, but the buttery flavor was SO good. Happy Thanksgiving! :)
Hi Erin! I just read Barbara’s post above and you are just the sweetest person ever. I swear! All the things you’ve helped me with recipe-wise the last few years and then buying special butter to make this pie for Barbara. If they gave out awards for the most thoughtful, kind and considerate (and most talented) blogger – you would take the cake. Or pie in this case! You should honestly be on Food Network or something.
Side note**If you ever test with Miyoko’s please do a post about that. We don’t really use Violife because of the ingredients but we do use Miyoko’s since my husband can’t tolerate dairy. The grass fed Ghee we buy is SO expensive to use as a sub for butter that I am always looking for healthy clean ingredient alternatives for dairy free. I’ve had really good success with Miyokos in most of my g-free/dairy free baked goods but I’ve never done something as finicky as a piecrust.
Also, to answer your question about the sugar because it’s only 1 tablespoon I’m going to use organic cane sugar. I always keep some on hand for things like this. If it were a larger amount I probably just wouldn’t make the recipe or would try to sub it out. I know sugar plays a big role in browning and crisping things up so I’m going with your exact recipe!
I know I’m going to love this crust. Which is sad because It’s something that I probably will only make on special occasions because of all the starches in the ingredients of Bob’s 1:1. I feel like that flour mix does wonders with gluten free baking but it’s pretty much all starch. Ugh. Why can’t broccoli taste like pie?!?! 🤷🏽♀️
Happy Thanksgiving Erin!!
Oh, you are really too nice! Thanks for your kind words. :D
I got the butter and tried it out because it seems like a few people wanted to know. And since I had already done all the hard work (working on pie crusts for 11 years during the fall and hating them all until now 😆), it was just a matter of trying it out and saying if it worked or not. I made an apple pie with a lattice top with it and don’t think I’ll ever do that again. 😆 My Swedish apple pie takes a fraction of the time and doesn’t leave me exhausted afterwards. My goodness.
We don’t have Miyoko’s here, so I won’t be able to test that. I don’t like the ingredients in Violife, either, but since you all have it in the US, I thought I’d take one for the team and just try it out. ;) It’s good to know that it works almost like butter! I wrote a review of the Violife crust in reply to Barbara in case you’re interested.
And great with the sugar! Good that you know not to mess with keto sweetener if you want the crust to come out properly. 🙌
And I know! These GF baking mixes aren’t great. Not healthy at all. But there’s no way to make a flaky paleo pie crust that doesn’t get soggy. Anyone who says otherwise is a liar. 😂 Just kidding. Maybe someone has figured something out during the last 1-2 years, but the “flaky” paleo pie crusts I’ve made have not been anything close to flaky.
I’m also not supposed to be having too many almonds, so almond flour isn’t the best choice for me, either. There’s not much that is. 🤷♀️ Except broccoli. 😆 And other vegetables. So, you know, things I really don’t like. 🙄 Oh well.
I hope that the crust will come out well for you! If you try Miyoko’s because of your husband, please let me know how it comes out. Happy Thanksgiving! :)
I totally agree with your comments, Holly! I’m still floored by Erin’s response to my comment! She definitely gets blogger of the year (or decade!)!
Ingredients in a product are so important, but for that one time a year to present a pie to a family that is used to traditional ingredients, having options is so useful. Let us know how the your experiment goes with Miyoko’s butter!
Aww, thanks. You two are so nice. 😊 And yes, I agree! I prefer using whole food ingredients and not these GF baking mixes, but if we were having guests over, I would absolutely just make a normal GF pie crust like this rather than one with ingredients that we would usually use for a pie crust, like tigernut flour, maple syrup and coconut oil. We like it, but it’s FAR from a classic flaky pie crust. Nobody wants that tigernut flour pie crust for Thanksgiving. 😆 If anyone else is reading this and wants something easier made with oat flour, oats and coconut oil (or butter), I have this Swedish Apple Pie that’s crustless and takes much less time. It’s what I normally make for Thanksgiving! I think I actually will be making it tomorrow as a bag of apples fell over a wooden box today and somehow all split open or got cut. Right after I had finished peeling and cutting all the apples for this pie. 😂