These mini fruit tartlets are easy to make with either a classic pastry cream filling or an even easier no-bake cheesecake filling, all nestled in a rich, buttery crust. You can make them gluten-free or use all-purpose flour.
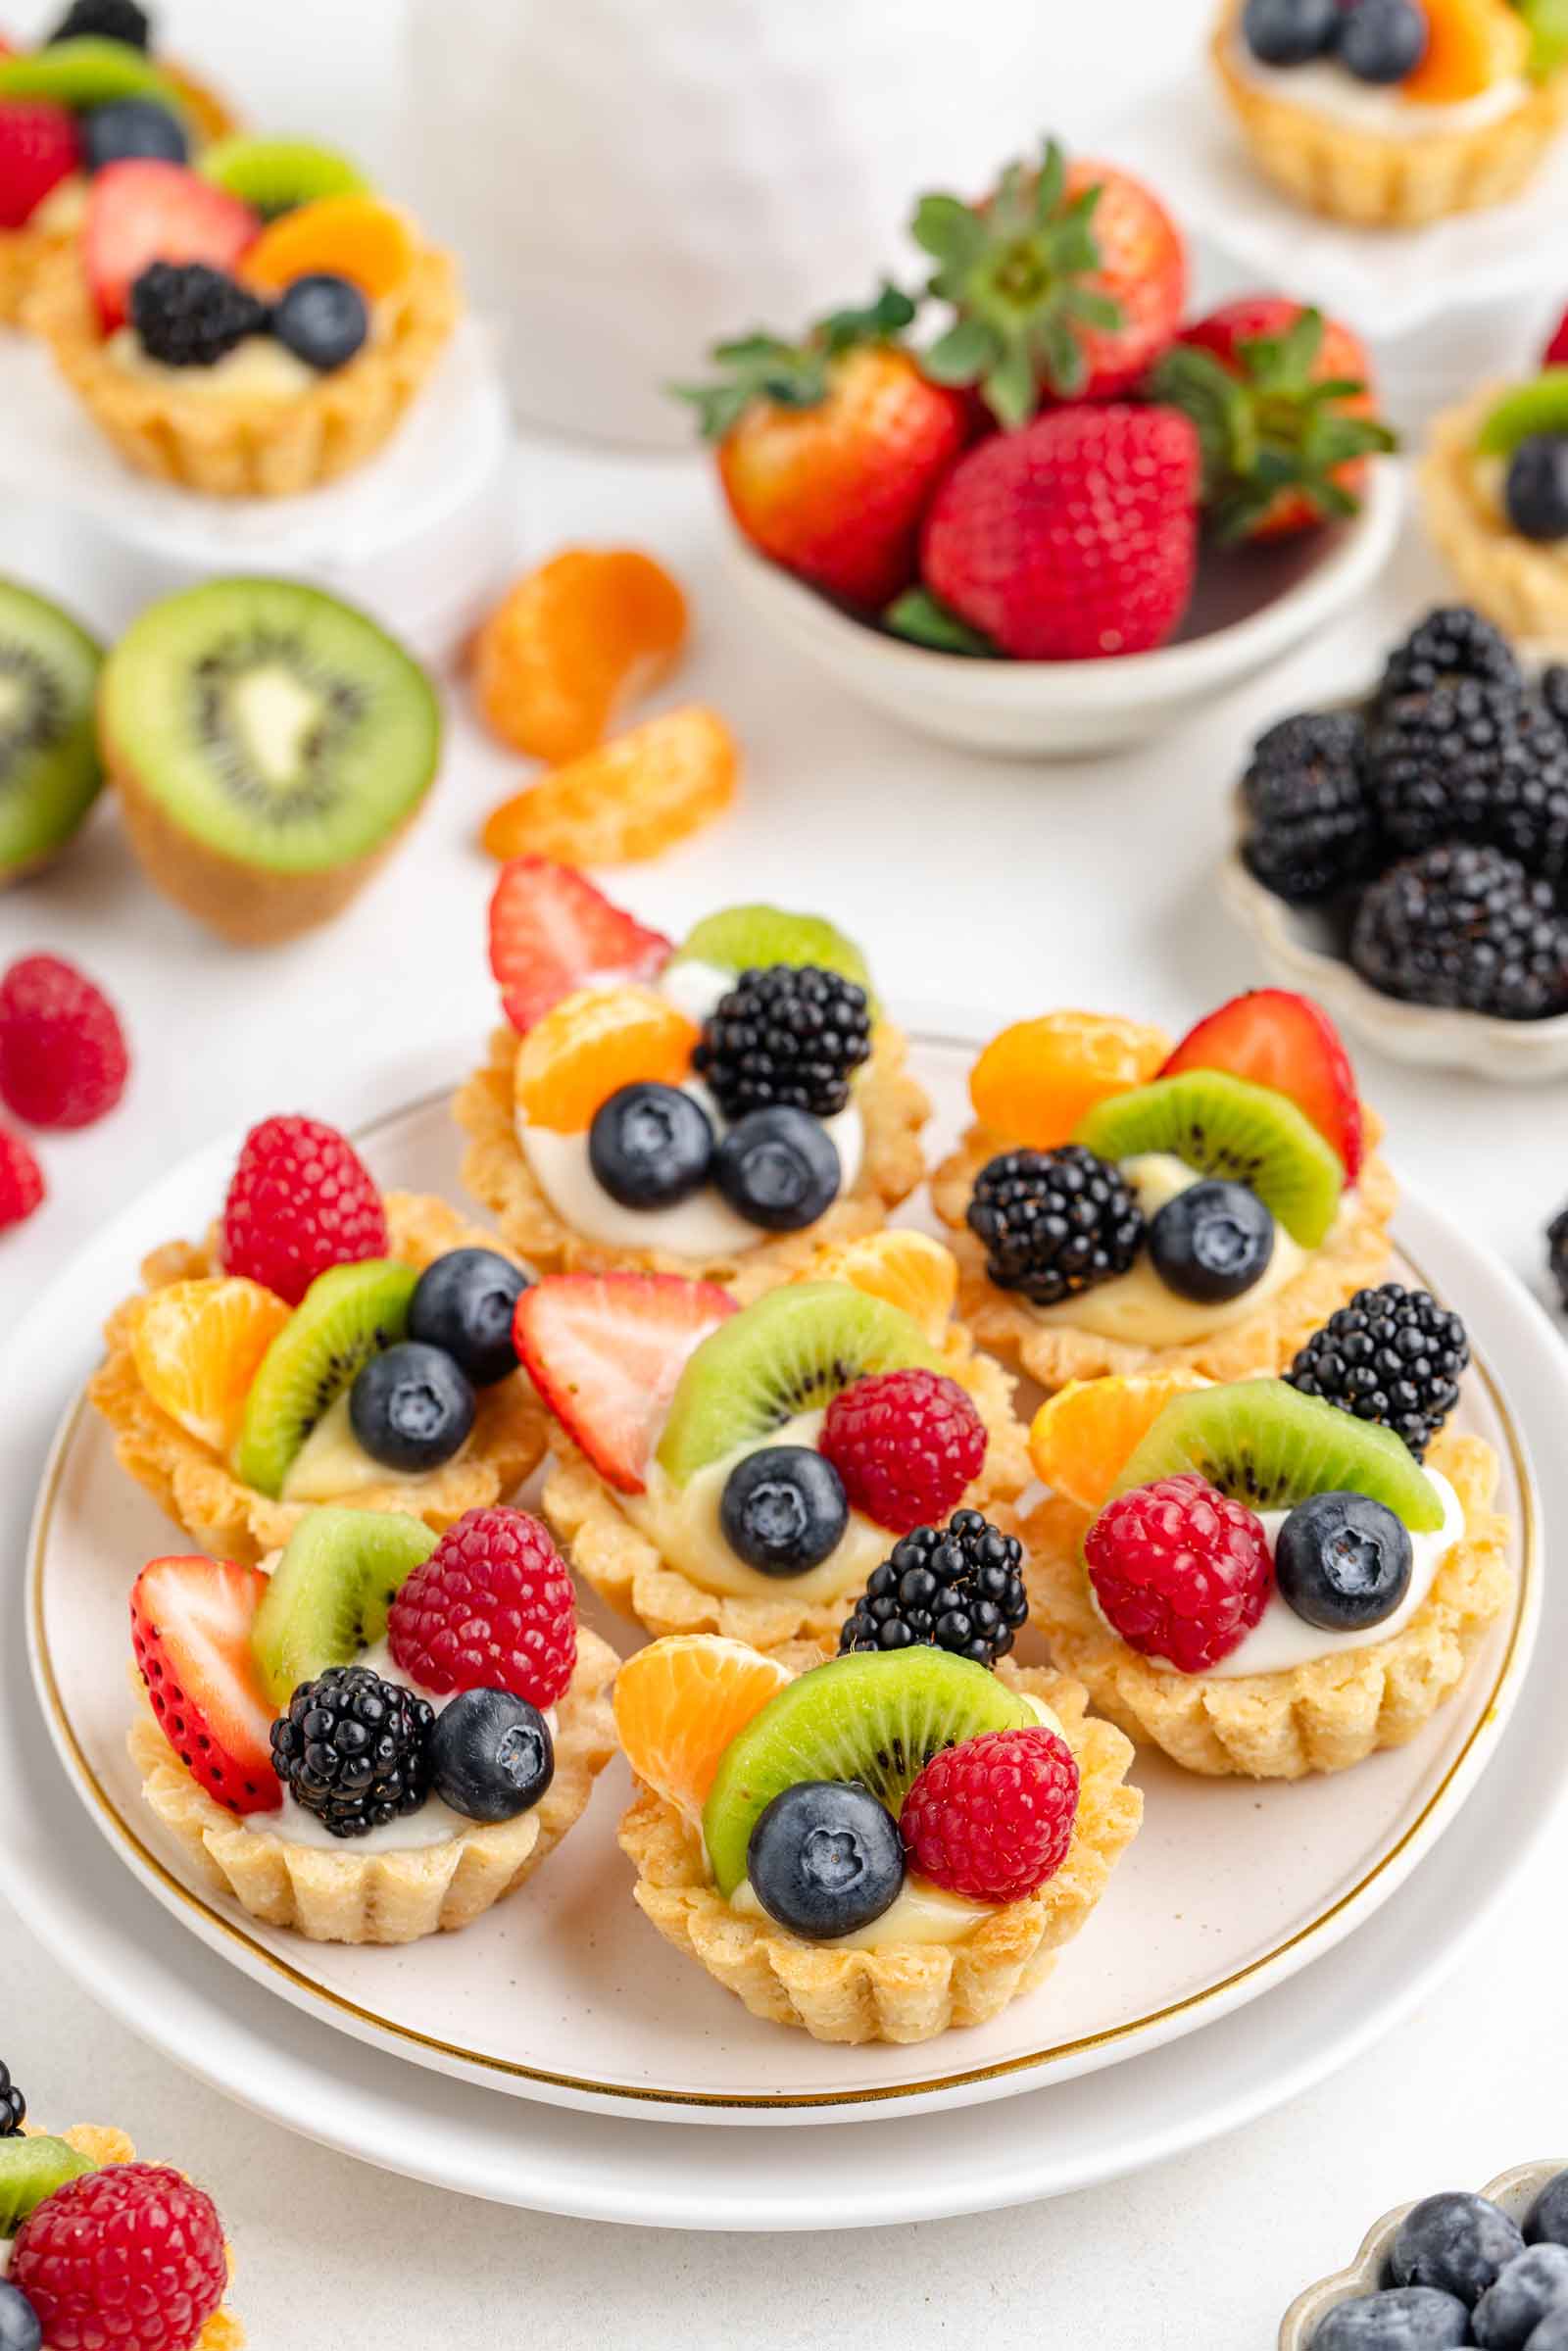
Topped with fresh fruit, they’re the perfect treat for any occasion, but especially for Easter, Mother’s Day, and baby showers.
I couldn’t decide which filling to go with. I love both equally.
My family preferred the cream cheese filling, but my photographer’s family preferred the pastry cream. That version does feel a little more special.
So both are included! If you’re in a hurry, go with the cheesecake filling. If you want something more sophisticated, go with the pastry cream.

What’s to love
- The small size makes them perfect for parties.
- Fruit tartlets are visually stunning, adding a touch of sophistication to any dessert table.
- You can prepare the elements in advance and assemble on day of serving.
Ingredient notes
Below are some notes on select ingredients. Please scroll below to see the full recipe.
- Flour – you can use all-purpose flour or the gluten-free flour option I talk about below.
- Butter – no subs for this. It’s essential for the perfect taste and texture!
- Milk – use whole milk for a creamier texture in the pastry cream filling. If using plant-based milk, note that it can change the color of the pastry cream. I tested these with unsweetened cashew milk and the result had a bit of a greyish hue to it.
Using prebaked tart shells
If you’re pressed for time or prefer a convenient option, you might want to consider using the prebaked tart shells from World Market. These ready-to-use tart shells eliminate the need to make and bake the crust from scratch, letting you focus on the filling and fruit.
The shells come in a pack of 16 for $5.99. Though you have enough filling for 18 tartlets, you can easily use it all on the 16 crusts.
Their shells may be slightly larger than mine. While I haven’t tried them myself (because I live in Germany, and we don’t have World Market), I’ve consistently heard and read great reviews about them.
How to make the tart shells
I talk about this below, but these are really great for making ahead. So if it’s too much to make the crusts and filling all at once, you can easily make them on different days and then assemble on the day of serving.
Here’s how to make the crust!
Whisk flour, sugar, and salt in a bowl. Cut in cold butter until mixture resembles coarse breadcrumbs.
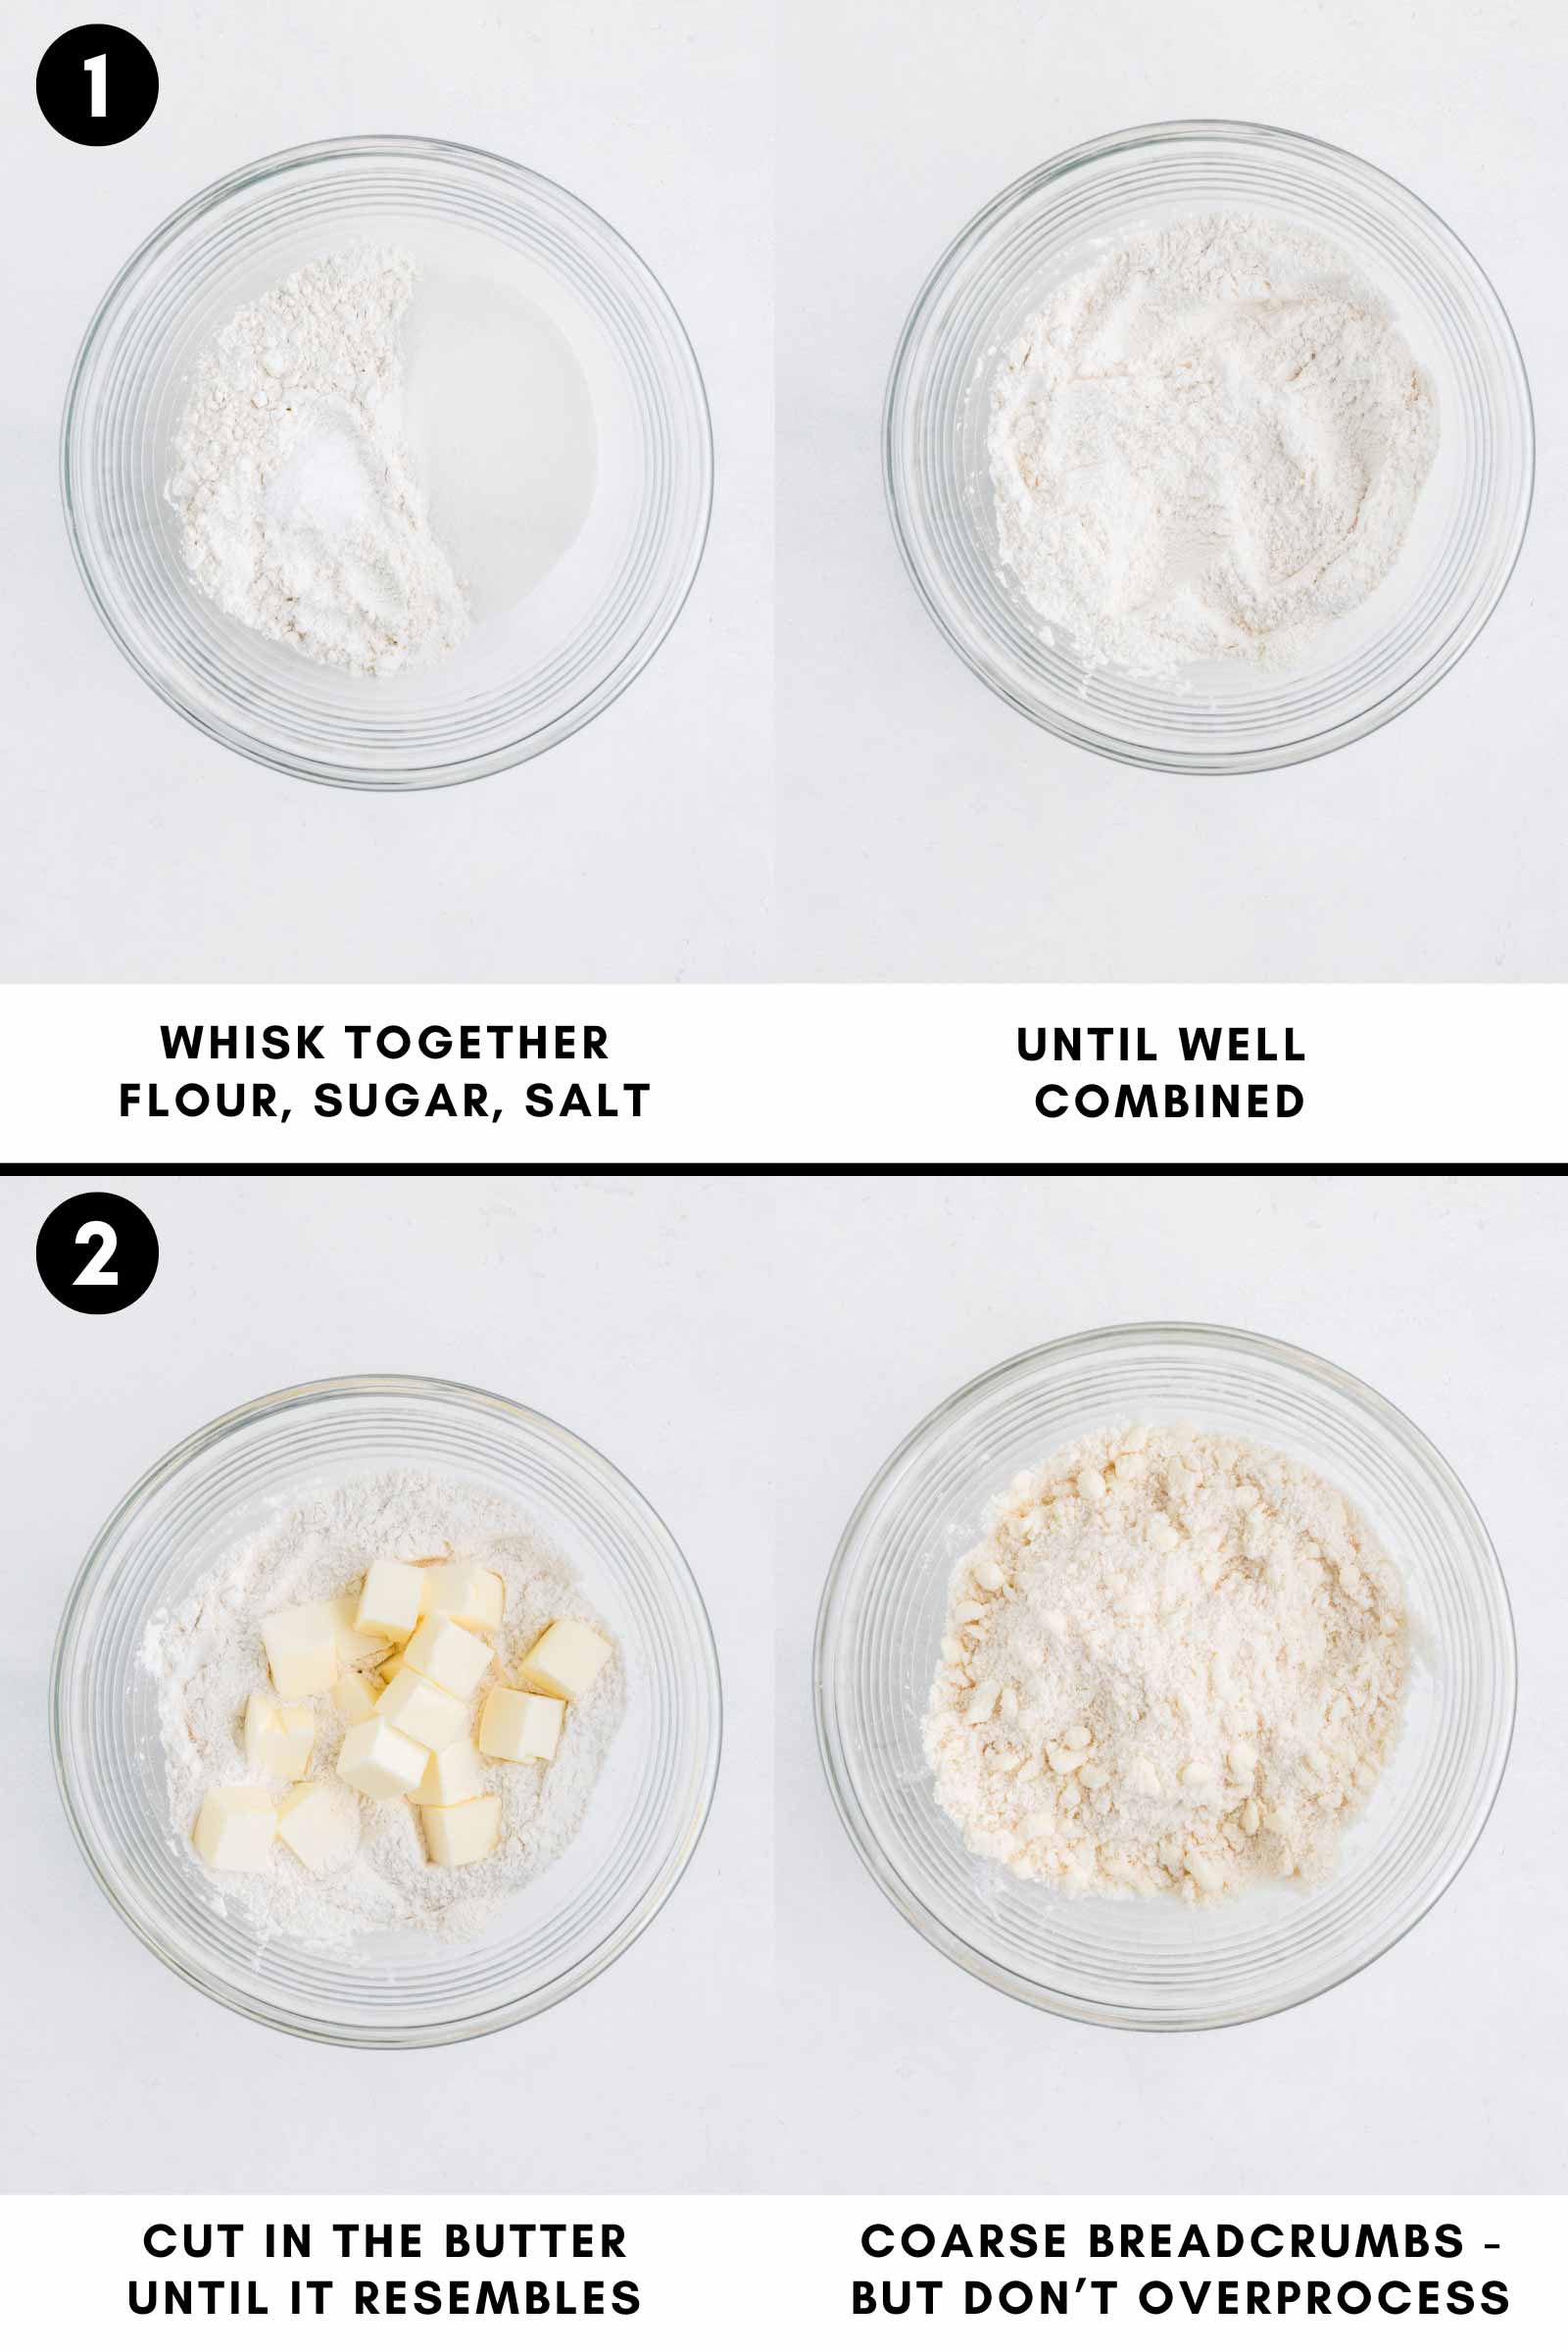
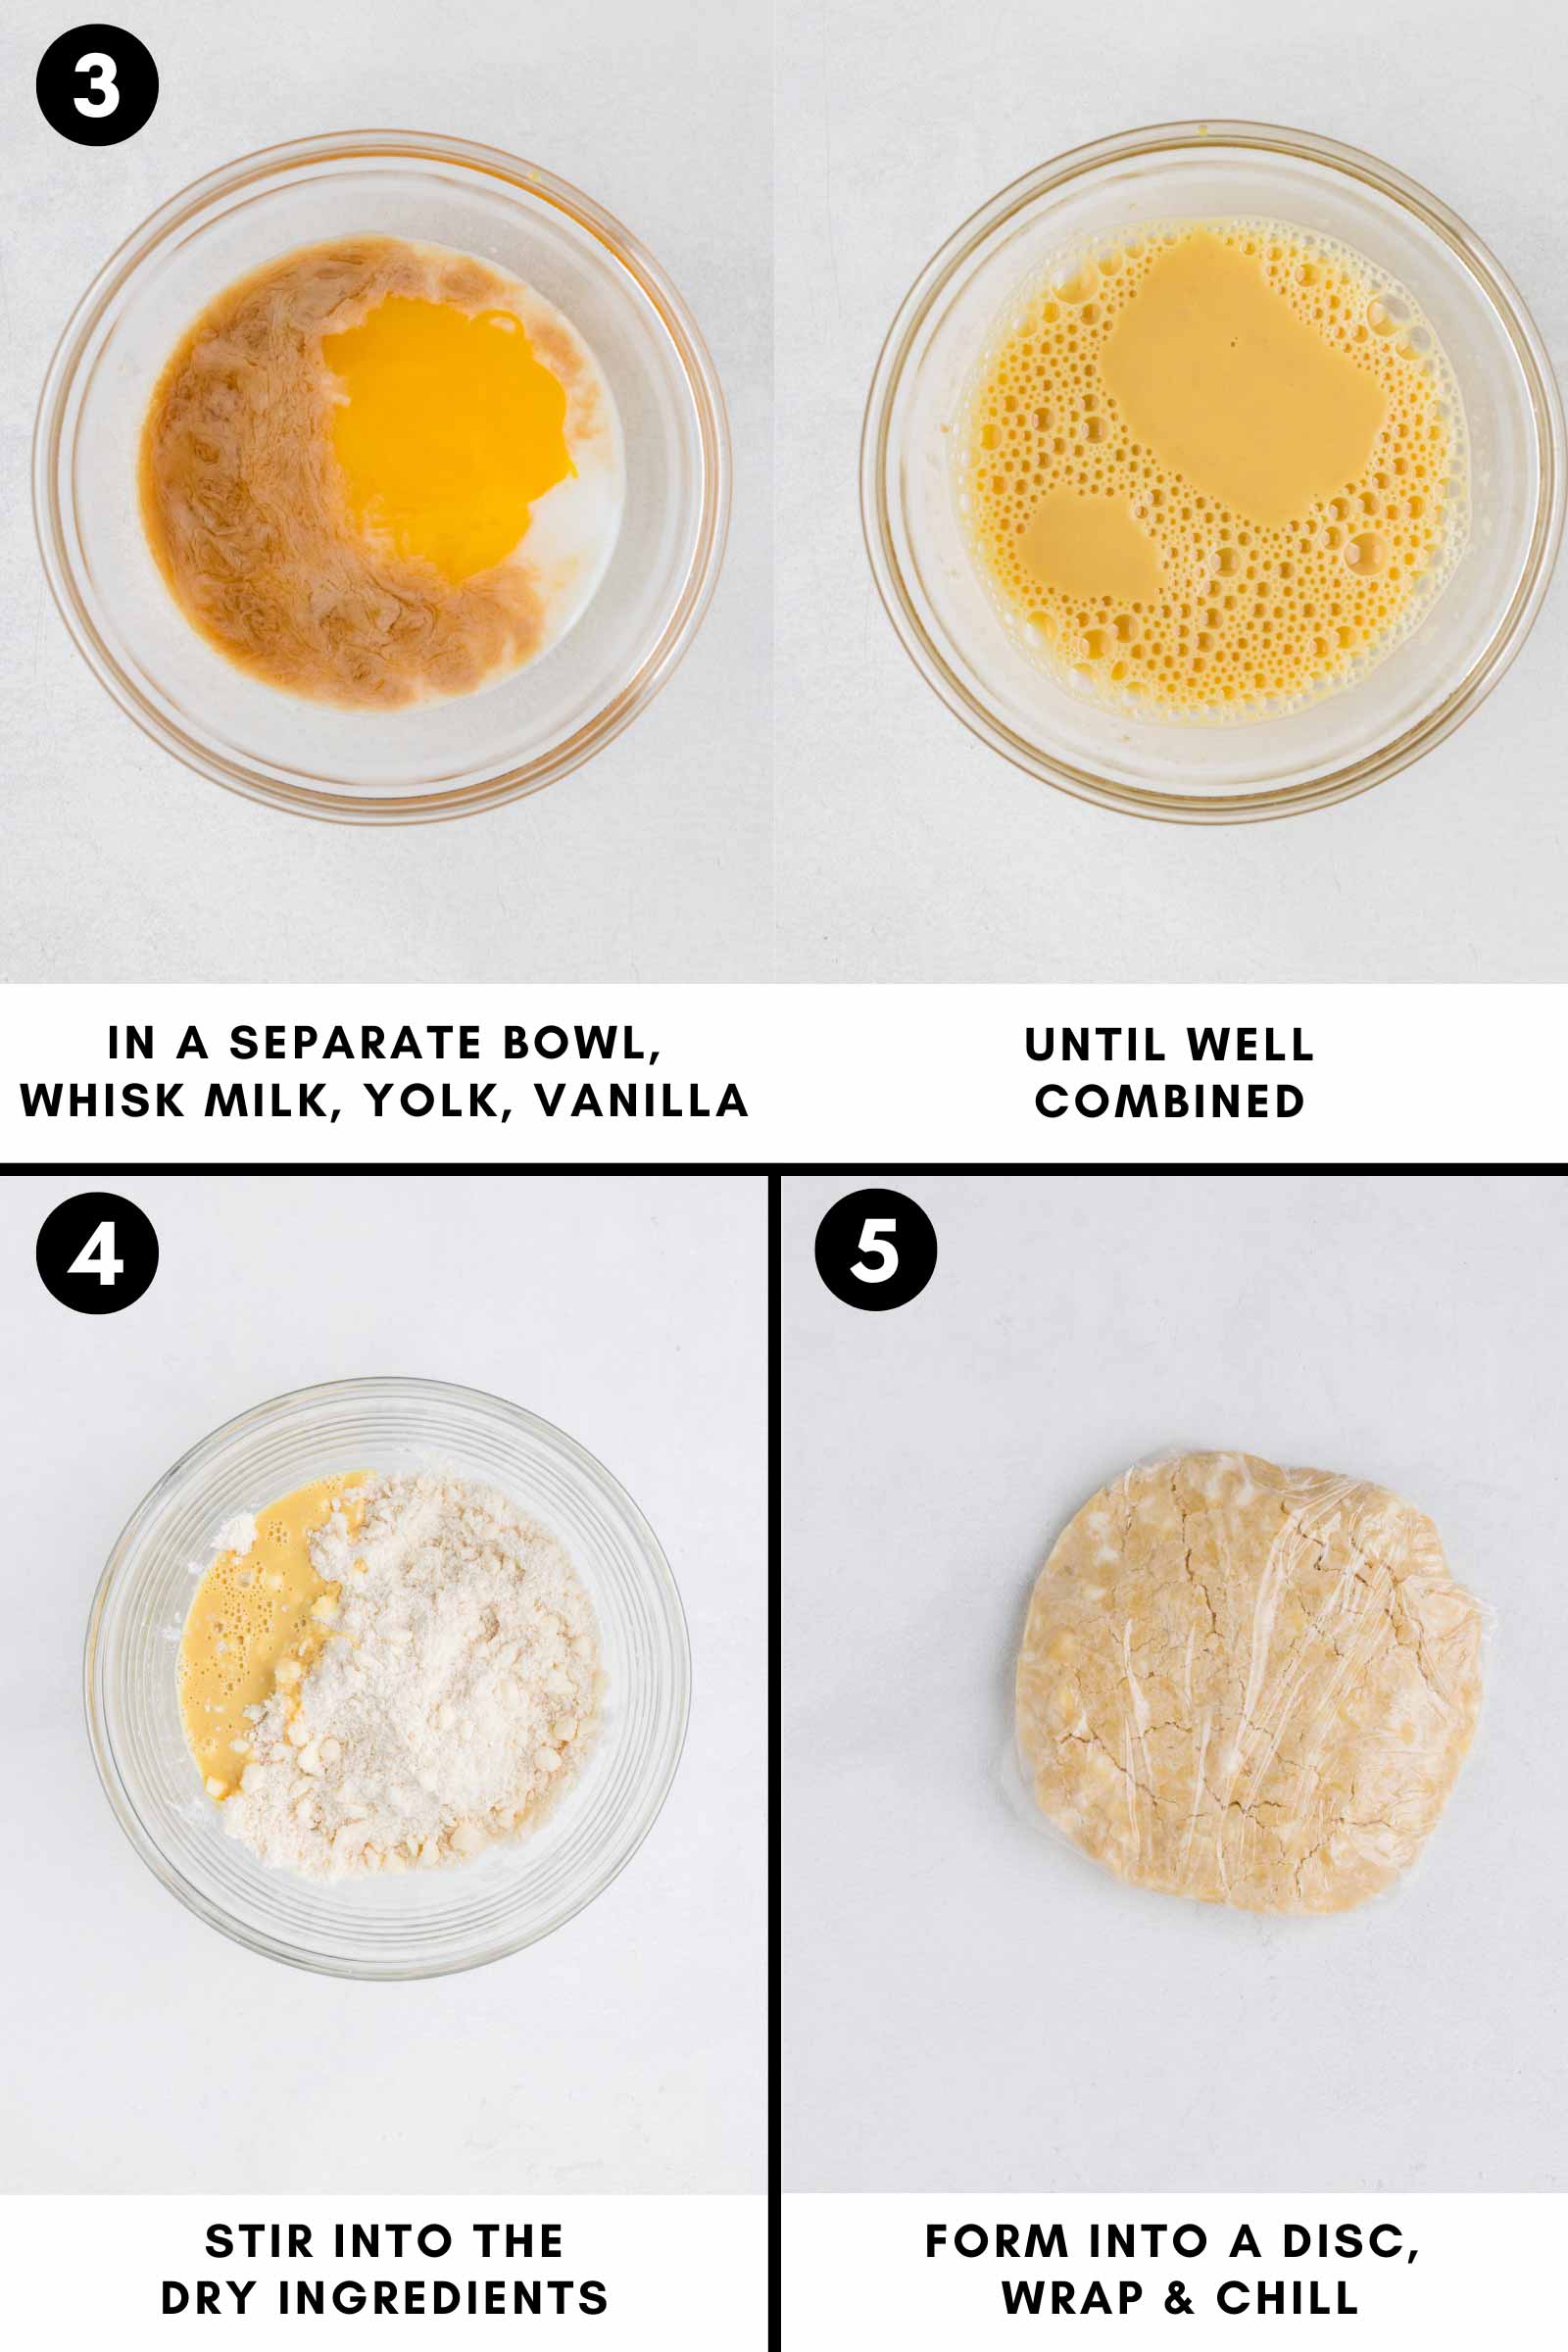
Whisk egg yolks, vanilla, and milk, then stir into dry ingredients. Work dough until it comes together, form into a disc, wrap in plastic, and chill for 1 hour.
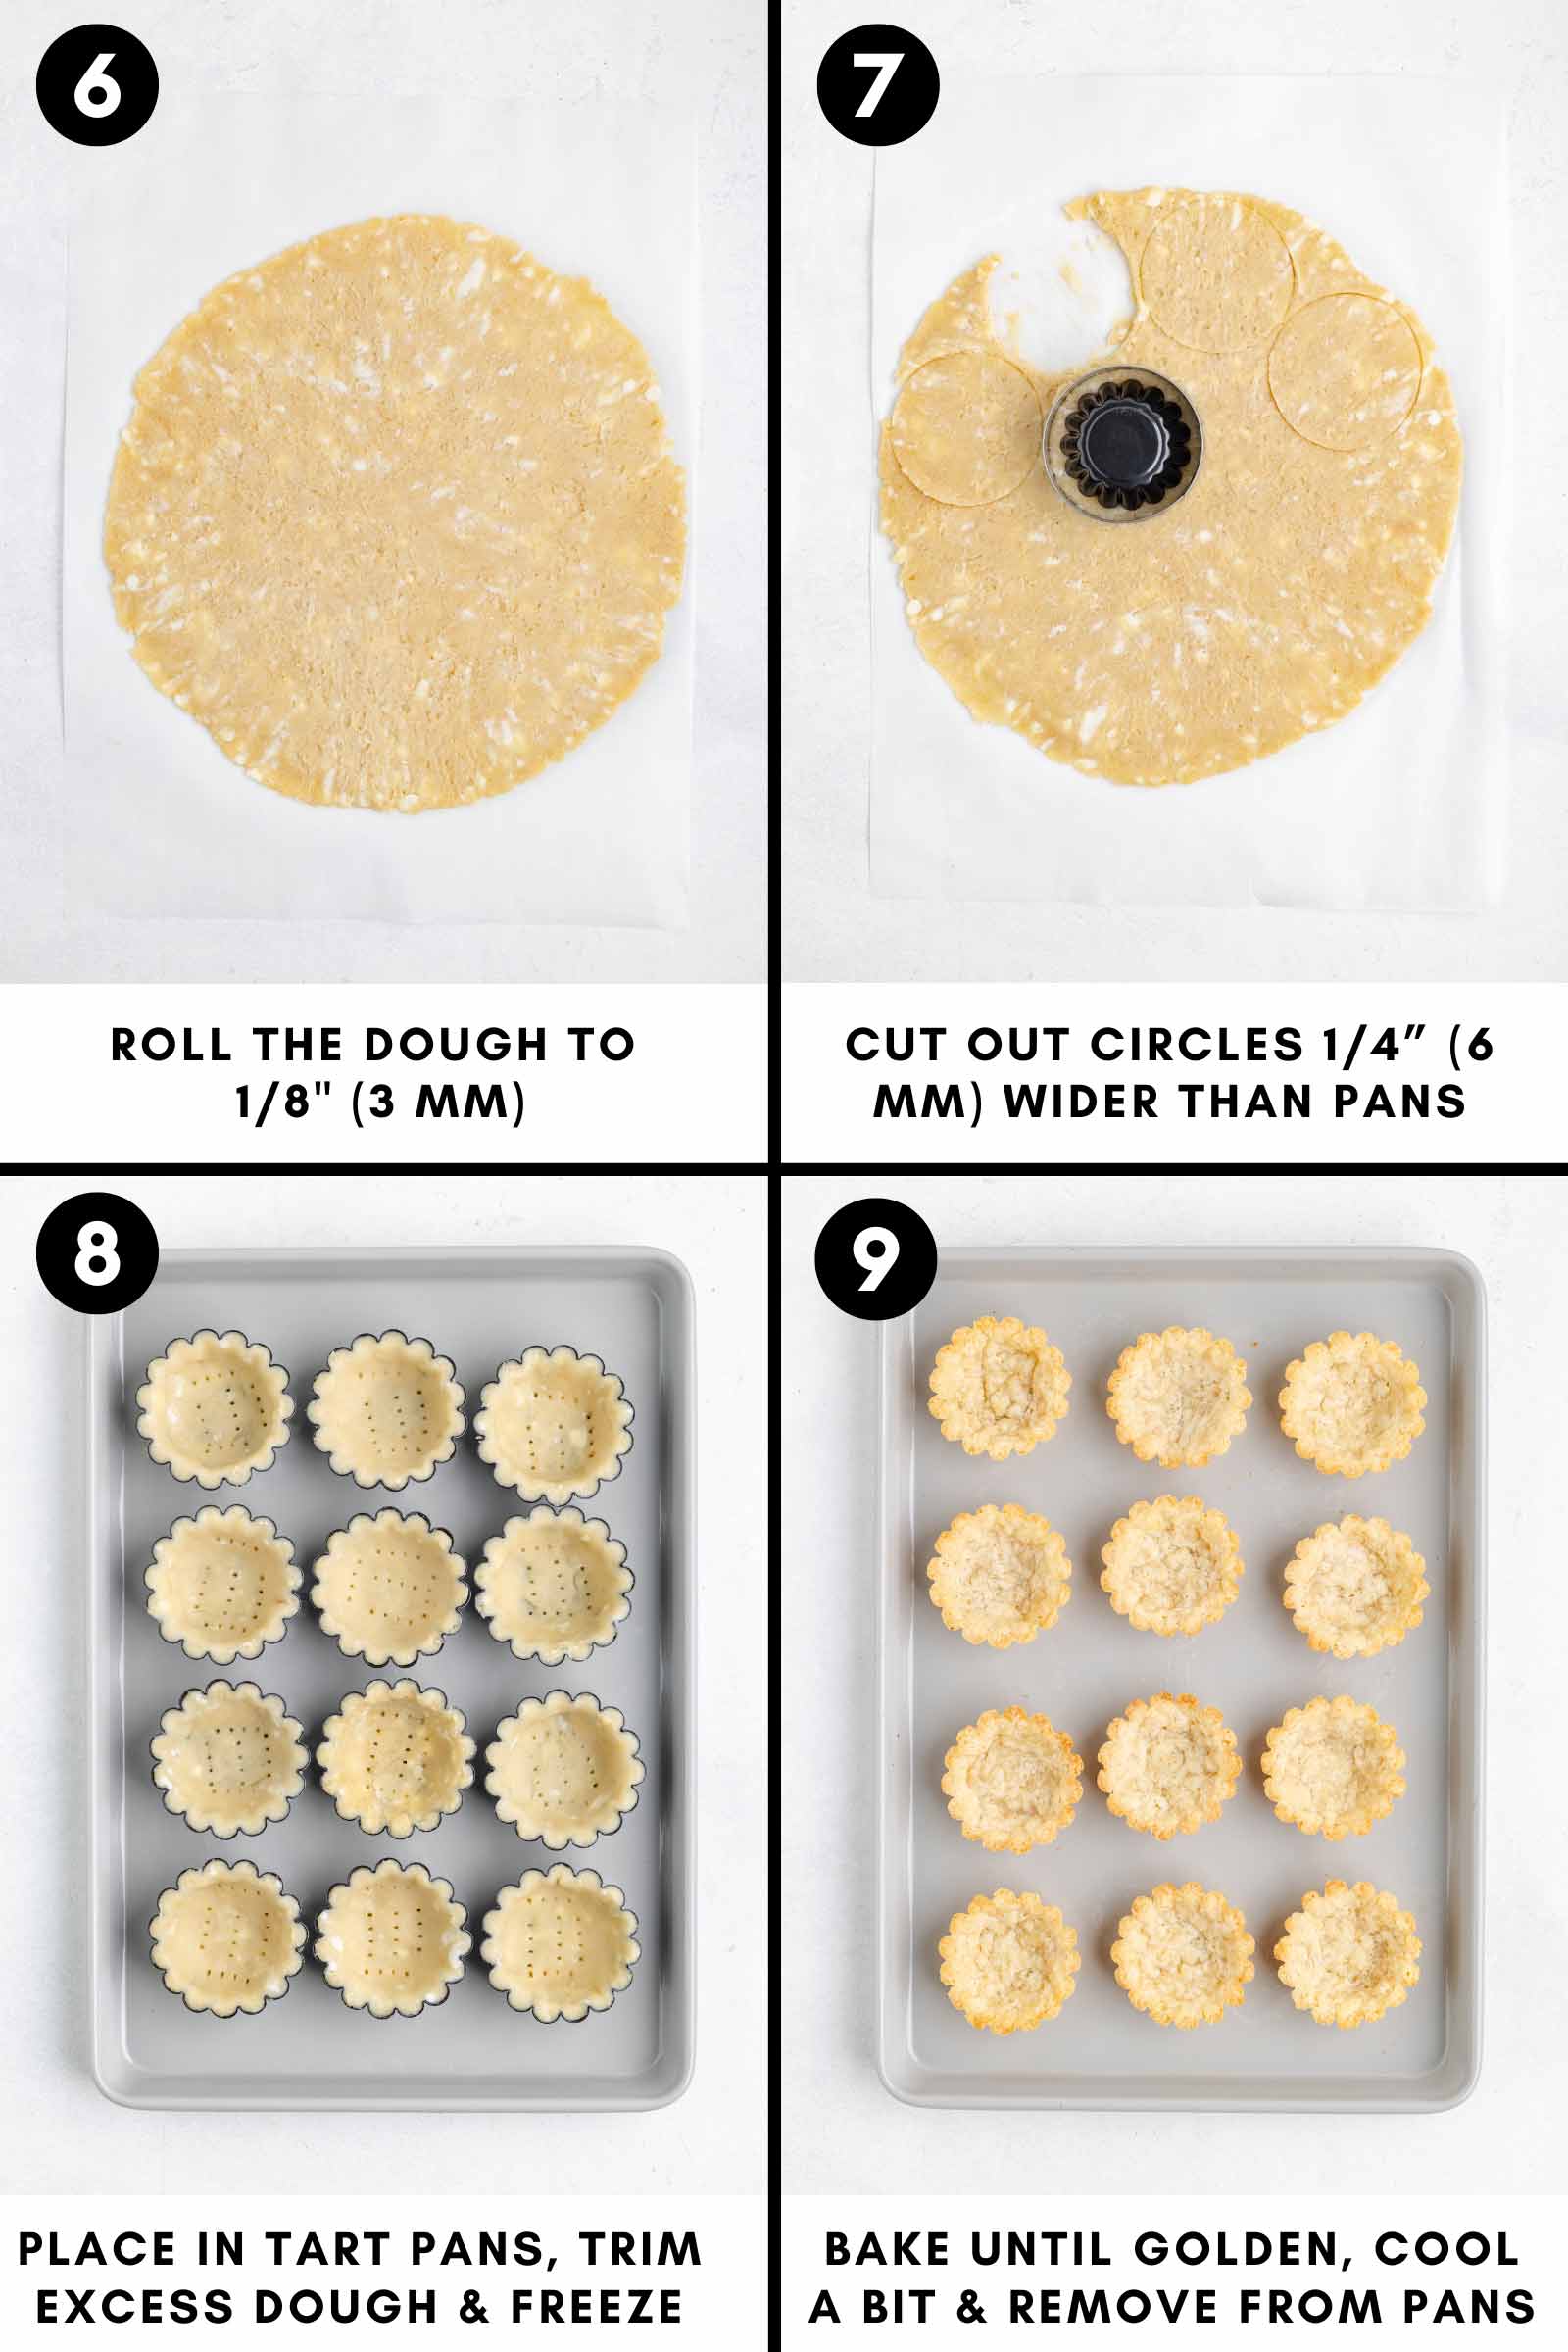
Grease tart pans. Roll out dough and cut circles to fit tart pans, pressing into place and pricking the bottoms with a fork.
Freeze for 20-30 minutes. Preheat oven to 375 °F (190 °C) and bake the tarts for 14-17 minutes until browned. Cool before removing them from the pans.
How to make the pastry cream option
This stuff is incredible! It’s hard not to just eat it all with a spoon (which is also true for the cheesecake filling!).

In a medium saucepan over medium heat, warm the milk and salt until it just starts to boil. Meanwhile, whisk the egg yolks and sugar in a heatproof bowl until pale and smooth. Add the cornstarch and whisk until fully combined and lump-free.
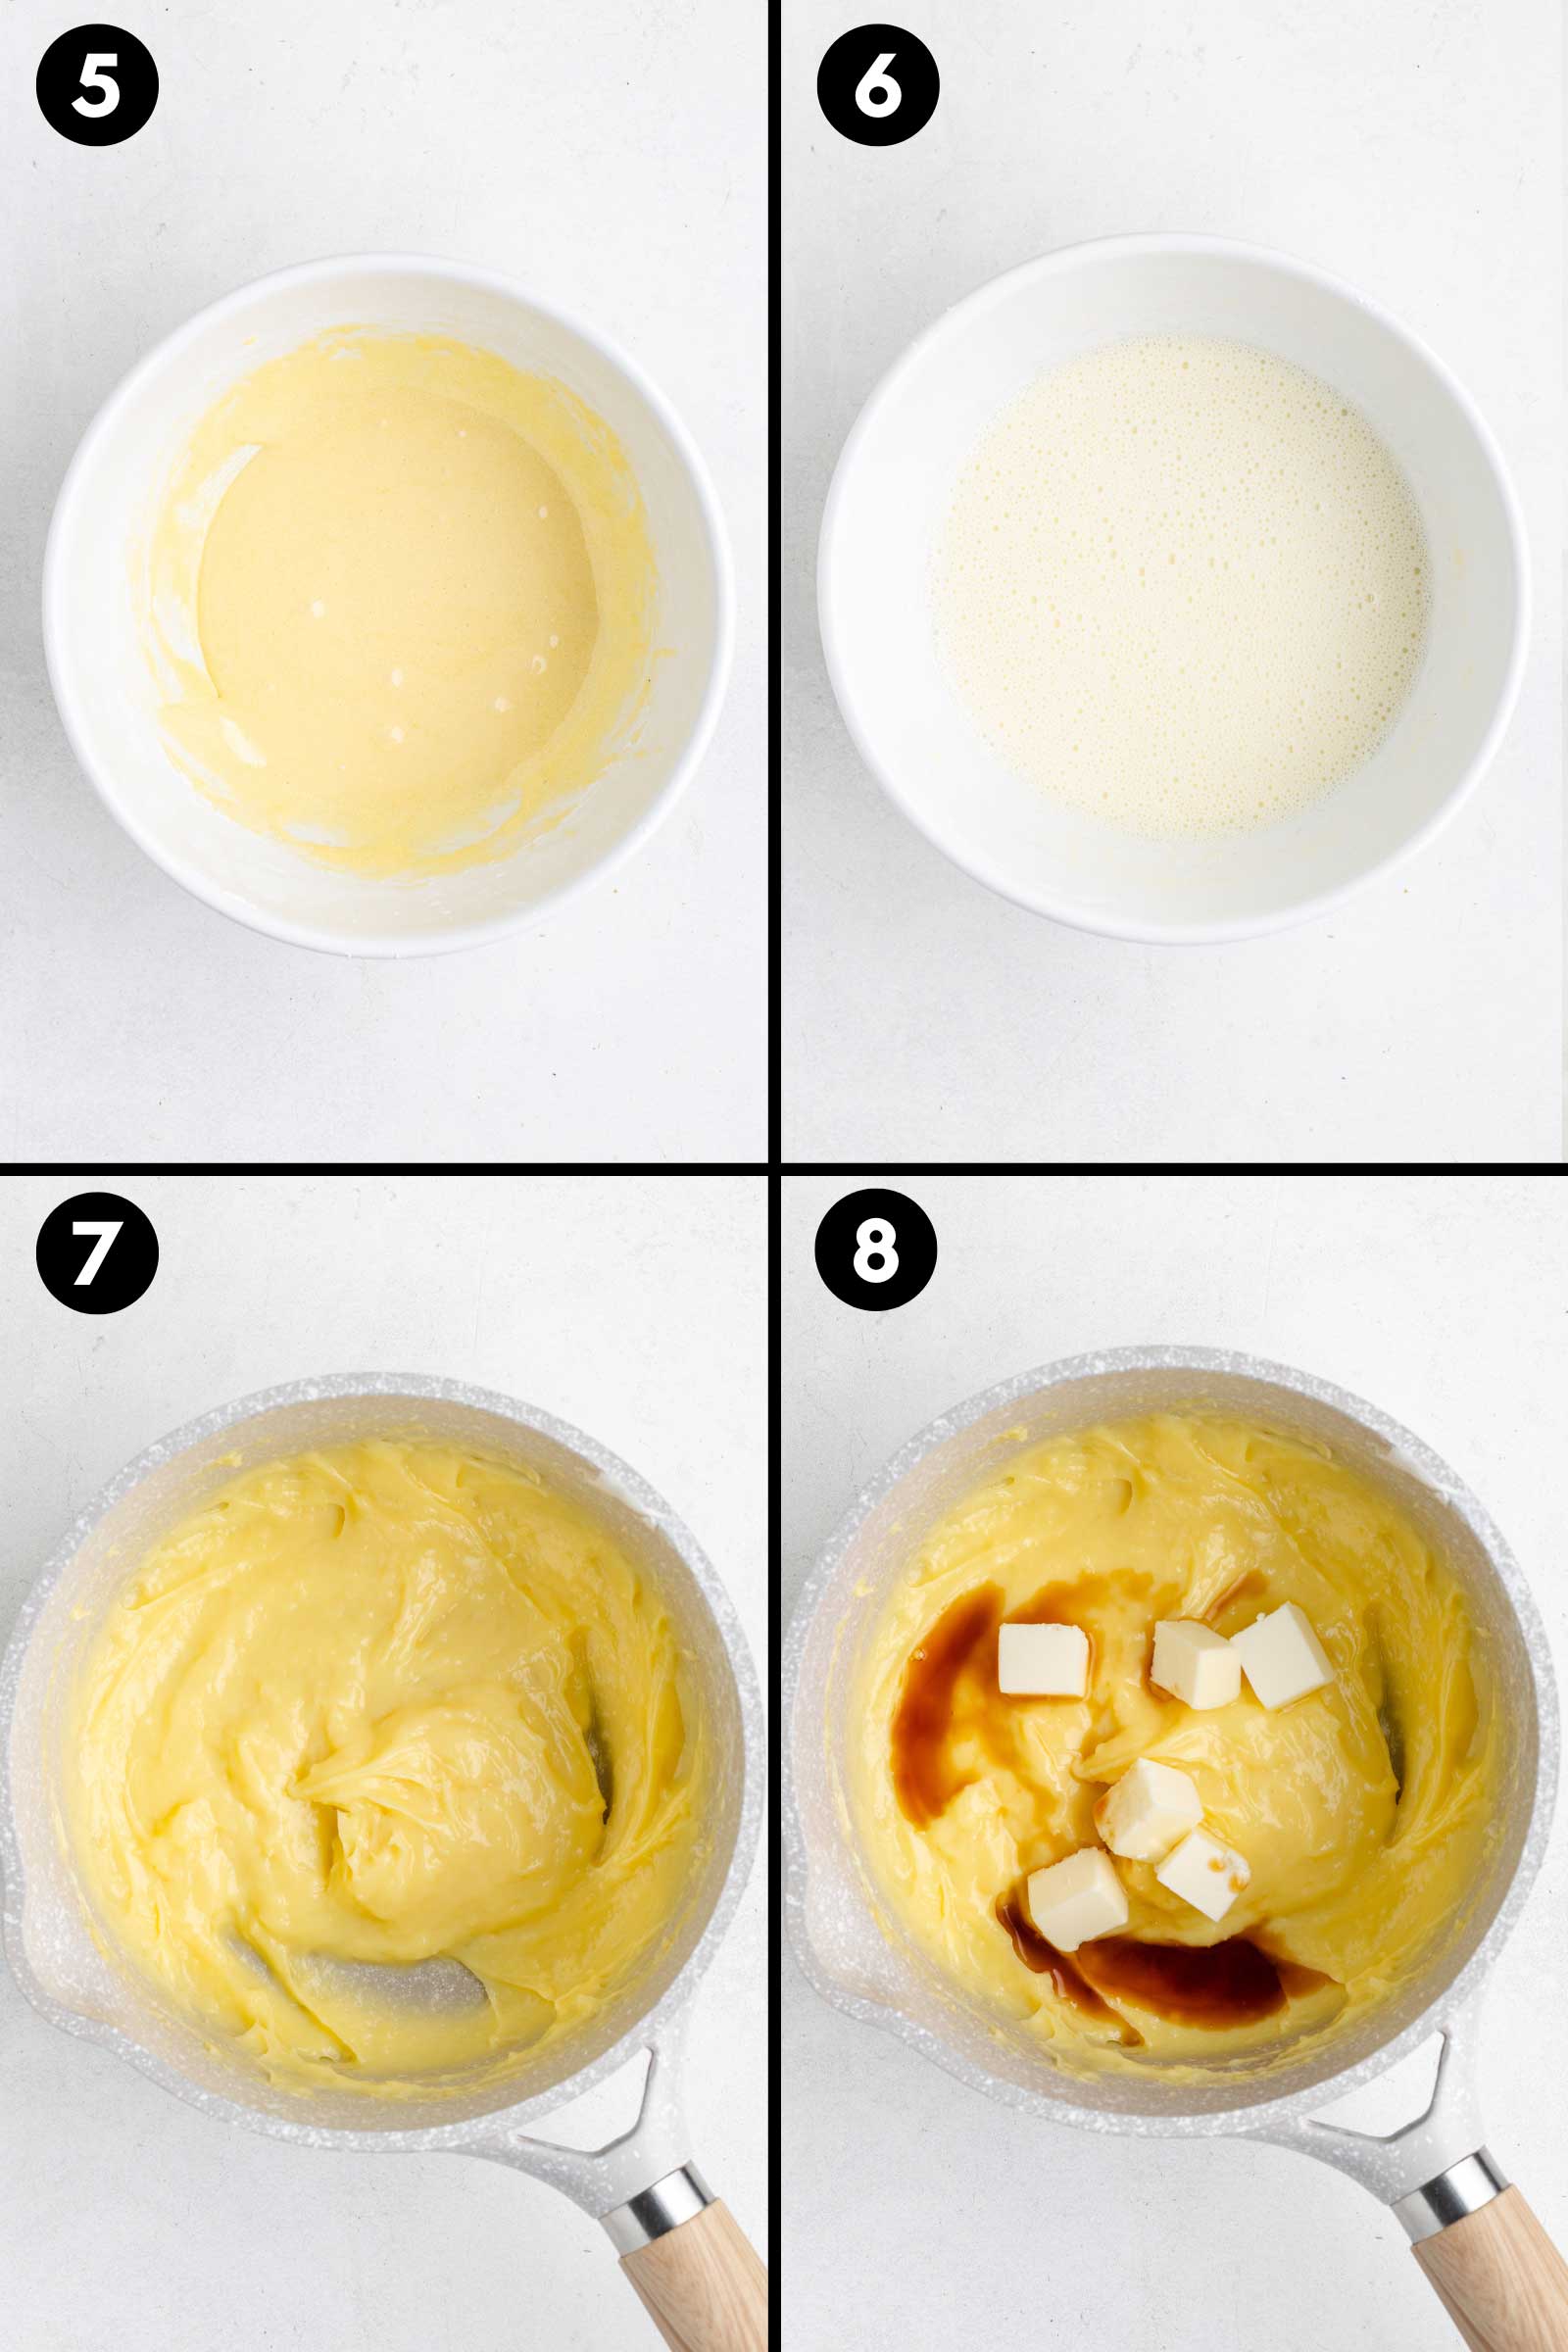
Slowly stream the hot milk into the egg mixture, whisking constantly to prevent curdling. Pour everything back into the saucepan and cook over medium heat, whisking continuously, until thickened and boiling, about 1 minute. Cook for another minute, then remove from heat.
Stir in the vanilla extract, almond extract, and butter until fully melted and incorporated.
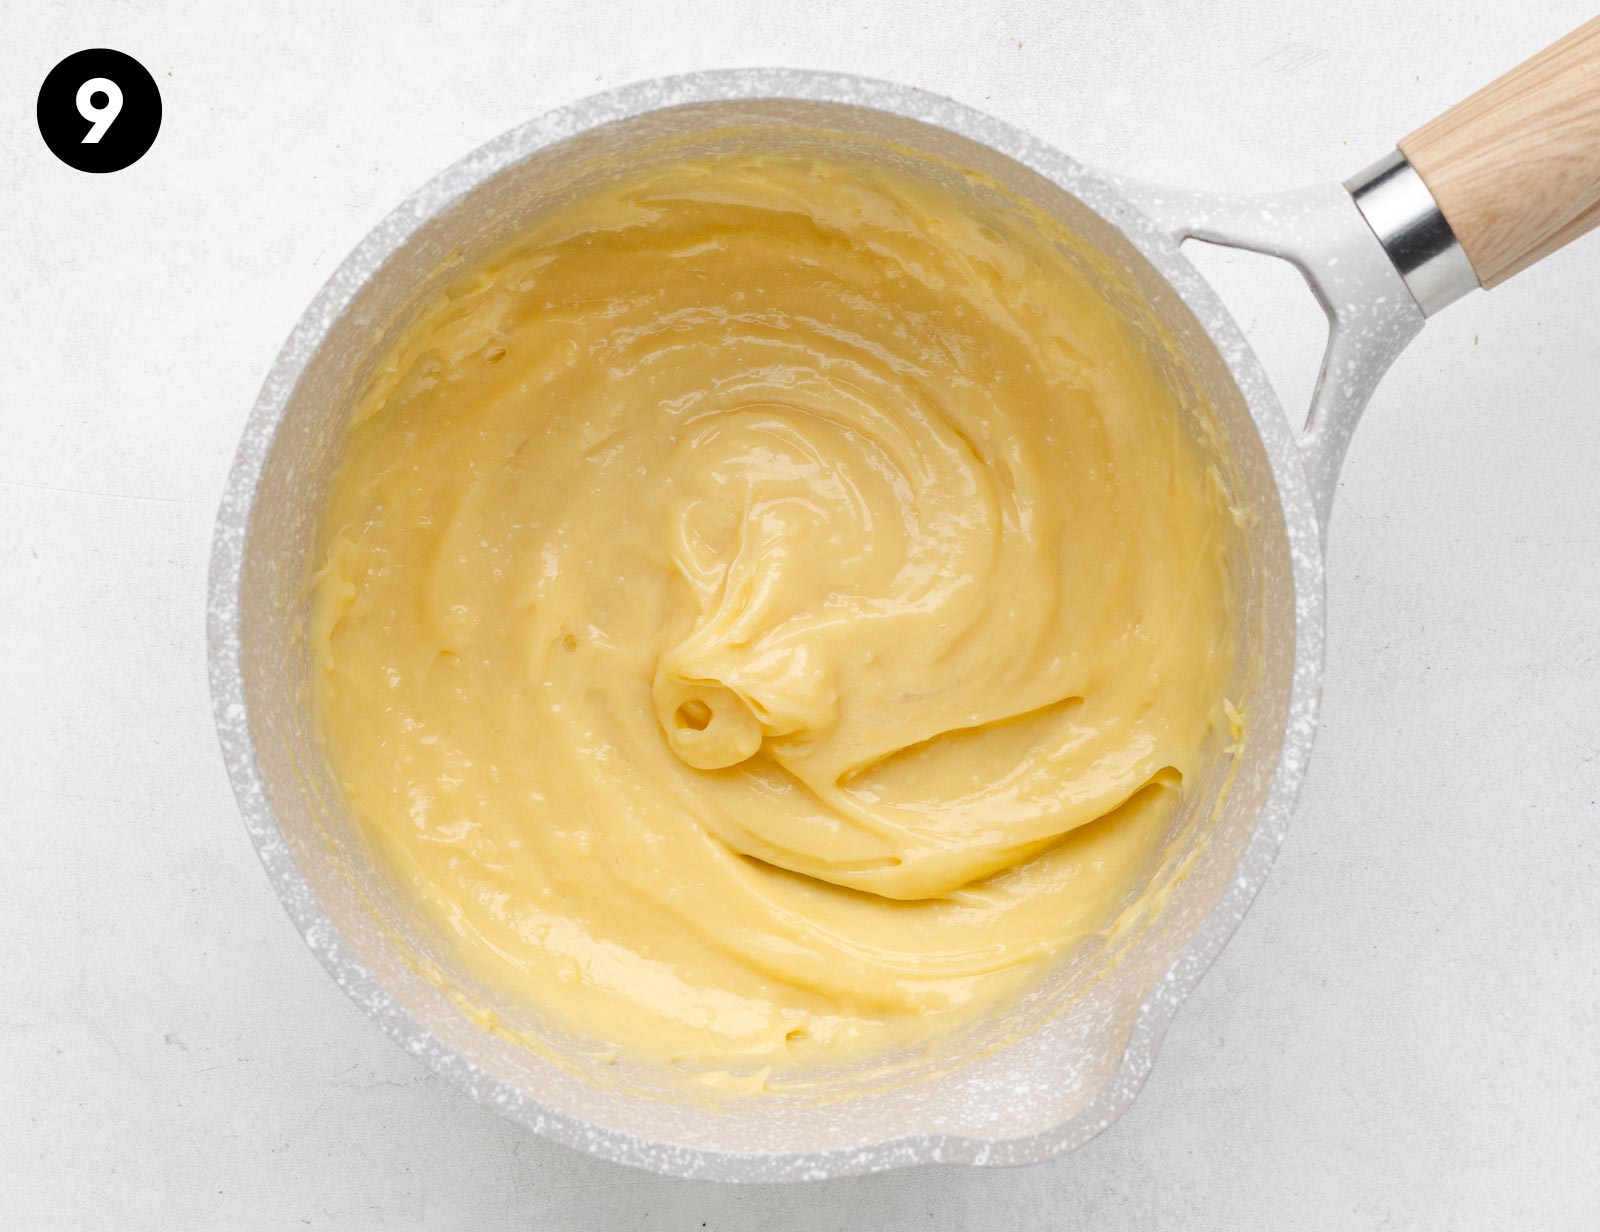
Transfer to a heatproof bowl and either press plastic wrap directly onto the surface to prevent a skin from forming or stir frequently as it cools. Let cool completely before using.
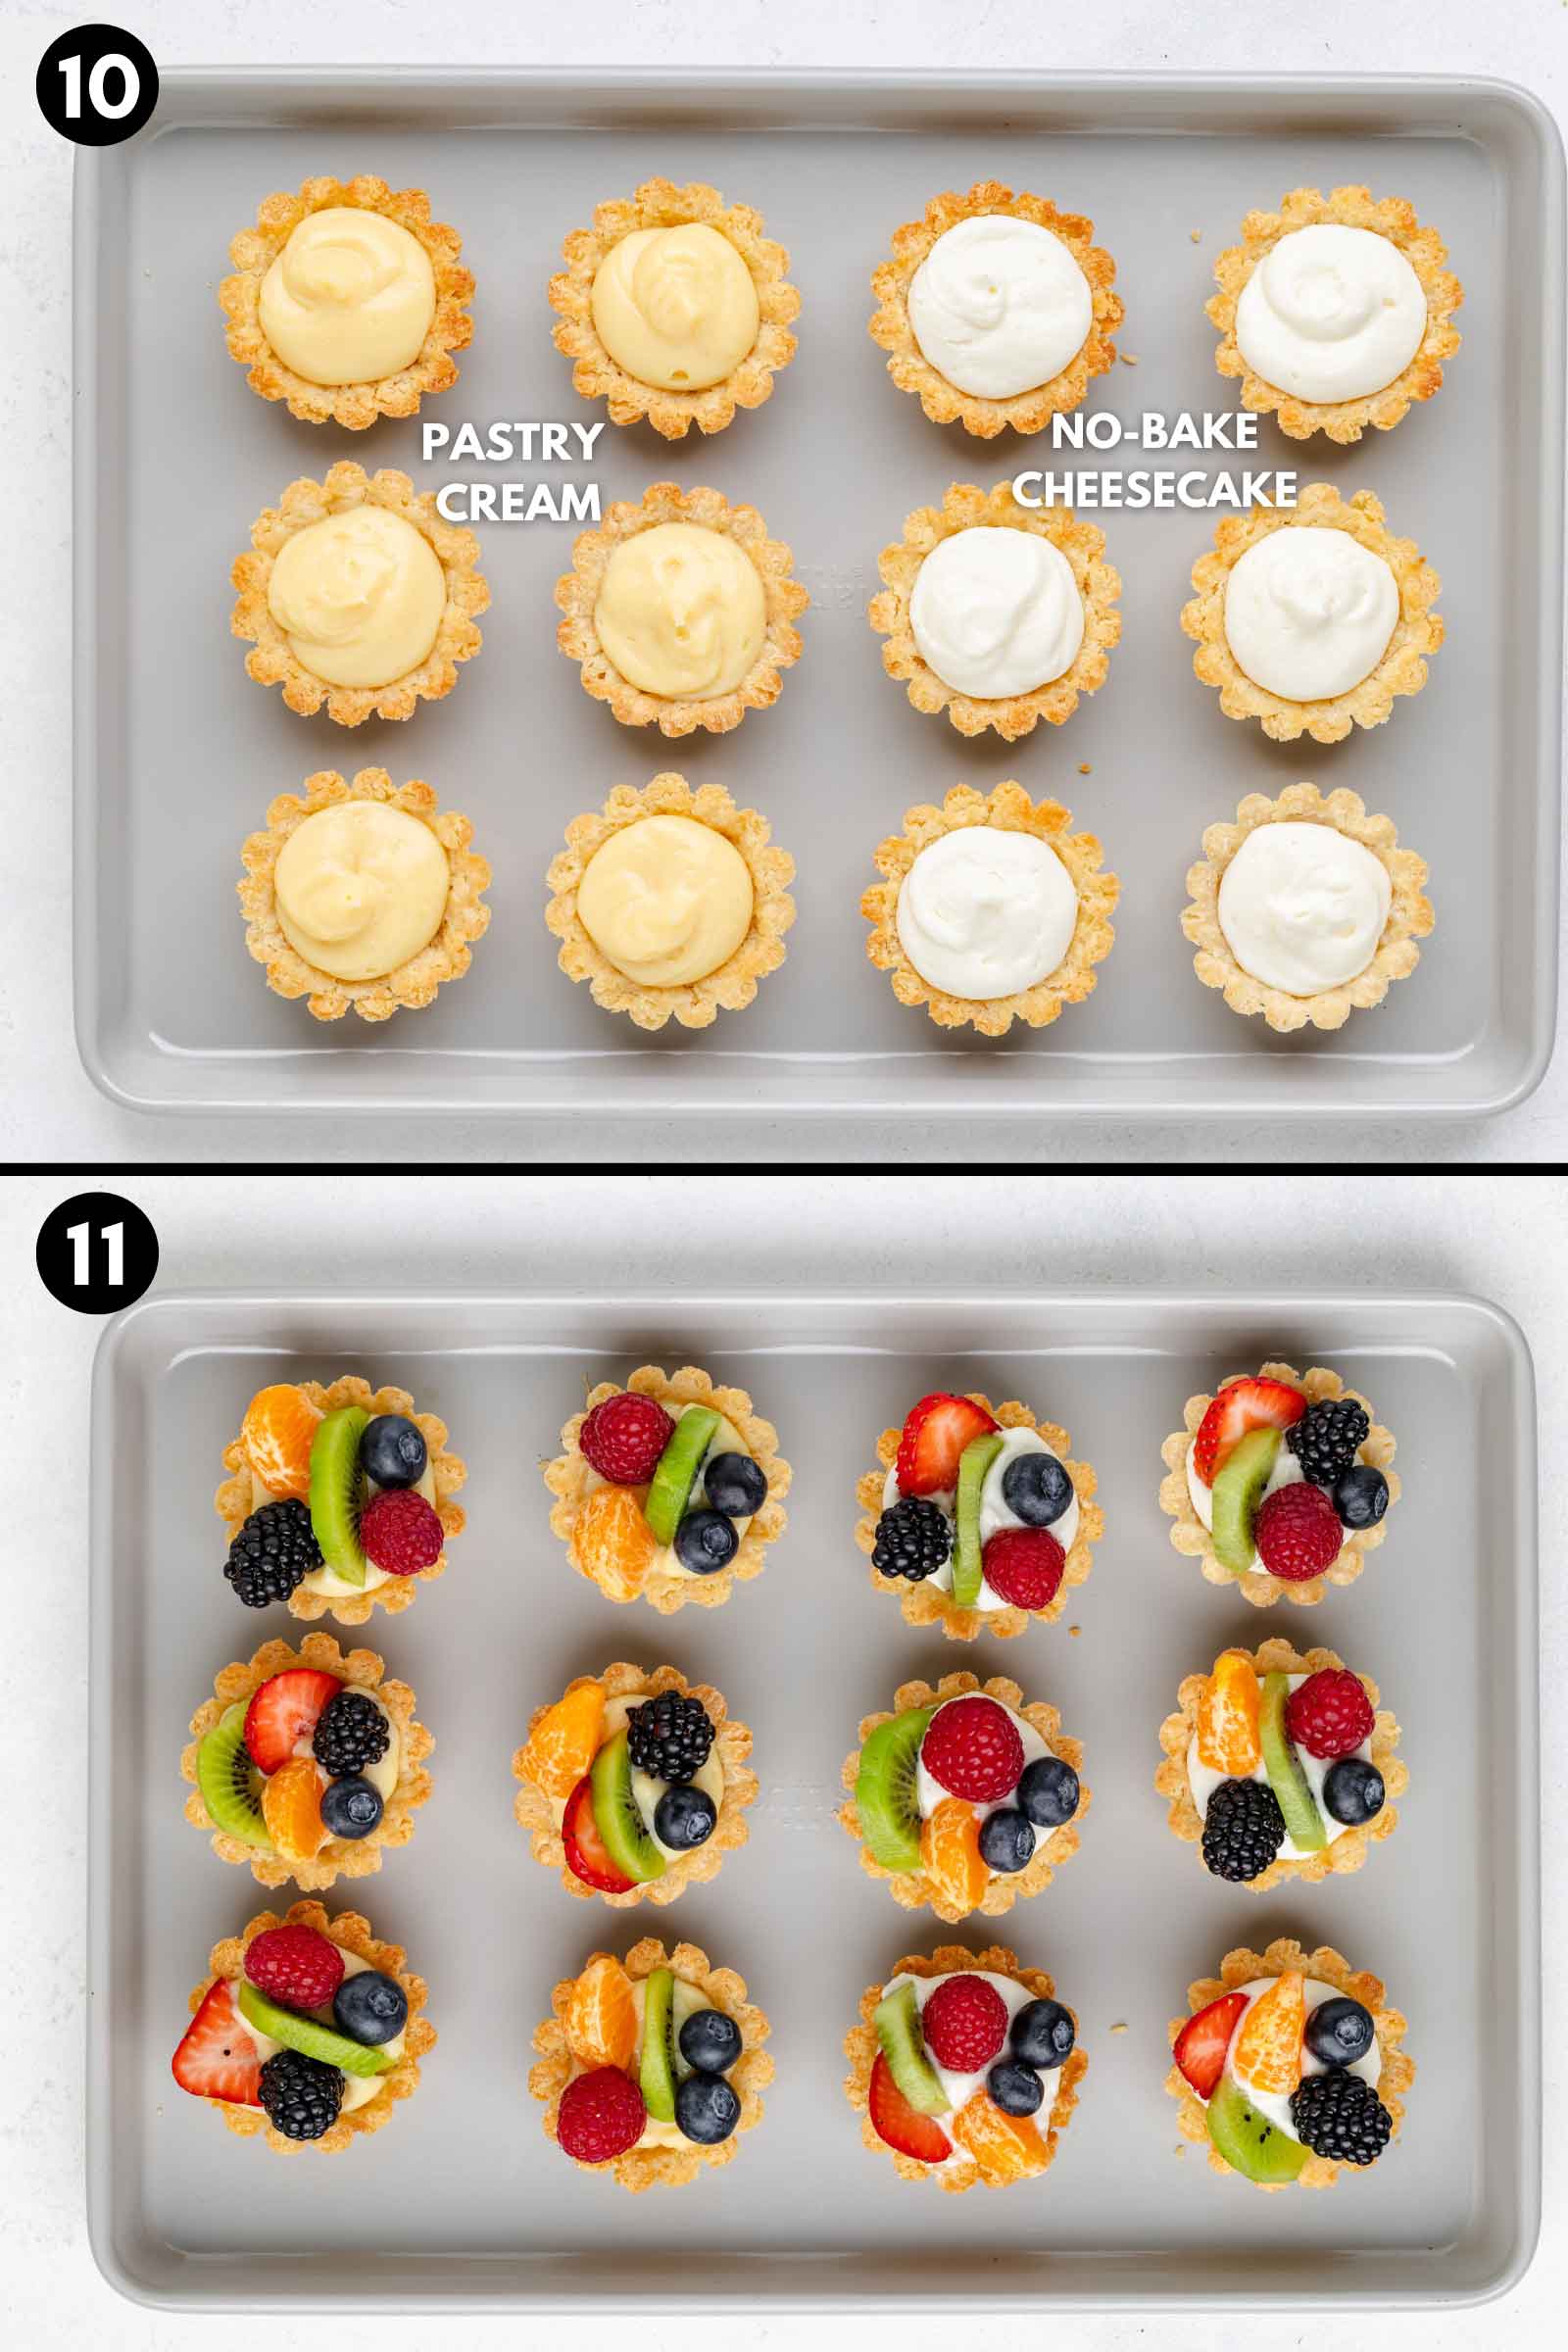
Fill cooled tartlet shells with pastry cream or cream cheese filling. Top with fresh fruit and mint.
Tart pans
I first tried these tarts in these Wilton Perfect Result 4.75″ (12 cm) Tart Pans.
If you’re sharing with another person, then using that size is fine. Otherwise, the tarts are too large and rich with these fillings.
If you want to use those, you’ll have enough dough for 4 tartlets.
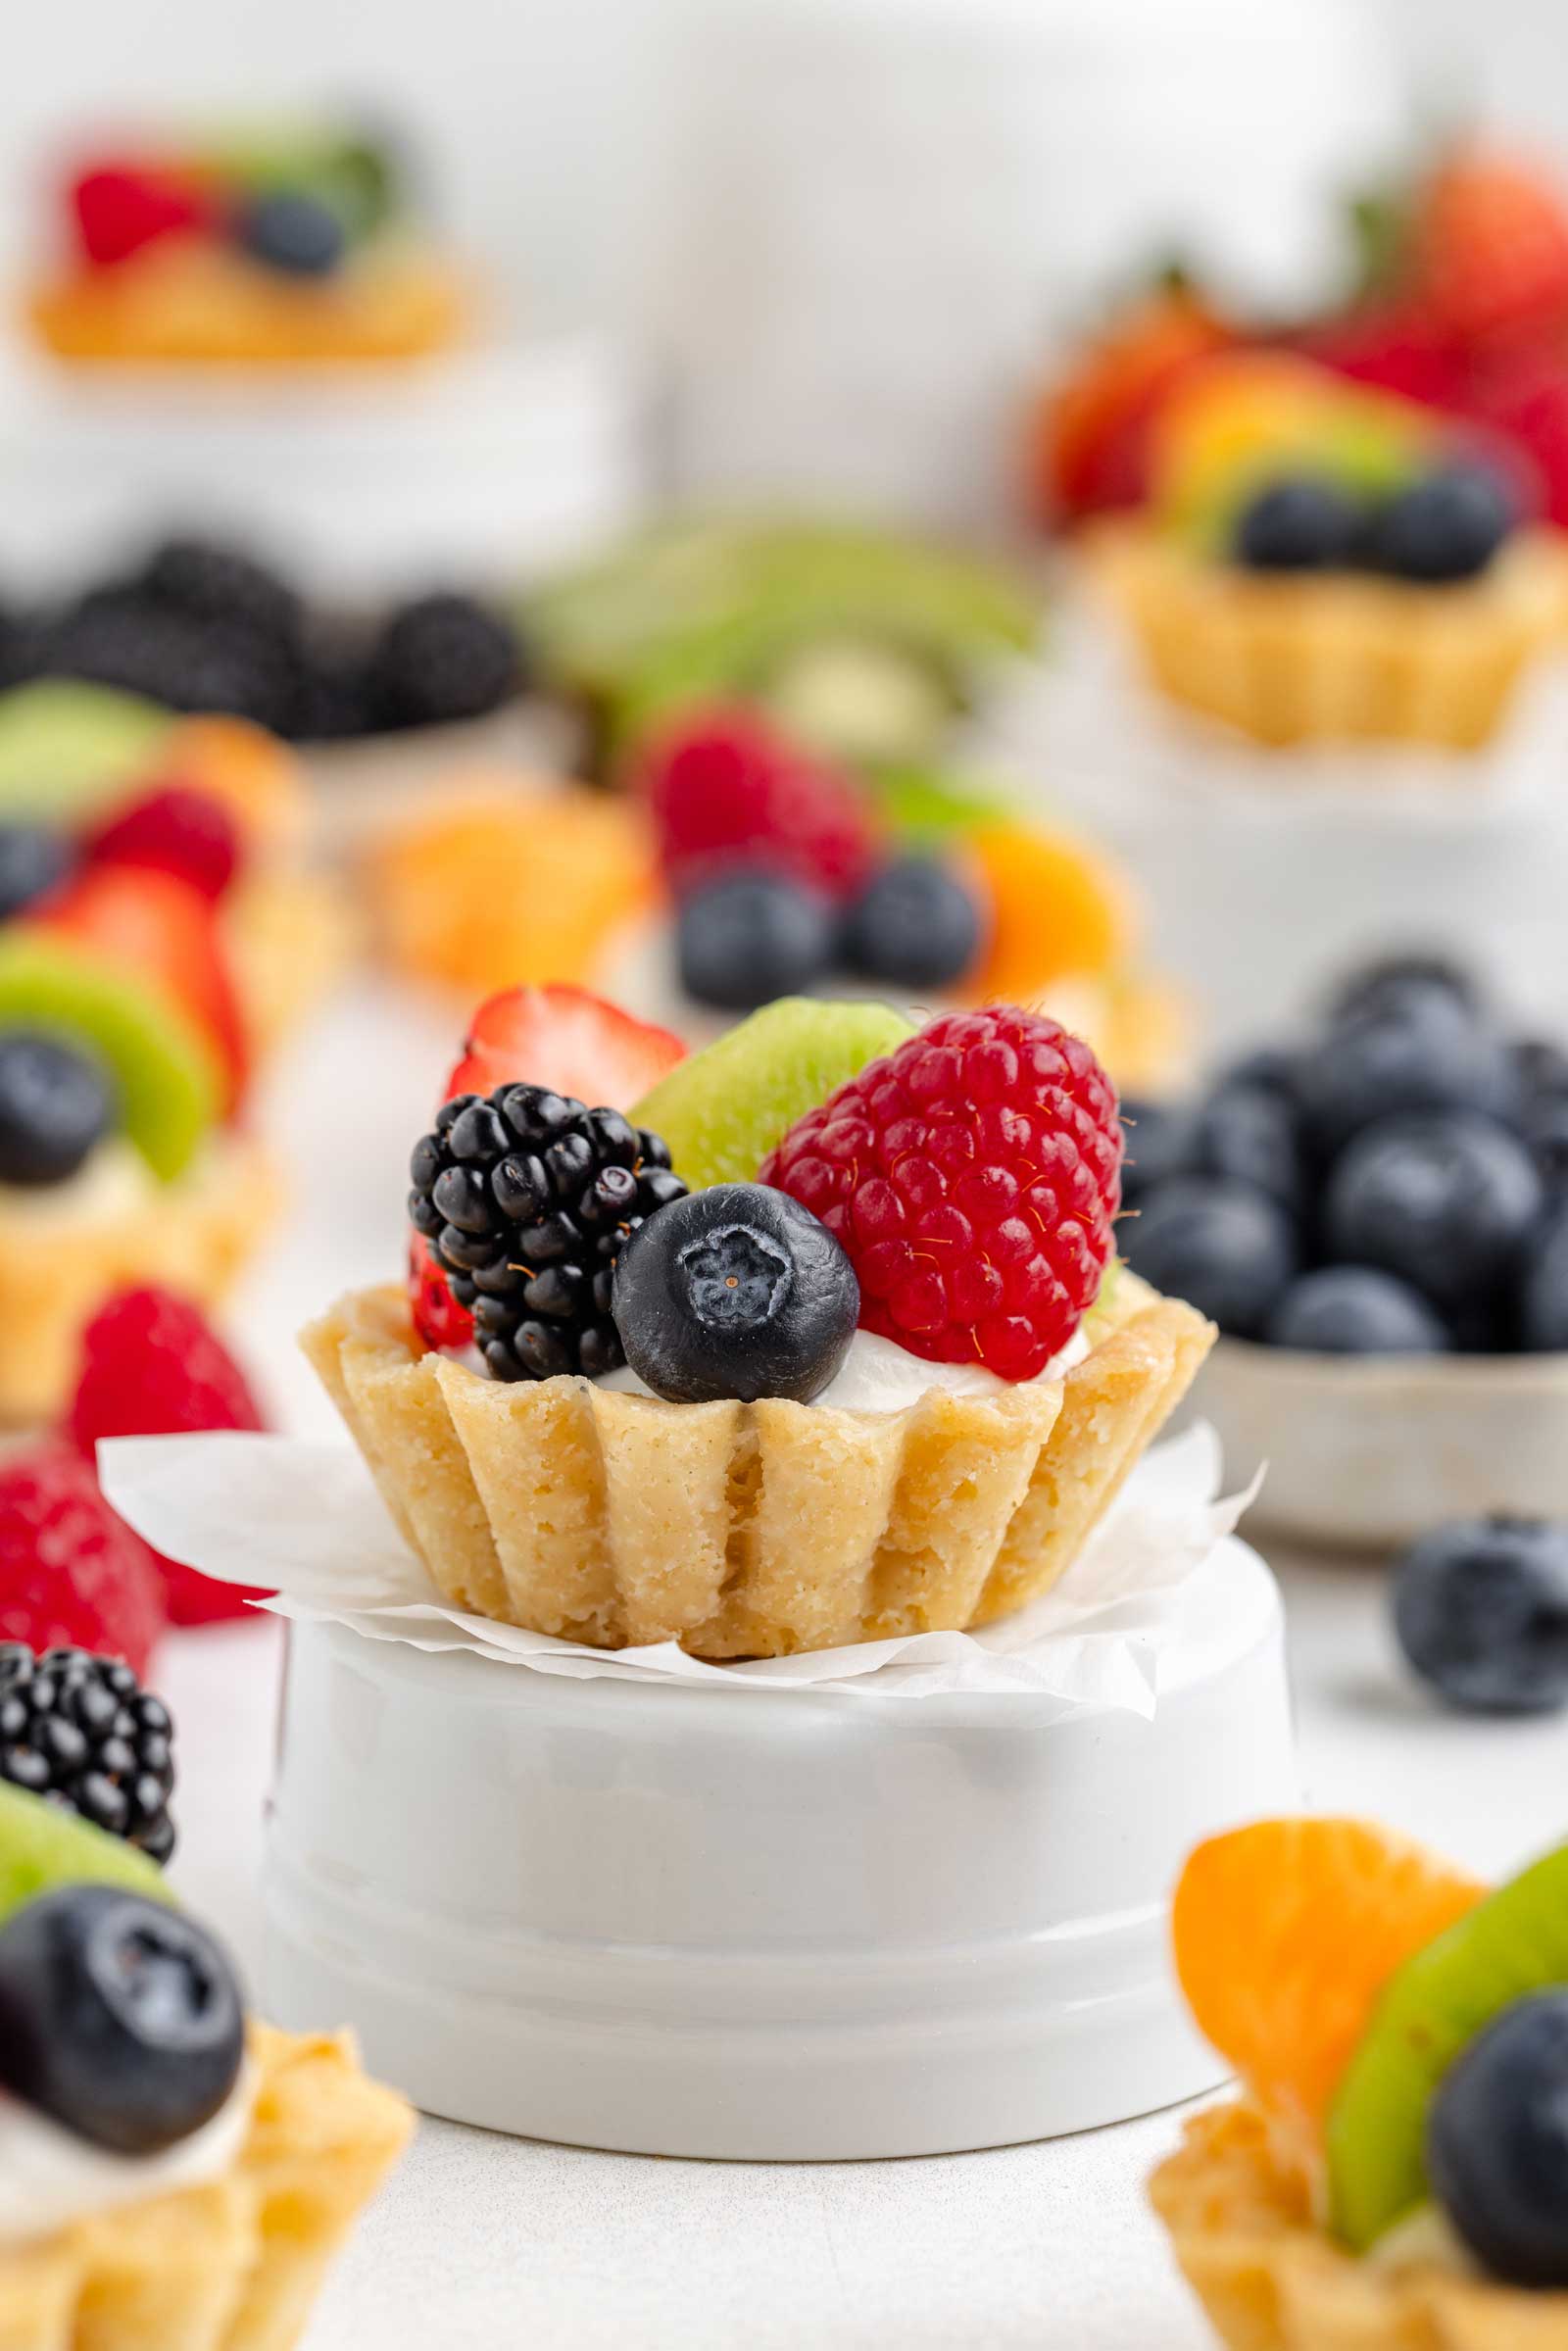
I wanted to make individual fruit tarts, so I bought some smaller fluted tartlet pans with an upper diameter of 2.55″ (6.5 cm) and a bottom diameter of 1.77″ (4.5 cm).
My photographer used these fluted 2.6″ (6.5 cm) tartlet pans, also called egg tart molds. They have a bottom diameter of 1.65″ (4.2 cm).
She used the same tartlet pans in my Chocolate Tartlets, and I have several more recipes coming up with them.
Can I press in the dough instead of rolling it out?
You can! That’s what I did when I used the same dough in my Peach Tartlets and Blueberry Tartlets recipes. It’s a fantastic recipe from King Arthur Flour.
For the larger Wilton pans mentioned above, pressing the dough in was easier.
When the new pans arrived, I initially pressed the dough into the first few pans before realizing that rolling it out was better for the tiny tartlet pans.
If using the fluted style of pans as I did, it’s just really fussy to press the dough into the pans. I was spending way too much time trying to make them just perfect.
So I switched over to rolling out the dough, speeding up the process quite a bit.
Don’t I need to use pie weights?
Nope! I see that some other fruit tartlet recipes have you use pie weights, but it’s not necessary with this tart crust recipe.
However, if you ever use this crust recipe for a 9″ (23 cm) tart, you’ll need pie weights. Without them, the crust tends to slump.
Make ahead, store and freeze
These tartlets are fantastic to prepare in advance!
The dough
You can make the tart dough up to 3 days ahead or freeze it for up to 3 months. Wrap the disc of dough in plastic wrap, then place it in a Ziploc bag. Thaw the dough overnight in the fridge. Avoid using the microwave to thaw it! If you absolutely must, use 30% power.
Unbaked tart shells
You can press the dough into the tart pans, place them in an airtight container, and refrigerate for up to 3 days or freeze for up to 3 months.
Baked tart shells
Once baked, you can store them in an airtight container at room temperature for up to 3 days or refrigerate for up to 5 days. They can also be frozen for up to 3 months.
The fillings
You can prepare the pastry cream or cream cheese filling in advance and store it in the refrigerator for up to 3 days.
You can’t freeze the pastry cream. But you can freeze the cream cheese filling option.
I previously thought it wouldn’t freeze well, but I recently tried it, and it worked out great.
Assembled tartlets
Once assembled, you can refrigerate the fruit tartlets in an airtight container for up to 2 days. But I do recommend filling and topping the tartlets the day of serving. This is to assure that the crusts are at their best!

Troubleshooting
If you encounter any issues while making fruit tartlets, here’s how to resolve them.
- Crust shrinking or cracking – ensure you properly chill the dough before baking and avoid overworking it. If the crust cracks, you can patch it with extra dough or brush it with melted chocolate to seal any gaps.
- Filling is too runny – refrigerate it briefly to firm up. Adding a bit more cornstarch or cream cheese can also help thicken it.
- Filling doesn’t set – this issue often results from incorrect ratios. Double-check your measurements and use a scale for accuracy. If needed, gently reheat the filling and add more thickening agents.

Gluten-free option
So far, I’ve only tested the gluten-free option using King Arthur Flour Gluten-Free Measure for Measure Flour.
It turns out just as delicious as the version made with all-purpose flour. I haven’t tried it yet with Bob’s Red Mill Gluten-Free 1-to-1 Baking Flour, but based on similar recipes I’ve made, it may have a slightly grittier texture compared to King Arthur’s.
If you try a different brand and aren’t happy with the results, I highly recommend giving it another shot with King Arthur.
I hope you’ll love these fruit tartlets! I’d love to hear your thoughts in the comments below. Thanks for stopping by! :)
Fruit Tartlets

- Prep Time:
- Cook Time:
- Ready in:
- Yield: 18
Ingredients
- 1 1/4 cups (150 grams) all-purpose flour or King Arthur Flour Gluten-free Measure for Measure Flour for a gluten-free version
- 1/4 cup (50 grams) granulated sugar
- 1/2 teaspoon salt
- 8 tablespoons (113 grams) unsalted butter, cold, cut into 1/2" cubes
- 1 large egg yolk
- 1 teaspoon vanilla extract
- 1 1/2 to 2 tablespoons milk
- 1 cup (236 ml) whole milk
- pinch of salt
- 3 large (50 grams each, out of shell) egg yolks, room temp
- 6 tablespoons (75 grams) granulated sugar
- 2 tablespoons + 1 teaspoon (23 grams) cornstarch
- 2 teaspoons vanilla extract
- 1/2 teaspoon almond extract
- 2 tablespoons (28 grams) unsalted butter, cubed
- 8 ounces (227 grams) cream cheese, room temp
- 1 1/3 cups (160 grams) powdered sugar
- 1/2 teaspoon vanilla extract
- pinch of salt
- 1/3 cup (80 ml) heavy cream, cold
- fruit of choice
- mint, optional
For the crust:
Pastry cream filling option:
Cream cheese filling option:
Topping:
Directions
- In a medium bowl, whisk together the flour, sugar, and salt.
- Cut in the cold butter until the mixture takes on the texture of coarse breadcrumbs.
- In a separate small bowl, whisk the egg yolks, vanilla, and 1 1/2 tablespoons of milk. Stir this into the dry ingredients.
- Use your hands to work the dough until it comes together. The dough shouldn't be crumbly, as you'll be rolling it out. If needed, add a bit more milk, but be careful not to overdo it, as too much will result in a softer baked crust.
- Shape the dough into a disc and wrap it in plastic wrap.
- Refrigerate for 1 hour. You can also freeze it for up to 3 months. While it’s chilling, you can prepare the filling (below).
- Grease eighteen 2.6” (6.5 cm) fluted non-stick mini tart pans.
- Roll out the dough between two sheets of parchment paper to approximately 1/8 inch (3 mm) thick. I used the bottom of a glass (a cookie cutter would create neater, more uniform edges) to cut out circles about 1/4” (6 mm) wider than the widest part of the tart pans, but I still needed to trim some excess. Do a test to ensure your circles are the right size for your pans. If the dough becomes difficult to handle, pop it in the freezer for a few minutes - this will make peeling off the circle cut-outs much easier. If the circles don’t lift perfectly from the parchment, it’s not an issue since you'll be pressing them into the pans and likely trimming away any extra anyway.
- Place a dough circle over a greased mini tart pan and press it firmly into place. Make sure to press down around the bottom edge to eliminate any air pockets.
- Prick holes across the bottom (almost all the way through, but not completely) with a fork. Repeat with the remaining tartlet pans.
- Freeze for 20-30 minutes.
- Towards the end of the chilling time, preheat your oven to 375 °F (190 °C) and place a baking sheet large enough to hold the tartlet pans in the lower third of your oven.
- Set the tartlets directly onto the hot baking sheet and bake for 14-17 minutes, rotating the pan halfway through if you notice uneven browning, until the sides are a nice golden brown and the bottoms are well-baked.
- Remove the baking sheet and tartlets from the oven and transfer them to a wire rack to cool for 15-20 minutes before taking them out of the pans. To do this, simply flip the pan over and let the crust drop into your hand. It’s best to do this while they’re still slightly warm. They release very easily.
- If preparing in advance, store the cooled crusts in an airtight container at room temperature for up to 3 days. You can make the fillings 3 days ahead of time, but I recommend filling and topping the tartlets the day of serving. This is to assure that the crusts are at their best!
- In a medium saucepan over medium heat, heat the milk and salt until it just reaches a gentle boil.
- Meanwhile, whisk the egg yolks and sugar in a medium heatproof mixing bowl until the mixture is pale and smooth.
- Sprinkle the cornstarch over the egg mixture and whisk thoroughly until fully combined and free of lumps.
- Gradually pour the hot milk into the egg mixture in a slow, steady stream, whisking constantly to prevent curdling.
- Pour this mixture back into the saucepan and cook over medium heat, whisking continuously, until it thickens and begins to boil, about 1 minute. Once boiling, continue cooking for 1 more minute.
- Remove the saucepan from the heat and stir in the vanilla extract, almond extract and butter until it's completely melted and incorporated.
- Transfer the pastry cream to a heatproof bowl and cover it with plastic wrap, ensuring the wrap touches the surface to prevent a skin from forming (or skip this step and just stir frequently until cooled). Let cool completely before using.
- Spoon 1 1/2 tablespoons (22 grams) of pastry cream into each cooled tartlet crust.
- Top with the fruit and mint, if using.
- In a large mixing bowl, beat the cream cheese, powdered sugar, vanilla, and salt using an electric hand mixer at medium speed until completely combined.
- While still mixing, now on low, gradually add the heavy cream.
- Once it’s well incorporated, turn the speed to high and beat until stiff peaks form - about 2-3 minutes.
- Immediately spoon in the filling into cooled crusts. You should have enough for at least 5 teaspoons (20 grams) per tartlet.
- Top with fruit and mint, if using.
- Once assembled, you can refrigerate the fruit tartlets (both versions) in an airtight container for up to 2 days.
Make the crusts:
If making pastry cream:
If making cream cheese filling:
Crust adapted from King Arthur Flour
Join over 12,400 readers and sweeten up
your inbox with new posts for free!
This subscription is free of charge and can be canceled at any time.


There are no responses on “Fruit Tartlets” — Be the first one!
2 comments are awaiting moderation!