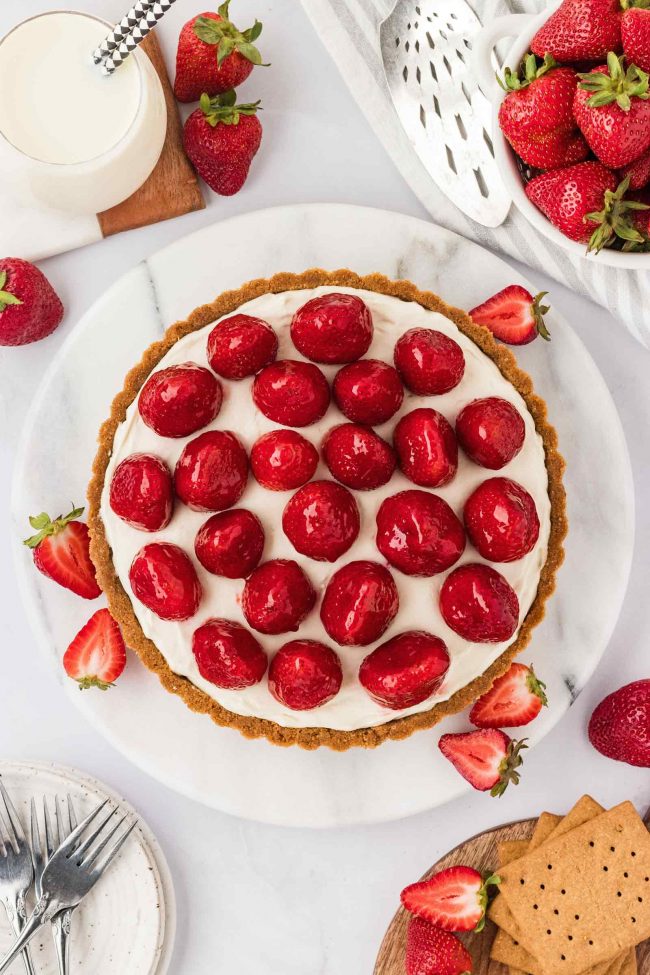
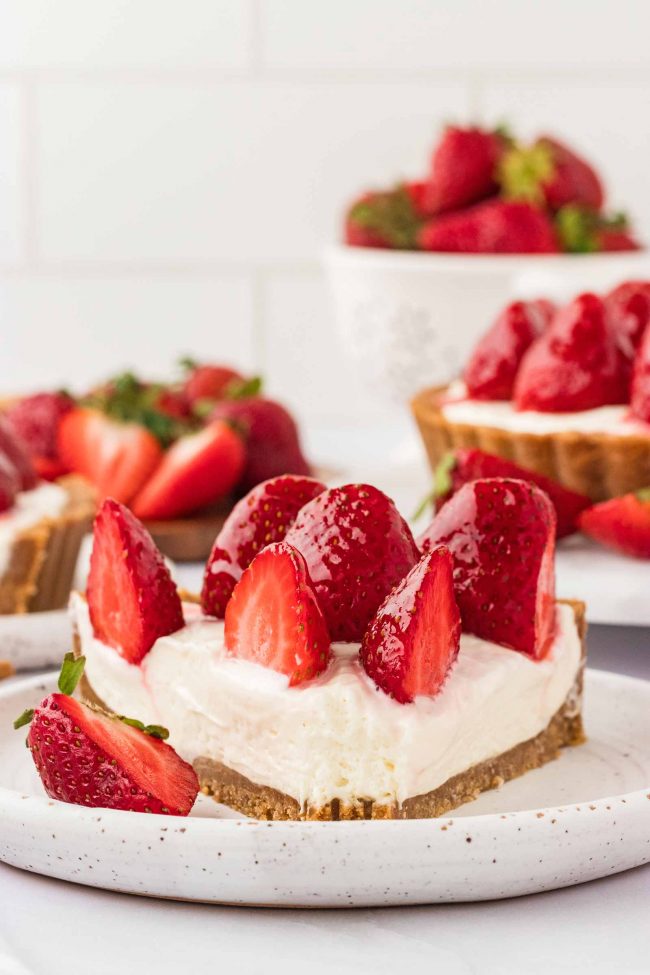
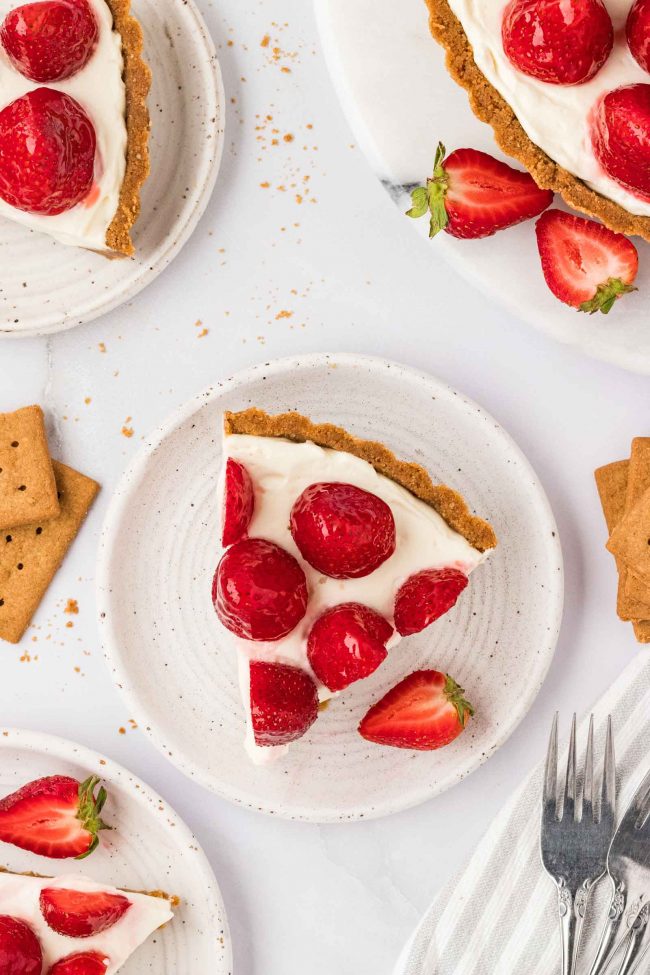
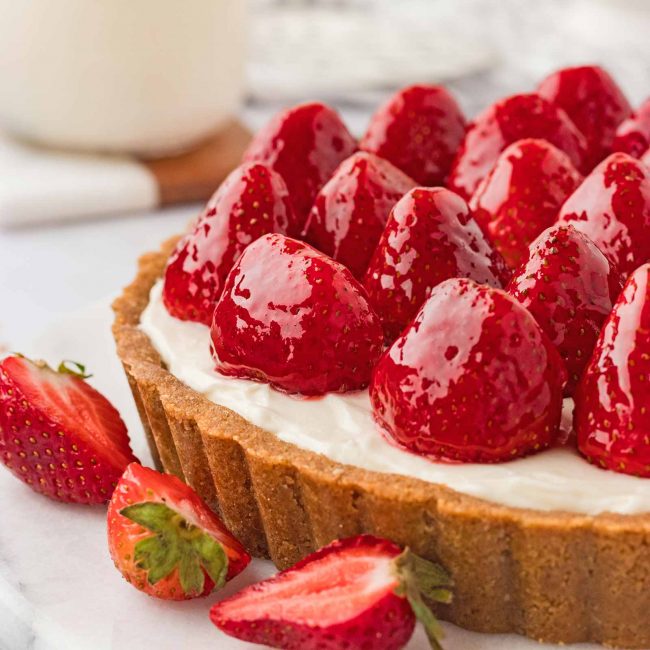
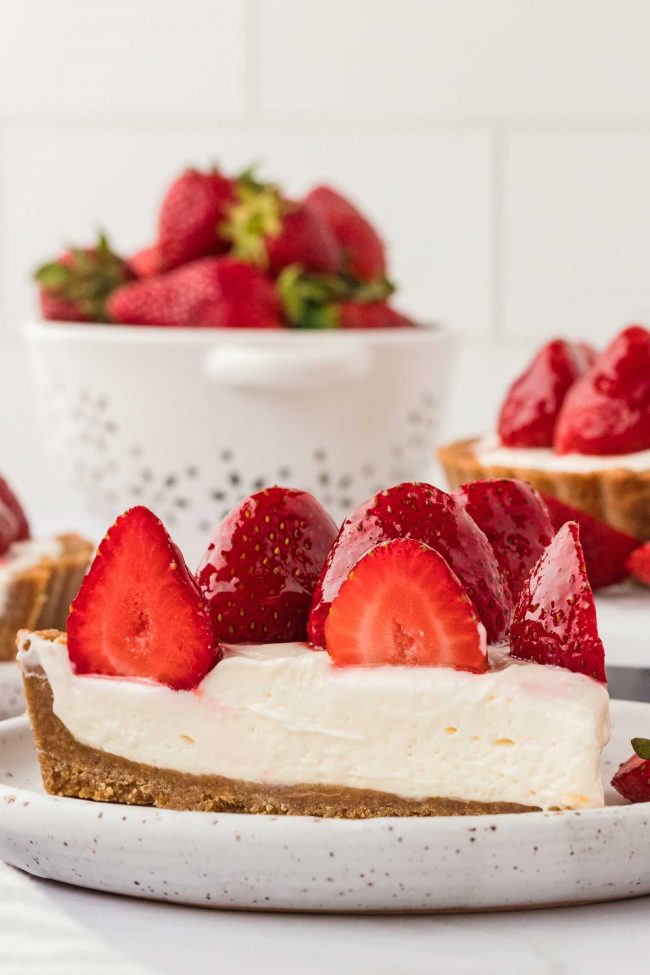
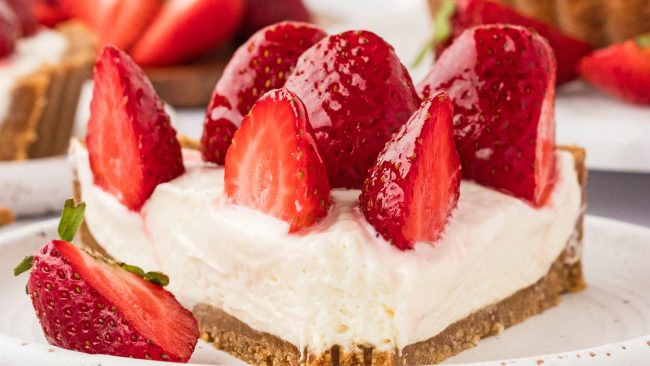
This cheesecake tart is no-bake and has a creamy cheesecake filling and a graham cracker crust that can be made traditionally or gluten-free. It’s prepared in a 9″ tart pan, topped with strawberries, and can be made ahead of time, making it ideal for July 4th and other holidays.
Today’s recipe uses the same crust and cheesecake filling as the No-bake Cherry Cheesecake that I posted last week.
I loved it so much that I had to make another version. The only difference is that I had to increase the crust recipe by 33% so that the crust wasn’t too thin.
So if you read the cherry cheesecake post, there’s really no need to read this one since it’s pretty much all the same info. Except this recipe is quicker.
Instead of making a cherry pie filling and spreading that over the cheesecake filling, you simply put on strawberries and brush them with strawberry jam.
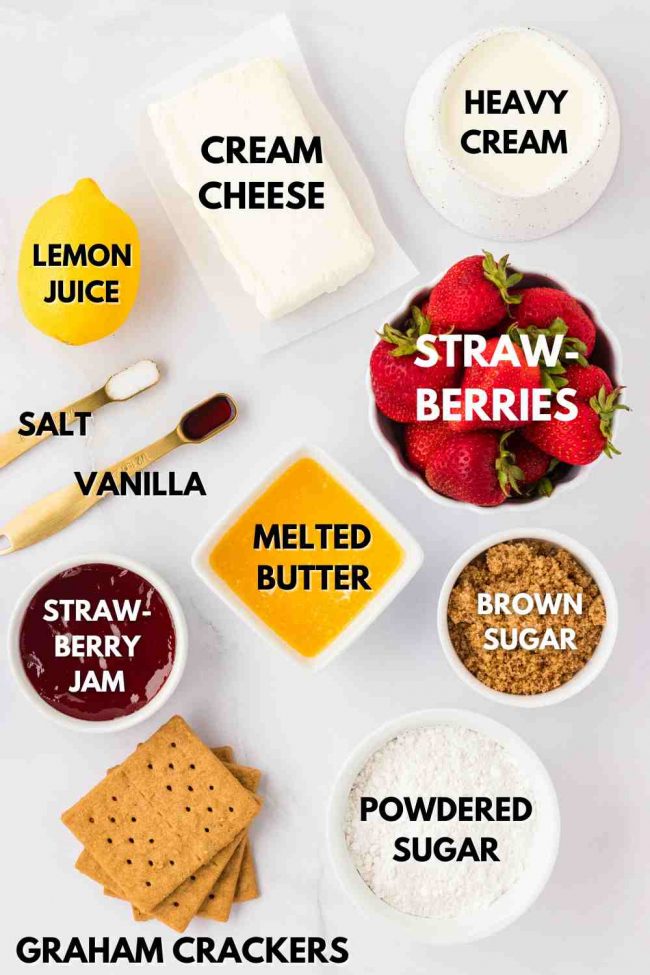
Ingredients
Here you can see what you’ll need for this recipe.
Please make sure to use heavy cream and not whipping cream or half-and-half. Whipping cream will work if you don’t have access to heavy cream (it’s not available in every country), but the filling will be SUPER soft and hard to cut.
How to make the crust
You can buy graham cracker crumbs or make your own by processing graham crackers in a food processor.
I tried using a Blendtec, but it turned the graham crackers into powder. But you want crumbs and not a fine powder.
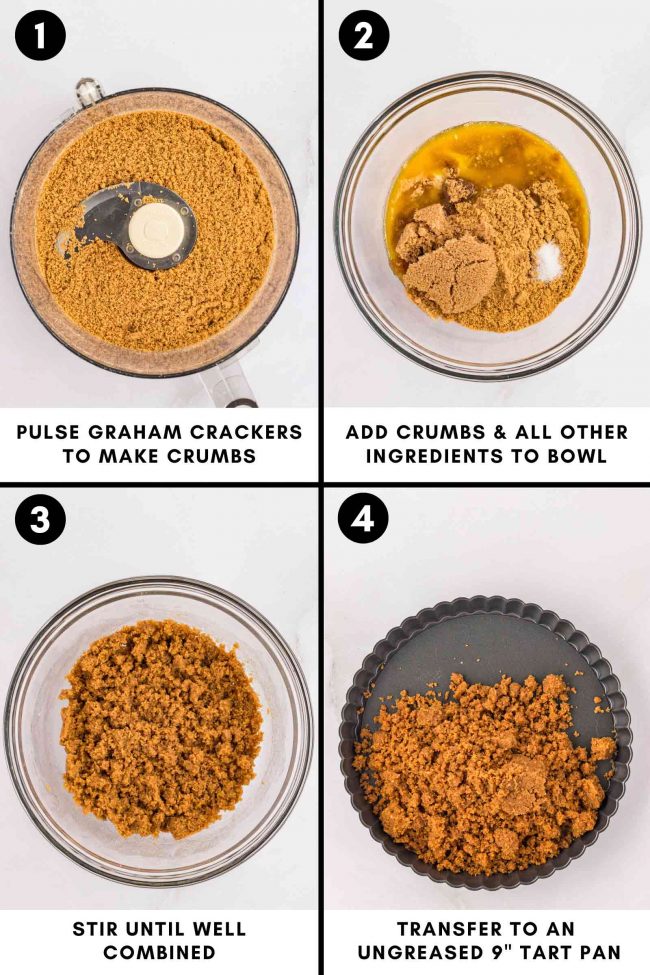
After pressing the crust into the tart pan, I like to freeze it to keep it fresh until use.
Refrigeration is also an option. The crust won’t get soggy!

How to make the cheesecake filling
Some recipes for no-bake cheesecake call for adding the heavy cream directly to the cream cheese and sugar mixture and then beating it together. I used this method for my 4th of July Fruit Pizza and the frosting on my Independence Day Cake, but for this cheesecake, it can be a bit risky.
While it works well for frosting, it seems as though it can be hit or miss for no-bake cheesecake filling. It doesn’t whip up for some people once it’s added it to the cream cheese mixture.
So for this recipe, you beat everything together except the heavy cream. Whip the heavy cream separately and then fold it into the cream cheese mixture.
The result is a light, airy, no-bake filling. And there’s no risk that the heavy cream won’t whip up!
How to make in advance
You can prepare the crust and refrigerate it for up to 3 days or freeze it for up to 2 months.
Once the cheesecake filling is made, it should be spread over the crust immediately. Don’t make the filling ahead of time, and then spread it over the crust later.
After adding the filling to the crust, the tart can be refrigerated for up to 2 days. Beyond that, the crust may start to soften.
I recommend adding the strawberries as soon to serving as you can. You don’t want the juicy strawberries making the cheesecake filling wet. No more than 4 hours in advance would be best.
For instructions on assembling and freezing the entire cheesecake in advance, see the freezing section below.

How to store
Simply cover with plastic wrap and refrigerate for up to 3 days. Keep in mind that no-bake cheesecake fillings need to be kept cool to maintain its firmness. If it gets too soft, it will be difficult to cut.
This dessert isn’t ideal for a BBQ unless you have a cooler with ice packs to keep it chilled.
How to freeze
- Store the wrapped cheesecake tart (without the strawberries!) in the freezer for up to 2 months, though it’s best enjoyed within the first month for optimal taste and texture.
- To thaw, unwrap the cheesecake and place it in the refrigerator. Thawing can take 8 hours to overnight.
- For convenience, you can slice the tart before freezing. This way, you can thaw individual slices as needed.

Can I bake the crust?
No-bake graham cracker crusts contain more fat than baked ones. The butter hardens in the fridge, which helps prevent the filling’s moisture from seeping into the crust.
If you plan to serve the cheesecake the same day you make it, baking the crust isn’t an issue. However, I wouldn’t recommend filling a baked crust and letting it sit overnight or longer in the fridge.
Some recipes suggest this is fine, but I haven’t tested it myself, so I can’t confirm.
Can I use a different type of crust?
Store-bought graham cracker crusts are already baked, so refer to the earlier section about using a baked crust.
A no-bake Oreo crust would work great and fits perfectly with the strawberries!
I wouldn’t recommend using a flaky pie crust, as it doesn’t pair well with this filling.
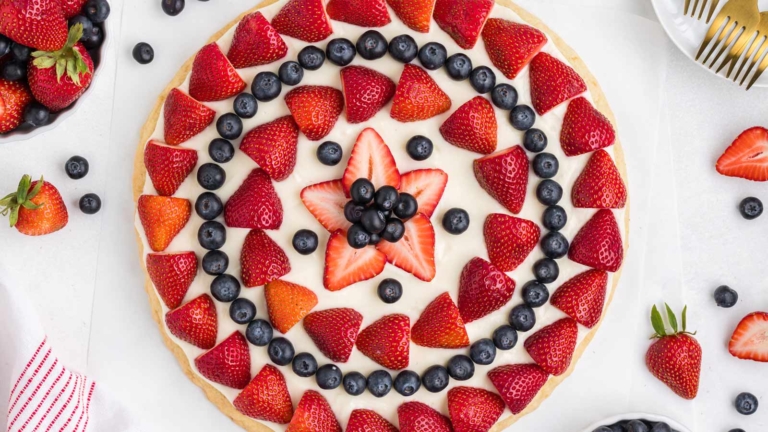
How to turn this into a July 4th tart
I wanted to have this be a strawberry tart as I’m sorely lacking in strawberry recipes, but if you added blueberries to the top, then you’d have a red, white and blue cheesecake tart that’s great for Memorial Day or July 4th.
Or use the design I used on my July 4th Fruit Pizza!
Gluten-free option
My photographer used Pamela’s Gluten-free Honey Grahams, and I’ve tested this recipe with them too. We enjoyed the crust mixture so much that I had to make it a second time because we couldn’t stop eating it.
The downside is that they’re quite pricey, and you need almost a whole box. Currently, they’re $4.99 per box on Amazon, which is 67 cents per ounce.
I’ve also made the crust with Honey Cinnamon Seed & Nut Flour Sweet Thins from Simple Mills, and it was just as delicious. Unfortunately, they’re even more expensive at $1.07 per ounce on Amazon.
If you use those, this cheesecake tart is grain-free.
Making homemade graham crackers from scratch just to crush them up for this crust isn’t the best option either, but you can certainly do that if you prefer.
Another option is to use the oatmeal cookie crust from this Gluten-free Cheesecake Crust recipe without baking it. However, I’m not sure if the crust will easily come out of the pan or if it’ll stick.
I remember often needing to make an additional third or half batch of the crust because it was so delicious that no one could resist it. 🙈
If anyone has tips on where to buy Pamela’s or Simple Mills products at a more affordable price, I’d love to hear them. :)

That’s it. I hope you’ll enjoy this cheesecake tart if you try it out! Thanks for reading.
Cheesecake Tart

- Prep Time:
- Cook Time:
- Ready in:
- Yield: 8 slices
Ingredients
- 2 cups (240 grams) graham cracker crumbs (from about 16 full sheets) or Pamela’s Gluten-free Honey Grahams for gluten-free
- 1/3 cup (66 grams) brown sugar
- 1/4 teaspoon salt
- 1/2 cup (113 grams) unsalted butter, melted
- 8 ounces (225 grams) cream cheese, room temp
- 3/4 cup (90 grams) powdered sugar
- 1 teaspoon freshly squeezed lemon juice
- 1/2 teaspoon vanilla extract
- 3/4 cup (177 ml) cold heavy whipping cream
- 1 1/2 pounds (680 grams) small strawberries
- 2-3 tablespoons strawberry jam, warmed
For the crust:
For the filling:
For the topping:
Directions
- In a medium mixing bowl, stir together the graham cracker crumbs, brown sugar and salt until well combined.
- Stir in the butter until well combined.
- Press onto the bottom and up the sides of an ungreased 9” tart pan. Pat it as evenly as you can get it. Freeze the crust while you prepare the topping. Once frozen, you can place the tart crust in a large Ziploc bag for up to 2 months.
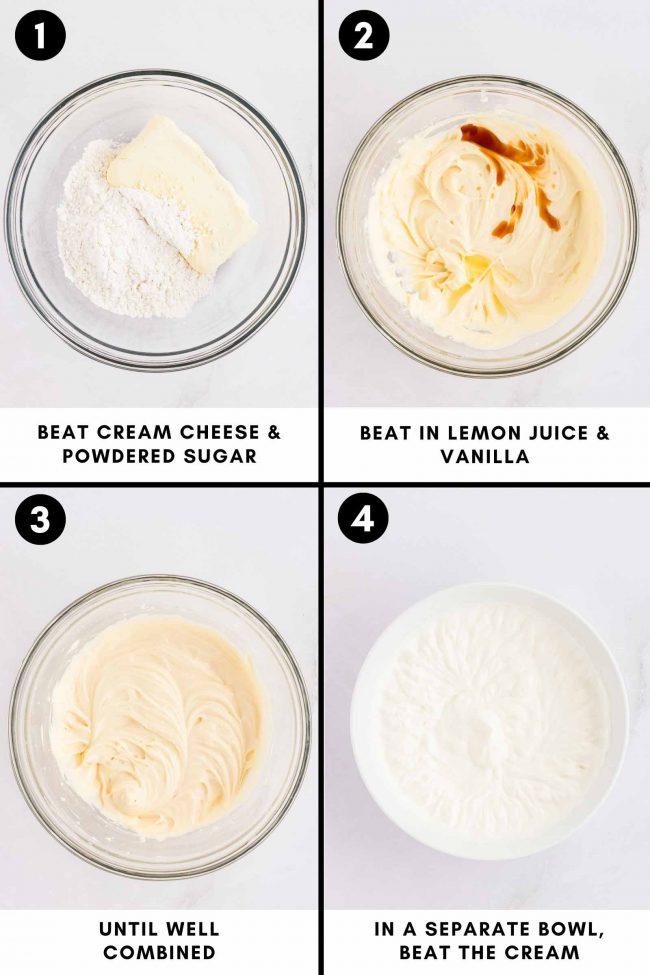
- Using a hand mixer or a stand mixer with a paddle attachment, beat the cream cheese and powdered sugar until smooth and creamy.
- Beat in the lemon juice and vanilla until combined.
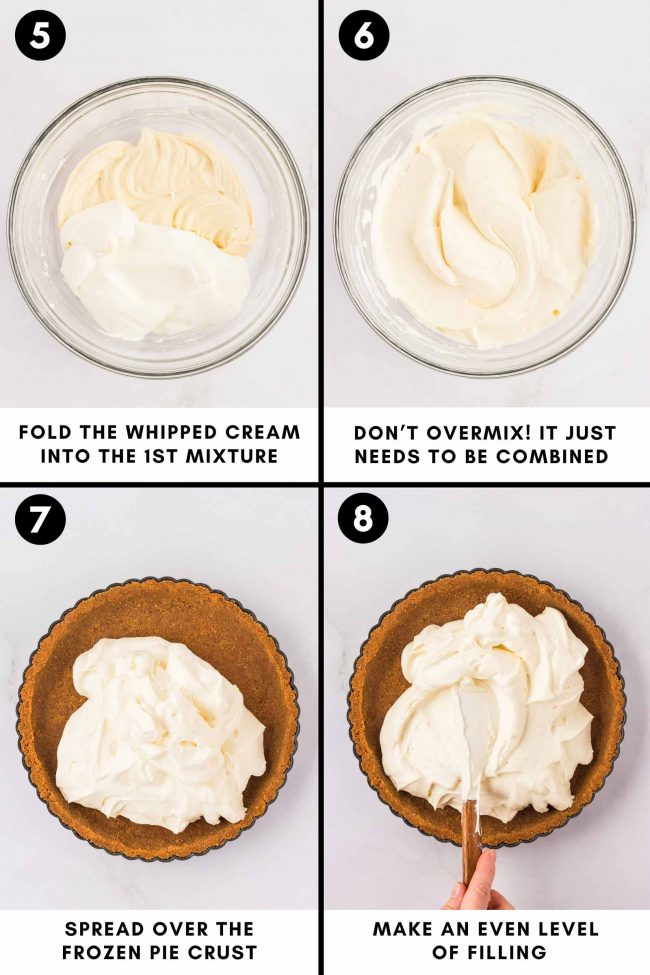
- In a separate medium or large mixing bowl, use a hand mixer or a stand mixer with the whisk attachment to beat the heavy cream. Start on low so it doesn't fly everywhere, and gradually increase the speed to high. Continue beating until you have stiff peaks. But don't overmix, or it'll break down into butter or can turn the filling soggy later on.
- Gradually fold the whipped cream into the cream cheese mixture.
- Transfer the cheesecake filling to the frozen crust. Evenly spread it out.
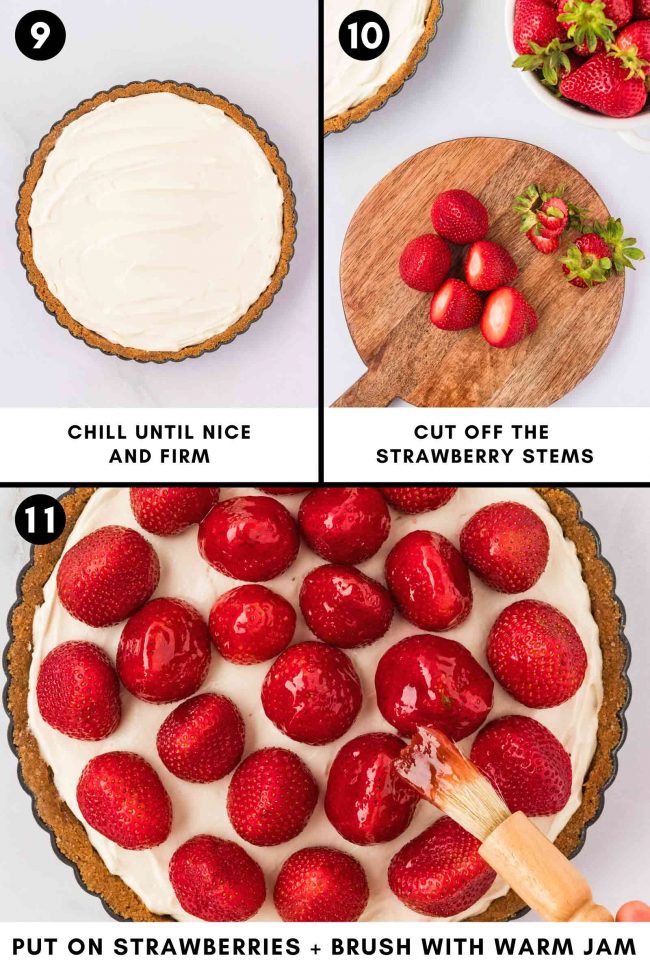
- Chill for at least 4+ hours before topping it with fresh strawberries.
- As close to serving as possible, rinse, hull, and pat the strawberries dry with a paper towel.
- Place the strawberries on top of the chilled and firm filling and then use a pastry brush to brush the warmed strawberry jam over the strawberries.
- Cover with plastic wrap and refrigerate for up to 2 days. Keep in mind that no-bake cheesecake fillings need to be kept cool to maintain its firmness. If it gets too soft, it will be difficult to cut.
Prepare the crust:
Prepare the filling:
Decorate:
How to store:
Join over 12,400 readers and sweeten up
your inbox with new posts for free!
This subscription is free of charge and can be canceled at any time.


1 comment on “Cheesecake Tart” — Add one!
1 comment is awaiting moderation!
This recipe turned out great. It was enjoyed by everyone and no leftovers 🥰